
1. المقدمة
The UMLIFE XH-W3001 is a digital LED temperature controller module designed for precise temperature management. It features a waterproof sensor probe and supports both heating and cooling modes, making it suitable for various applications such as incubation, equipment cases, and air conditioning systems. This manual provides detailed instructions for the safe and effective use of your XH-W3001 thermostat.
2. معلومات السلامة
- تأكد من حجم امدادات الطاقةtage matches the device's rated voltagه (220 فولت).
- All wiring should be performed by a qualified individual to prevent electrical shock or damage.
- Do not expose the device to excessive moisture or extreme temperatures outside its operating range.
- احفظ الجهاز بعيدًا عن المواد القابلة للاشتعال.
- افصل التيار الكهربائي قبل القيام بأي أعمال توصيل أو صيانة.
3. انتهى المنتجview
The XH-W3001 features a clear digital LED display for current temperature readings and control settings. It includes two buttons for easy parameter adjustment and an indicator light to show output status.

الشكل 3.1: الجبهة view of the XH-W3001 Thermostat.
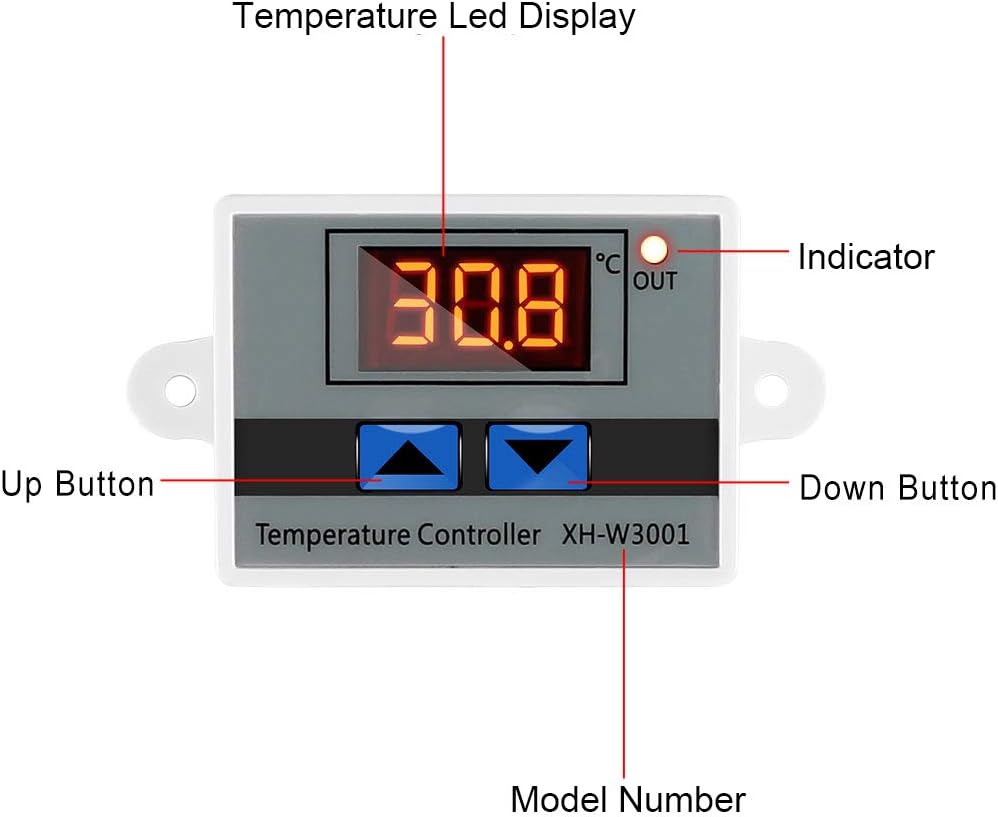
Figure 3.2: Labeled components of the XH-W3001 Thermostat.
المميزات الرئيسية:
- ضوء مؤشر LED: Displays the current output status.
- أنبوب العرض الرقمي: Shows measuring temperature with high accuracy (0.1℃ precision).
- وضعين للعمل: Heating (start temperature < stop temperature) and Cooling (start temperature > stop temperature).
- نطاق واسع لدرجة الحرارة: -50℃ to 110℃.
- بناء متين: ABS flame retardant housing.
- مسبار مقاوم للماء: 1-meter NTC10K stainless steel probe.
4. المواصفات
| ميزة | مواصفة |
|---|---|
| نموذج | XH-W3001 |
| المجلدtage | 220V (also suitable for 110V) |
| مدى درجة الحرارة | -50 درجة مئوية إلى 110 درجة مئوية |
| Temperature Control Precision | 0.1 درجة مئوية |
| نوع العرض | قاد |
| نوع المسبار | NTC10K (1 meter, waterproof) |
| مادة | ABS (Acrylonitrile Butadiene Styrene), Stainless Steel |
| المكونات المضمنة | 1pcs Temperature Controller |
5. الإعداد والأسلاك
Proper wiring is crucial for the safe and correct operation of the XH-W3001. Refer to the diagram below and follow the instructions carefully.

Figure 5.1: XH-W3001 220V Wiring Connection Diagram.
تعليمات الأسلاك:
- Power Input (220V): Connect the two wires from your 220V AC power supply to the terminals labeled 'N' (Neutral) and 'L' (Live) on the controller. These are typically the two leftmost terminals.
- Load Output (220V): Connect the device you wish to control (e.g., a heater or fan) to the output terminals. One wire from the load connects to the 'N' terminal (Neutral) of the output, and the other wire connects to the 'L' terminal (Live) of the output. Ensure the load's voltage matches the controller's output.
- مسبار الاستشعار: Plug the waterproof NTC10K temperature sensor probe into the dedicated two-pin connector on the controller. The probe can be placed in the environment where temperature needs to be measured.
- التأريض: If applicable, ensure proper grounding for your power supply and load according to local electrical codes.
Warning: Always ensure power is disconnected before making any wiring connections to prevent electrical shock.
6. تعليمات التشغيل
الطاقة الأولية:
After correct wiring, apply power to the controller. The LED display will show the current measured temperature. The red indicator light will illuminate when the output is active.
ضبط معلمات درجة الحرارة:
The XH-W3001 has two main parameters: Start Temperature (P0) and Stop Temperature (P1).
- Set Start Temperature (P0):
اضغط مع الاستمرار على UP button for approximately 3 seconds. The display will flash. Use the UP or تحت buttons to adjust the desired start temperature. Press the UP button again to confirm and exit, or wait 5 seconds for automatic exit. - Set Stop Temperature (P1):
اضغط مع الاستمرار على تحت button for approximately 3 seconds. The display will flash. Use the UP or تحت buttons to adjust the desired stop temperature. Press the تحت button again to confirm and exit, or wait 5 seconds for automatic exit.
Working Modes (Heating/Cooling):
- وضع التدفئة: إذا كان Start Temperature (P0) تم تعيينه أدنى من ذلك Stop Temperature (P1), the controller operates in heating mode. The output will activate when the current temperature drops below P0 and deactivate when it reaches P1.
- وضع التبريد: إذا كان Start Temperature (P0) تم تعيينه أعلى من ذلك Stop Temperature (P1), the controller operates in cooling mode. The output will activate when the current temperature rises above P0 and deactivate when it reaches P1.
الإعدادات المتقدمة:
To access advanced settings, press and hold both UP و تحت buttons simultaneously for approximately 3 seconds. The display will show 'P0'. Use the UP or تحت buttons to cycle through the parameters (P0-P6). Press the UP button to enter the selected parameter's adjustment mode, then use UP or تحت to change its value. Press UP again to save and exit the parameter, or wait 5 seconds for automatic exit.
- P0: Heating/Cooling Mode (Set Start Temp) - (As described above, this is the primary start temperature setting)
- P1: Stop Temperature (Set Stop Temp) - (As described above, this is the primary stop temperature setting)
- P2: Temperature Correction: Adjusts the measured temperature by a certain offset (e.g., to calibrate the sensor). Range: -10.0℃ to 10.0℃.
- P3: Delay Start: Sets a delay time (in minutes) before the output activates after the temperature condition is met. Range: 0 to 10 minutes.
- P4: High Temperature Alarm: Sets a temperature threshold. If the current temperature exceeds this value, an alarm may be triggered (visual or audible, depending on implementation).
- P5: Low Temperature Alarm: Sets a temperature threshold. If the current temperature falls below this value, an alarm may be triggered.
- P6: Data Lock: Locks the settings to prevent accidental changes.
إعادة التعيين إلى إعدادات المصنع:
To restore all settings to their factory defaults, power off the controller. Then, press and hold both the UP و تحت buttons simultaneously while powering the device back on. The display will show '888' indicating a successful reset.
7. الصيانة
- تنظيف: Gently wipe the device's exterior with a dry, soft cloth. Do not use abrasive cleaners or solvents.
- العناية بالمسبار: Ensure the sensor probe is clean and free from debris for accurate readings. The stainless steel probe is waterproof, but avoid unnecessary physical damage.
- الاتصالات: قم بفحص جميع توصيلات الأسلاك بشكل دوري للتأكد من أنها آمنة وخالية من التآكل.
8. استكشاف الأخطاء وإصلاحها
- العرض فارغ:
Check power connections. Ensure the voltage supply is correct (220V). - قراءة درجة الحرارة غير دقيقة:
Verify the sensor probe is correctly connected and placed in the desired measurement area. Use the P2 (Temperature Correction) setting to calibrate if necessary. - Controller not switching output:
Check if the Start (P0) and Stop (P1) temperatures are set correctly for the desired heating or cooling mode. Ensure the load is properly wired and functional. Check if P3 (Delay Start) is active. - Settings cannot be changed:
Check if P6 (Data Lock) is enabled. Disable it to adjust settings.
9. الضمان والدعم
This product is covered by a standard manufacturer's warranty against defects in materials and workmanship. For specific warranty terms and conditions, please refer to the product packaging or contact the retailer where the product was purchased.
For technical support, troubleshooting assistance, or inquiries regarding product operation, please contact UMLIFE customer service through the retailer's platform or the official UMLIFE webموقع.


