
1. المقدمة
The Fydun MPPT Solar Charge Controller is designed to efficiently manage power flow from your solar panels to your battery bank and connected loads. It features Maximum Power Point Tracking (MPPT) technology to optimize solar energy harvesting, automatic 12V/24V system voltage identification, and comprehensive safety protections. This controller is suitable for various applications, including home, industrial, commercial, car, and motorcycle battery systems.

Image 1.1: Fydun MPPT Solar Charge Controller shown in diverse application environments, including residential, portable, and large-scale solar installations.
2. معلومات السلامة
Please read all instructions carefully before installation and operation. Failure to follow these instructions may result in damage to the unit, battery, or other components, and may cause personal injury.
- Ensure all connections are tight and correct to prevent excessive voltage drop and potential overheating.
- قم دائمًا بتوصيل البطارية بوحدة التحكم أولاً، ثم باللوحة الشمسية، وأخيرًا بالحمل. افصلها بالترتيب العكسي.
- Do not attempt to repair or modify the controller. Refer to qualified personnel for service.
- قم بتثبيت وحدة التحكم في منطقة جيدة التهوية، بعيدًا عن المواد القابلة للاشتعال وأشعة الشمس المباشرة.
- The controller is rated IP32, meaning it is protected from tools and wires greater than 2.5 millimeters and from spraying water. It is not waterproof and should not be exposed to heavy rain or submerged.
3. انتهى المنتجview
The Fydun MPPT Solar Charge Controller features a clear LCD display for monitoring system status, dual USB outputs for charging devices, and robust terminals for secure connections.

الصورة 3.1: بزاوية view of the Fydun Solar Charge Controller, highlighting its compact design and terminal block.
3.1. المكونات
- شاشة LCD: يعرض معلمات النظام في الوقت الفعلي مثل مستوى الصوتtage, current, battery status, and load status.
- أزرار التحكم: للتنقل بين القوائم وضبط الإعدادات.
- مخرجات USB مزدوجة: Provides 2.4A max output for charging external devices.
- أطراف توصيل الألواح الشمسية: Connects to your solar array.
- أطراف البطارية: يتصل بمجموعة البطارية الخاصة بك.
- محطات التحميل: يتصل بأحمال التيار المستمر لديك.
- مستشعر درجة الحرارة: For accurate temperature compensation of charging parameters.

الصورة 3.2: الجبهة view of the Fydun Solar Charge Controller, showing the LCD screen, control buttons, and USB ports.

Image 3.3: Diagram illustrating the physical dimensions of the Fydun Solar Charge Controller (17.5cm x 14cm x 4cm).
4. المواصفات
| ميزة | مواصفة |
|---|---|
| حاضِر | 30 أمبير |
| تصنيف المجلدtage | 12V / 24V (Auto-identification) |
| مخرج يو اس بي | 2.4 أ * 2 |
| الإفراط في التفريغ Voltage | 10.5V - 11V (for 12V system, adjustable) |
| تعويض درجة الحرارة | -3mv/℃/cell |
| خسارة عدم التحميل | <45 مللي أمبير |
| حلقة المجلدtagه قطرة | <200mv |
| نوع العرض | شاشة الكريستال السائل |
| نوع التهمة | ام بي بي تي |
| درجة الحماية | IP32 |
| مادة | بلاستيك |
| أبعاد | 17.5 × 14 × 4 سم |
| وزن | 454 جرام |
5. الإعداد
Follow these steps for proper installation of your solar charge controller. Incorrect wiring can damage the controller and other components.
5.1. طريقة الاتصال
- قم بتوصيل البطارية: Connect the battery to the controller's battery terminals (marked with a battery symbol). Ensure correct polarity (+ to + and - to -). The controller will automatically detect the battery voltagهـ (12 فولت أو 24 فولت).
- ربط اللوحة الشمسية: Connect the solar panel to the controller's solar panel terminals (marked with a solar panel symbol). Ensure correct polarity.
- توصيل الحمل: Connect your DC loads to the controller's load terminals (marked with a light bulb symbol). Ensure correct polarity.
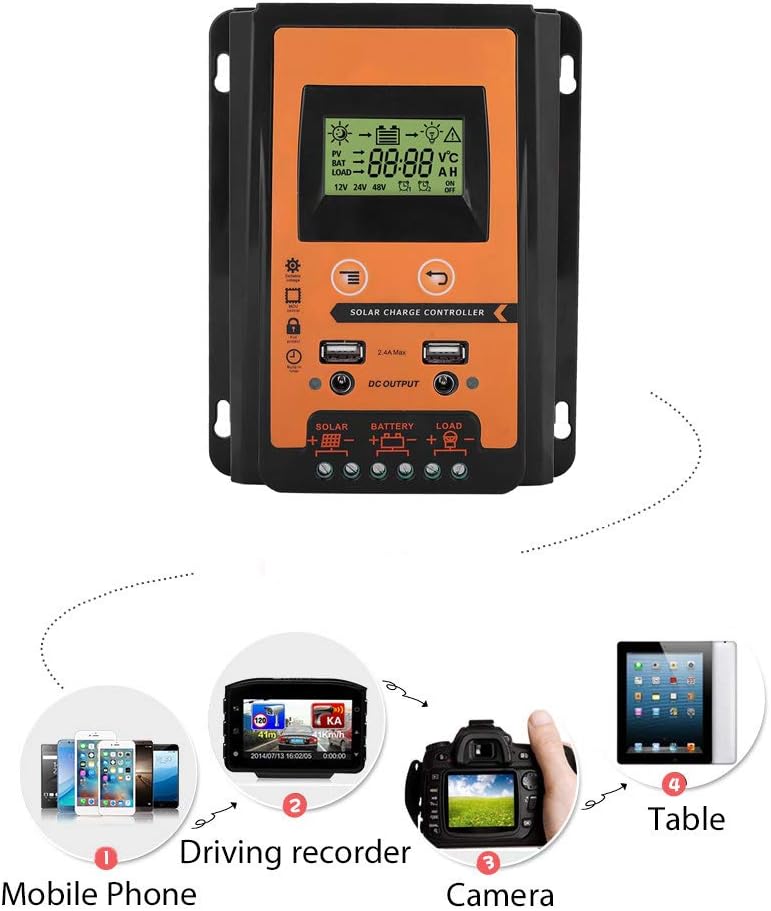
Image 5.1: Diagram illustrating the correct connection order for the solar panel, battery, and load to the Fydun Solar Charge Controller.
Important: Always connect the battery first and disconnect the load first, then the solar panel, and finally the battery when disassembling the system.
6. تعليمات التشغيل
The controller features an LCD display and control buttons for monitoring and adjusting settings.
6.1. شاشة LCD
توفر شاشة LCD معلومات في الوقت الفعلي حول نظامك الشمسي، بما في ذلك:
- لوحة للطاقة الشمسية المجلدtagه وحالة الشحن.
- حجم البطاريةtagومستوى الشحن.
- Load status (on/off) and current.
- حجم النظامtagهـ (12 فولت أو 24 فولت).
6.2. ضبط مستوى الصوتtagالإعدادات الإلكترونية
The controller allows for manual adjustment of certain voltage parameters, such as the over-discharge recovery voltage. If you encounter issues or need to fine-tune your system, you can adjust the voltage:
- Press and hold the MCU control button (usually the 'Menu' or 'Set' button) for approximately 3-4 seconds. This will bring up a management interface on the display.
- Use the 'Add' button (or 'Up' arrow) to navigate through the settings and increase the voltage value until it reaches your desired setting, for example, 13.7V for battery recovery.
- Press the MCU control button again to save the new setting. The display will stop flashing, indicating the data has been saved.
6.3. USB Output Usage
The dual USB ports can be used to charge various 5V devices, such as mobile phones, driving recorders, and cameras.

Image 6.1: Illustration of various portable electronic devices, such as mobile phones, driving recorders, and cameras, being charged via the controller's USB output.
7. الصيانة
تضمن الصيانة الدورية الأداء الأمثل وطول عمر جهاز التحكم في شحن الطاقة الشمسية.
- تنظيف: Periodically clean the controller's exterior with a dry cloth to remove dust and dirt. Ensure the display remains clear.
- فحص الاتصال: Annually inspect all wiring connections to ensure they are secure and free from corrosion. Loose connections can cause overheating and damage.
- تهوية: تأكد من أن منطقة التركيب جيدة التهوية لمنع ارتفاع درجة حرارة وحدة التحكم.
8. استكشاف الأخطاء وإصلاحها
يتناول هذا القسم المشكلات الشائعة وحلولها.
8.1. No Output from Load Terminals
- علامة مرض: The load connected to the controller is not receiving power.
- السبب المحتمل: حجم البطاريةtage is too low. The controller automatically stops output when battery voltage drops below a certain threshold (e.g., 10.5V-11V for a 12V system) to protect the battery from over-discharge.
- حل: Allow the solar panel to charge the battery. The controller will resume load output once the battery voltage recovers to 12.6V (for a 12V system).
8.2. المجلد غير صحيحtage Readings or Charging Behavior
- علامة مرض: The display shows unexpected voltage values, or charging seems inefficient.
- السبب المحتمل: المجلدtage settings may be misconfigured or require adjustment. The normal operating voltage range for the controller is typically 10.7V to 13.7V (for a 12V system).
- حل: Refer to Section 6.2 "Adjusting Voltage Settings" to manually adjust the voltage parameters, such as setting the recovery voltage to 13.7V if needed.
9. الدعم
Fydun is committed to providing reliable products and customer satisfaction. If you have any questions regarding the installation, operation, or troubleshooting of your MPPT Solar Charge Controller, please contact our customer support. We are available to assist you with any inquiries.