
1. المقدمة
This manual provides detailed instructions for the installation, operation, maintenance, and troubleshooting of the SEAFRONT SKI780 VFD Inverter Frequency Converter. This device is designed for precise motor speed control in various industrial and commercial applications. Please read this manual thoroughly before installation and operation to ensure safe and efficient use of the product.

الشكل 1: عام view of the SEAFRONT SKI780 VFD Inverter Frequency Converter.
2. معلومات السلامة
يجب عليك دائمًا مراعاة احتياطات السلامة التالية لمنع الإصابة الشخصية أو إتلاف المعدات:
- تأكد من أن عمليات التركيب والتوصيل تتم بواسطة فنيين مؤهلين فقط.
- Disconnect all power sources before performing any wiring, maintenance, or inspection.
- تأكد من أن مستوى الصوت المدخلtage يطابق مواصفات العاكس.
- Do not touch electrical components immediately after power-off, as residual voltage may be present. Wait at least 5 minutes.
- Install the inverter in a clean, dry, and well-ventilated environment, away from direct sunlight, corrosive gases, and flammable materials.
- تأكد من التأريض الصحيح للمعدات.
3. انتهى المنتجview
The SEAFRONT SKI780 VFD Inverter is a versatile device offering advanced control features for various motor applications.
المميزات الرئيسية:
- Integrated synchronous control and proportional timing control.
- Six speed control modes for automatic operation.
- Ability to lock all or part of the keys (analog potentiometer unlocked).
- Normally open relay and two high configuration outputs with 100 optional channels.
- Integrated user-defined counter/meter.
- 0-100% adjustable torque output at zero speed, with zero-speed brake function.
- V/F control and output torsion control.
- Integrated communication interface.
- Equipped with a speed potentiometer and an external panel.
- Five opto-isolated digital inputs, 100 optional channels.
- One analog input, two analog output channels.
- Textile pendulum frequency function, suitable for textile equipment.

الشكل 2: الجبهة view of the inverter showing the control panel and terminals.
4. المواصفات
| مواصفة | قيمة |
|---|---|
| رقم الموديل | SKI780-0D75G-1 |
| ماركة | SEAFRONT |
| حجم الإدخالtage | 220 فولت (تيار متردد) |
| حجم الإخراجtage | 220 فولت (تيار متردد) |
| طاقة الإخراج | 750 واط |
| ذروة انتاج الطاقة | 1500 واط |
| Inverter Power (VA) | 2200 فولت أمبير |
| شكل الموجة الناتجة | موجة جيبية معدلة |
| الأبعاد (الطول × العرض × الارتفاع) | 14.2 سم طول × 11 سم عرض × 8.5 سم ارتفاع (5.6 × 4.3 × 3.3 بوصة) |
| عدد منافذ الطاقة | 1 |
| مصدر الطاقة | Vehicle DC Power Socket (Note: Product description indicates AC input) |
| بلد المنشأ | الصين |
| رقم GTIN/الرمز العالمي للمنتج | 736342831933 |

Figure 3: Dimensions of the SKI780 VFD Inverter.
5. الإعداد
Careful installation and wiring are crucial for the proper functioning of the VFD inverter.
5.1 التركيب
- Mount the inverter vertically on a stable, non-flammable surface.
- تأكد من وجود مساحة كافية حول الوحدة للتهوية المناسبة وتبديد الحرارة.
- Avoid mounting in areas with excessive vibration, dust, or moisture.
5.2 الأسلاك
Refer to the wiring diagram provided with your specific unit for detailed connections. General wiring steps include:
- Power Input (L, N): Connect the main AC power supply to the L and N terminals. Ensure correct voltagه (220 فولت تيار متردد).
- خرج المحرك (U، V، W): Connect the three-phase motor leads to the U, V, and W terminals.
- التأريض (PE): Connect the ground wire to the PE terminal for safety.
- Brake Resistor (P+, PB): If a brake resistor is used, connect it to the P+ and PB terminals.
- محطات التحكم: Connect external control signals (digital inputs, analog inputs, relay outputs) to the respective terminals as per your application requirements.

Figure 4: Close-up of the inverter's terminal block for wiring connections.
5.3 External Panel Compatibility
If using an external control panel, ensure it is compatible with the inverter. The new panel design is specifically for new inverter models.

Figure 5: Correct connection of a new external panel to the inverter.
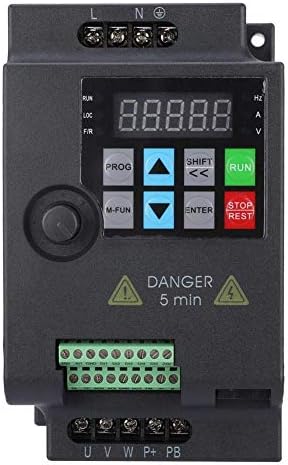
Figure 6: Incorrect connection of an old external panel to the inverter. Ensure panel compatibility.
6. تعليمات التشغيل
The inverter features a control panel for setting parameters and operating the motor.
6.1 انتهت لوحة التحكمview
تتضمن لوحة التحكم عادةً ما يلي:
- عرض: Shows frequency, voltagالمعلمات الإلكترونية والحالية وغيرها.
- زر PROG: يدخل/يخرج من وضع ضبط المعلمات.
- M-FUN Button: Multi-function button, often used for quick access to common functions.
- الأسهم لأعلى/لأسفل: تصفح القوائم وقم بتعديل قيم المعلمات.
- SHIFT/Left/Right Arrows: Move cursor or change digits during parameter entry.
- زر الإدخال: يؤكد الاختيارات ويحفظ تغييرات المعلمات.
- زر التشغيل: يبدأ المحرك.
- زر الإيقاف/إعادة الضبط: يوقف المحرك أو يعيد ضبط حالات الأعطال.
6.2 التشغيل الأساسي
- تشغيل الطاقة: قم بتوصيل الطاقة بالعكس. ستضيء الشاشة.
- ضبط التردد: Use the Up/Down arrows or the external potentiometer to set the desired output frequency.
- بدء تشغيل المحرك: اضغط على يجري اضغط على الزر لتشغيل المحرك. سيتسارع المحرك إلى التردد المحدد.
- إيقاف المحرك: اضغط على توقف / إعادة تعيين button to stop the motor. The motor will decelerate and stop.
6.3 إعداد المعلمة
To configure advanced settings:
- اضغط على بروغ button to enter parameter setting mode.
- Use the Up/Down arrows to navigate through parameter groups and individual parameters.
- يضعط يدخل لتحديد معلمة.
- Use the Up/Down arrows and SHIFT buttons to adjust the parameter value.
- يضعط يدخل لحفظ القيمة الجديدة.
- يضعط بروغ to exit parameter setting mode.
7. الصيانة
Regular maintenance ensures the longevity and reliable operation of your VFD inverter.
- تنظيف: نظّف بشكل دوري الجزء الخارجي من العاكس وفتحات التهوية لمنع تراكم الغبار. استخدم قطعة قماش ناعمة وجافة. لا تستخدم المنظفات السائلة.
- تقتيش: افحص توصيلات الأسلاك بانتظام للتأكد من إحكامها وخلوها من علامات التلف أو التآكل. تحقق من وجود أي أصوات أو روائح غير معتادة أثناء التشغيل.
- مراوح التبريد: Ensure cooling fans are operating correctly and are free from obstructions. Replace noisy or faulty fans.
- الظروف البيئية: تأكد من أن بيئة التشغيل تظل ضمن نطاقات درجة الحرارة والرطوبة المحددة.
- عمر المكثف: Electrolytic capacitors have a finite lifespan. Consider professional inspection and replacement after several years of continuous operation.
8. استكشاف الأخطاء وإصلاحها
يوفر هذا القسم حلولاً للمشكلات الشائعة التي قد تواجهها.
| مشكلة | السبب المحتمل | حل |
|---|---|---|
| العاكس لا يعمل | No input power; Blown fuse; Faulty wiring | افحص مصدر الطاقة؛ استبدل الفيوز؛ تحقق من توصيلات الأسلاك. |
| المحرك لا يعمل | Incorrect parameters; Motor wiring error; Overload | Check frequency and control parameters; Verify motor wiring (U, V, W); Reduce motor load. |
| عطل التيار الزائد (OC) | Sudden load change; Short circuit in motor; Acceleration/deceleration time too short | Check motor and load; Increase acceleration/deceleration time parameters. |
| أوفرفولtagخطأ إلكتروني (OV) | حجم الإدخالtage too high; Regeneration during deceleration | تحقق من مجلد الإدخالtage; Increase deceleration time; Install a brake resistor if necessary. |
| أندرفولtagخطأ هـ (الأشعة فوق البنفسجية) | حجم الإدخالtage too low; Power supply instability | تحقق من مجلد الإدخالtage; Ensure stable power supply. |
| عطل ارتفاع درجة الحرارة (OH) | Poor ventilation; Ambient temperature too high; Fan failure | Improve ventilation; Reduce ambient temperature; Check and replace cooling fan. |
For persistent issues or faults not listed, please contact technical support.
9. الدعم
For technical assistance, product inquiries, or service requests, please contact SEAFRONT customer support through your purchase channel or the official SEAFRONT website. Please have your model number (SKI780-0D75G-1) and serial number ready when contacting support.