
Artillery SW-X1
Artillery Sidewinder X1 3D Printer User Manual
Model: SW-X1
1. المقدمة
This manual provides essential information for the setup, operation, maintenance, and troubleshooting of your Artillery Sidewinder X1 3D Printer. Please read this manual thoroughly before operating the device to ensure proper use and to prevent damage.

Figure 1.1: The Artillery Sidewinder X1 3D Printer, showcasing its design and a sampالطباعة.
2. الميزات الرئيسية
- Ultra-Quiet Stepper Driver: Designed for reduced heat dissipation and higher torque, contributing to quieter operation.
- Synchronized Dual Z System: Ensures consistent and parallel movement of the X-carriage relative to the build plate, even if one Z-stepper encounters an issue.
- طارد ذو محرك مباشر: Enhances reliability, particularly when printing with flexible filaments.
- AC Heating Platform: Provides rapid heating of the build plate. The lattice glass surface offers excellent adhesion when heated and allows for easy removal of prints once cooled.
- حماية انقطاع التيار الكهربائي: Enables the printer to resume printing from the last recorded position after a power interruption.
- Filament Runout Sensor: Automatically pauses printing and prompts for filament feeding when the material runs out.
- شاشة تعمل باللمس بالكامل: Provides clear instructions and intuitive control.

Figure 2.1: Visual representation of the Artillery Sidewinder X1's key features, including quiet operation, heated bed, and various sensors.
3. ماذا يوجد في الصندوق
Upon unboxing, verify that all components listed below are present and undamaged:
- 1 x Artillery Sidewinder X1 3D Printer
- 1 × مجموعة أدوات التجميع
- دليل تعليمات التجميع (1 × 1)
- 1 x Assembly Guide (likely a quick start guide or visual aid)

الشكل 3.1: مفصل view of the included assembly tool kit, showing various tools and spare parts.
4. الإعداد والتجميع
The Artillery Sidewinder X1 comes 95% pre-assembled. Follow the included Assembly Instruction Manual for detailed steps. Key assembly points include:
- فك التعبئة: قم بإزالة جميع المكونات بعناية من العبوة.
- تركيب الجسر: Secure the gantry to the base unit. Ensure all connections are firm.
- حامل خيوط: Attach the filament spool holder to the top of the gantry.
- وصلات الكابلات: Connect all necessary cables, paying attention to proper routing to avoid interference with moving parts.
- توصيل الطاقة: Connect the power supply unit. Ensure the correct voltage (110V) is selected if applicable.
4.1 Initial Leveling
Accurate bed leveling is crucial for successful prints. The Sidewinder X1 features large leveling knobs for easier adjustment.
- Heat the build plate to your typical printing temperature (e.g., 60°C for PLA) before leveling.
- Use the touch screen to move the nozzle to each corner and the center of the build plate.
- Adjust the leveling knobs until a piece of paper can slide with slight friction between the nozzle and the build plate.

Figure 4.1: Components facilitating setup and operation, including the direct drive extruder, large leveling knob, synchronized dual Z system, and inductive endstop sensors.
5. تعليمات التشغيل
5.1 Loading Filament
To load filament, gently press the extruder arm and insert the filament into the direct drive extruder until it catches. Use the touch screen controls to extrude a small amount of filament to ensure it is flowing correctly through the nozzle.
5.2 Printing from SD Card/USB Stick
The Sidewinder X1 supports printing directly from a TF Card or USB Stick.
- Prepare your 3D model using a slicing software (e.g., Cura, PrusaSlicer, Simplify3D) and save the G-code file to your TF Card or USB Stick.
- Insert the storage device into the designated slot on the printer.
- Navigate the full touch screen interface to select your desired G-code file and initiate the print.
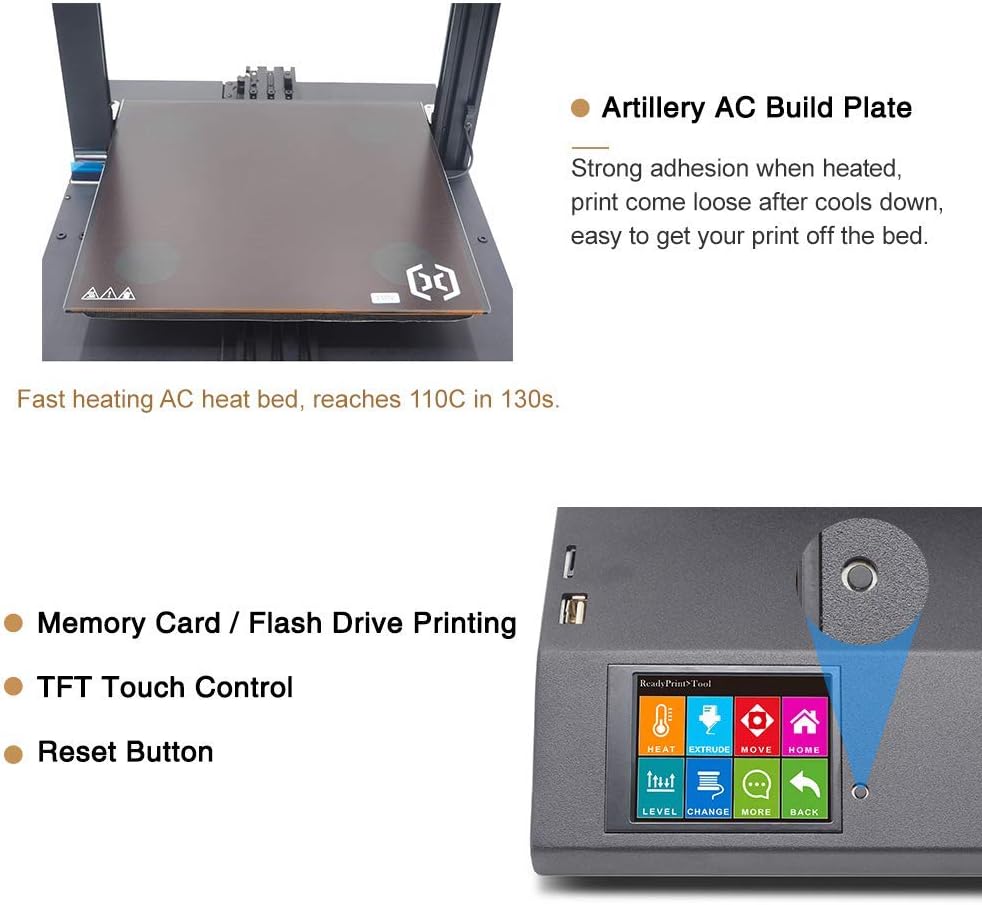
Figure 5.1: The Artillery AC Build Plate, known for its strong adhesion when heated, and the intuitive TFT Touch Control screen with a reset button for easy operation.
6. الصيانة
تضمن الصيانة الدورية الأداء الأمثل وطول عمر طابعة ثلاثية الأبعاد الخاصة بك.
- تنظيف لوحة الطباعة: After each print, allow the build plate to cool completely before removing the print. Clean the surface with isopropyl alcohol to remove any residue.
- تنظيف الفوهة: Periodically check the nozzle for clogs. Use the included needle or a brass brush to clean any filament buildup.
- تشحيم: Apply a small amount of lubricant to the Z-axis lead screws and smooth rods every few months or as needed.
- التوتر حزام: Ensure the X and Y axis belts are properly tensioned. They should be taut but not overly tight.
- تحديثات البرامج الثابتة: Check the official Artillery webالموقع الإلكتروني للاطلاع على أي تحديثات متاحة للبرامج الثابتة لتحسين الأداء أو إضافة ميزات جديدة.
7. استكشاف الأخطاء وإصلاحها
يتناول هذا القسم المشكلات الشائعة التي قد تواجهها.
7.1 مشاكل الطباعة الشائعة
- ضعف التصاق الطبقة الأولى:
- تأكد من أن سطح الطباعة مستوٍ بشكل صحيح.
- Verify the correct bed temperature for your filament type.
- Clean the build plate surface thoroughly.
- عدم خروج الخيط:
- Check for a clogged nozzle.
- Ensure the filament is loaded correctly and the extruder gear is gripping it.
- Verify the hotend temperature is appropriate for the filament.
- تغيير الطبقات:
- تحقق من شد الحزام على المحورين X و Y.
- Ensure the printer is on a stable surface.
- Reduce print speed if necessary.
7.2 استعادة الطاقة بعد انقطاع التيار الكهربائي
The Sidewinder X1 features power failure recovery. If power is interrupted during a print, the printer will attempt to resume from the last position once power is restored.

Figure 7.1: The printer's power failure detection system, which allows it to resume printing after a power outage, preventing print job ruin.
8. المواصفات الفنية
| المعلمة | قيمة |
|---|---|
| دقة الطبقة | 0.1 ملم |
| إطار | البثق الألومنيوم |
| XYZ Positioning Accuracy | 0.05 ملم، 0.05 ملم، 0.1 ملم |
| خيوط الطباعة | جيش التحرير الشعبى الصينى ، ABS ، TPU ، مواد مرنة |
| قطر الخيط | 1.75 ملم |
| قطر الفوهة | 0.4 ملم |
| أقصى سرعة للطباعة | 150 مم/ثانية |
| سرعة السفر القصوى | 250 مم/ثانية |
| حجم البناء | 300×300×400 ملم |
| نوع الطارد | الطارد بالدفع المباشر |
| Maximum Build Plate Temperature | 130 درجة مئوية |
| متطلبات الطاقة | 110 فولت |
| الاتصال | USB, TF Card, USB Stick |
| لوحة التحكم | MKS Gen L |
| نوع فوهة | بركان |
| أبعاد الماكينة | 550x405x640 mm (550x405x870 mm with spool holder) |
| وزن العنصر | 17.3 كيلوجرام (38.1 رطل) |
| مدعوم File شكل | slicer, prusaslicer, cura, kisslicer, ideamaker, slic3r, simplify3d |

Figure 8.1: A visual summary of the Artillery Sidewinder X1's technical specifications and dimensions.
9. الدعم والضمان
For any assistance, questions, or warranty inquiries, please contact Artillery customer support. You can typically find contact information on the official Artillery webالموقع أو من خلال بائع التجزئة الذي تم شراء المنتج منه.
As per the product description, for help or questions, contact "Rxlife" (the seller) by clicking "Ask a question" behind "sold by".
Ask a question about this manual
Ask about setup, troubleshooting, compatibility, parts, safety, or missing instructions. Manuals+ will review the question and use this page’s manual context to help answer it.