
1. المقدمة
This manual provides essential information for the safe and effective operation of your Skyking MECO-G R-2025THz Digital Auto-Ranging Clamp Meter. This True RMS meter is designed for measuring AC current up to 1000A, voltage, resistance, frequency, and temperature. Please read this manual thoroughly before use and retain it for future reference.
2. معلومات السلامة
To ensure safe operation and avoid damage to the meter, observe the following safety precautions:
- Always adhere to safety regulations as per GB4793-1 and IEC 61010-1. This meter is rated for CAT III 600V and CAT II 1000V.
- لا تتجاوز قيم الإدخال القصوى المحددة لكل دالة.
- Ensure test leads are properly connected to the correct input terminals before making any measurements.
- Inspect the meter, test leads, and accessories for any damage before each use. Do not use if damaged.
- Never attempt to measure current on circuits with voltage exceeding the meter's rating.
- Exercise extreme caution when working with live electrical circuits.
3. انتهى المنتجview
The Skyking MECO-G R-2025THz is a compact and versatile digital clamp meter. Key components include:
- Cl الحاليةamp فك: For non-contact AC current measurement. Features a 45mm jaw opening.
- قرص الوظائف الدوار: Selects measurement functions (OFF, 1000A~, 600A~, 60A~, V, mV, Ω, Hz/Duty, Temp).
- شاشة LCD: 3 digits, 6000 counts, True RMS readings. Includes backlight for low-light conditions.
- أزرار الوظائف: Includes buttons for Hz/Duty, Range, and Select.
- أطراف الإدخال: Dedicated ports for 'V', 'COM', and 'Hz/°C°F Ω' test lead connections.
- مشغل: Located on the side for opening the clamp فك.
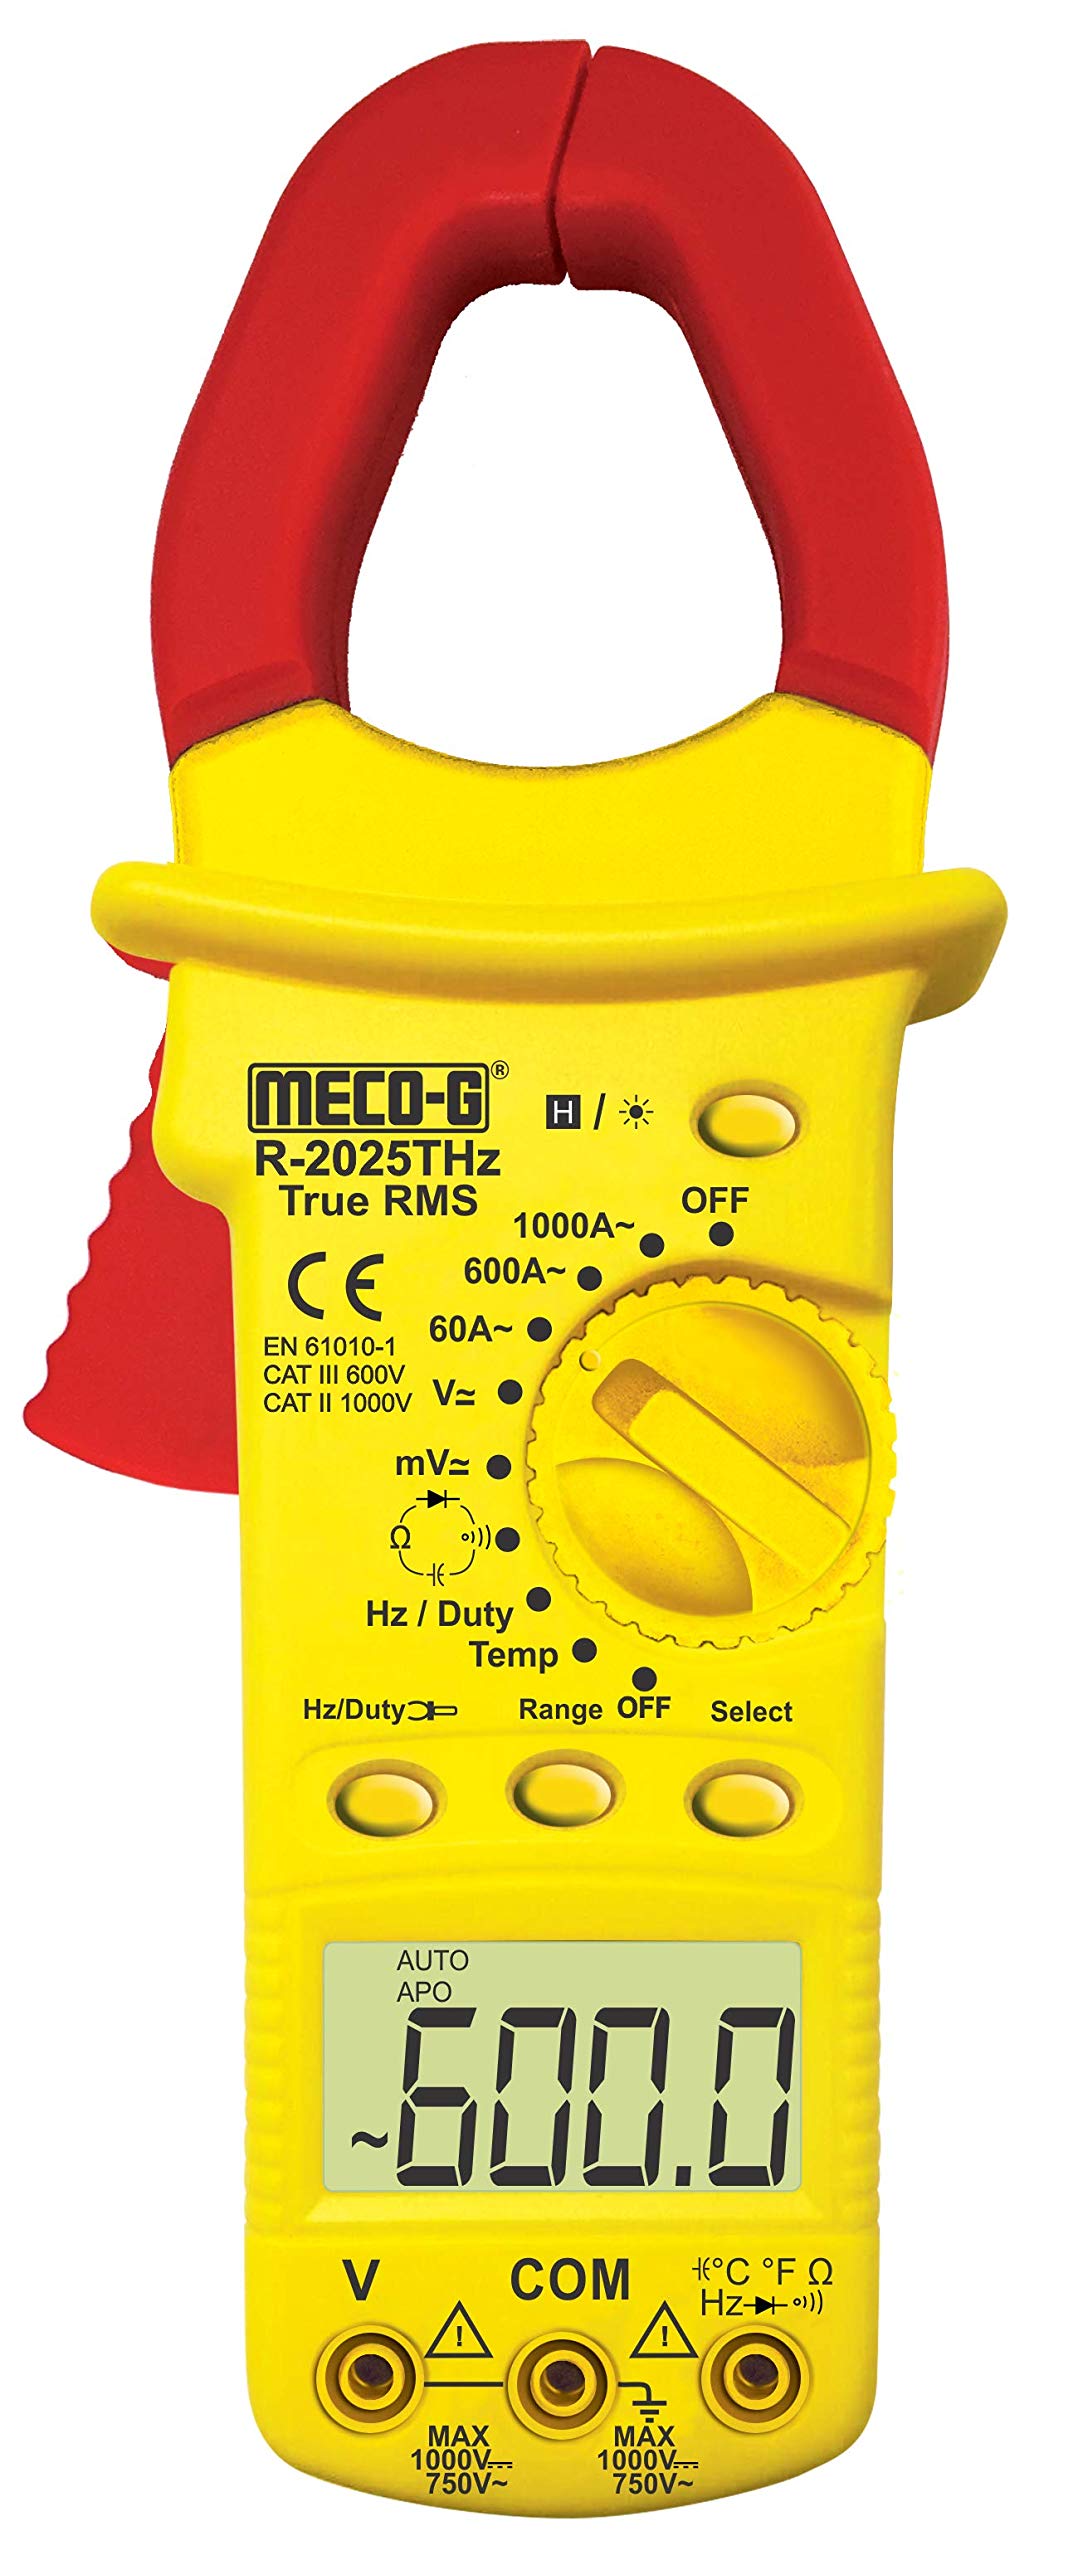
This image displays the main components of the clamp meter, including the current clamp, function selector dial, LCD display, and input jacks for test leads.
4. الإعداد
قبل استخدام clamp meter, perform the following setup steps:
4.1. تركيب البطارية
- تأكد من إيقاف تشغيل العداد.
- حدد موقع غطاء حجرة البطارية على الجزء الخلفي من العداد.
- قم بفك البراغي المثبتة وإزالة الغطاء.
- Insert the required batteries (not included) according to the polarity indicators inside the compartment.
- أعد تركيب غطاء البطارية وثبته بالبرغي (البراغي).
4.2. توصيل أسلاك الاختبار
للمجلدtage, resistance, frequency, and temperature measurements, connect the test leads as follows:
- Insert the red test lead into the 'V' or 'Hz/°C°F Ω' input terminal.
- أدخل سلك الاختبار الأسود في طرف الإدخال "COM" (المشترك).
5. تعليمات التشغيل
Follow these steps for various measurement functions:
5.1. تشغيل/إيقاف التشغيل
Rotate the function dial from the 'OFF' position to the desired measurement function to turn the meter ON. Rotate back to 'OFF' to power down. The meter features an Auto Power-Off function after 15 minutes of inactivity.
5.2. AC Current Measurement (1000A, 600A, 60A)
- Rotate the function dial to the '1000A~', '600A~', or '60A~' position.
- اضغط على الزناد لفتح clamp فك.
- قم بتطويق موصل واحد فقط من الدائرة بعلامة clamp الفك. تأكد من إغلاق الفك تماماً.
- اقرأ قيمة التيار المتردد على شاشة LCD.
5.3. المجلدtage Measurement (V, mV)
- قم بتوصيل أسلاك الاختبار كما هو موضح في القسم 4.2.
- Rotate the function dial to the 'V' or 'mV' position.
- المس نقاط الاختبار المطلوبة في الدائرة الكهربائية بمجسات الاختبار.
- اقرأ المجلدtage value on the LCD display. Use the 'Select' button to switch between AC and DC voltagهـ إن أمكن.
5.4. قياس المقاومة (Ω)
- قم بتوصيل أسلاك الاختبار كما هو موضح في القسم 4.2.
- قم بتدوير قرص الوظائف إلى وضع 'Ω'.
- تأكد من فصل التيار الكهربائي عن الدائرة أو المكون قيد الاختبار.
- المس أطراف مجسات الاختبار عبر المكون أو الدائرة لقياس المقاومة.
- اقرأ قيمة المقاومة على شاشة LCD.
5.5. Frequency / Duty Cycle Measurement (Hz/Duty)
- قم بتوصيل أسلاك الاختبار كما هو موضح في القسم 4.2.
- Rotate the function dial to the 'Hz/Duty' position.
- Touch the test probes to the desired test points.
- Press the 'Hz/Duty' button to toggle between frequency and duty cycle measurements.
- اقرأ القيمة على شاشة LCD.
5.6. Temperature Measurement (Temp)
- Connect the K-Type Thermocouple leads (included) to the 'V' and 'COM' input terminals, observing polarity.
- Rotate the function dial to the 'Temp' position.
- ضع مسبار المزدوجة الحرارية عند النقطة المراد قياس درجة الحرارة عندها.
- Read the temperature value on the LCD display. Use the 'Select' button to switch between Celsius (°C) and Fahrenheit (°F).
5.7. وظيفة الاحتفاظ بالبيانات
Press the 'Hold' button (if available, or 'Select' button may serve this function) to freeze the current reading on the display. Press it again to release the hold function.
5.8. وظيفة الإضاءة الخلفية
Press the 'Back Light' button (if available, or 'Select' button may serve this function) to illuminate the LCD display for better visibility in dark environments. Press it again to turn off the backlight.
6. الصيانة
تضمن الصيانة المناسبة طول عمر ودقة جهاز الكمبيوتر الخاص بكamp متر:
- تنظيف: امسح العداد جasing مع الإعلانamp القماش. لا تستخدم المنظفات أو المذيبات الكاشطة.
- استبدال البطارية: When the low battery indicator appears on the display, replace the batteries promptly to ensure accurate readings. Refer to Section 4.1 for battery installation.
- تخزين: If the meter is not used for an extended period, remove the batteries to prevent leakage. Store the meter in a dry environment, within the specified storage temperature range of -10°C to 50°C (14°F to 122°F).
7. استكشاف الأخطاء وإصلاحها
إذا واجهت مشاكل مع جهازكamp فيما يخص العداد، يرجى الرجوع إلى المشاكل والحلول الشائعة التالية:
- لا يوجد عرض: Check if the meter is turned ON. Verify battery installation and ensure batteries are not depleted. Replace batteries if necessary.
- قراءات خاطئة: Ensure test leads are correctly connected. Verify that the correct measurement function and range are selected. Check for any damage to the test leads or meter.
- Meter Turns Off Automatically: This is a normal function (Auto Power-Off) designed to conserve battery life. The meter will turn off after 15 minutes of inactivity. Rotate the function dial to turn it back on.
8. المواصفات
| ميزة | مواصفة |
|---|---|
| عرض | 3 Digits, 6000 Counts Trms |
| انقطاع التيار الكهربائي التلقائي | عشر دقائق من الخمول |
| درجة حرارة التشغيل والرطوبة | 0°C ~ 40°C (32°F ~ 104°F) & ≤ 80% RH |
| درجة حرارة التخزين والرطوبة | -10 درجة مئوية ~ 50 درجة مئوية (14 درجة فهرنهايت ~ 122 درجة فهرنهايت) |
| لوائح السلامة | GB4793-1, IEC 61010-1, CAT II 600V, CAT III 1000V |
| مؤشر انخفاض مستوى البطارية | Battery icon displayed |
| فتح الفك | 45 ملم |
| الأبعاد (الطول × العرض × الارتفاع) | 140 x 70 x 35mm (Approx.) |
| وزن | 180gms. Approx (With Battery) |
| مادة | معدن |
| مصدر الطاقة | يعمل بالبطارية (البطاريات غير مرفقة) |
| رقم الموديل | R-2025THz |
9. الضمان والدعم
For warranty information or technical support, please refer to the documentation provided at the time of purchase or contact your retailer. Keep your purchase receipt as proof of purchase.