
1. المقدمة
Thank you for choosing the Walfront LCD Digital Programmable Weekly Timer Switch. This device is designed for automatic control of various electrical appliances based on user-defined schedules. Please read this manual carefully before installation and operation to ensure proper use and to prevent damage.
2. معلومات السلامة
تحذير: Electrical installation should only be performed by qualified personnel. Disconnect power before installation or maintenance to prevent electric shock.
- تأكد من مستوى الصوت المدخلtage matches the timer's specifications (24V for this model).
- Do not exceed the maximum load capacity of 16A 250VAC (resistive load).
- أبقِ الجهاز بعيداً عن الماء والرطوبة الزائدة.
- Do not attempt to disassemble or repair the unit yourself. Contact support if issues arise.
3. انتهى المنتجview
The Walfront LCD Digital Programmable Weekly Timer Switch is a high-precision device built with durable, moisture-resistant, and corrosion-protected materials. It features a clear LCD display and supports up to 16 ON/OFF programs daily and weekly.
3.1 الميزات الرئيسية
- High-quality construction for long lifespan.
- Automatic ON/OFF control for various electrical devices.
- Built-in 1.2V/40mA rechargeable battery for memory retention.
- Industrial-grade chip for high precision and strong anti-interference.
- Up to 16 ON and 16 OFF programming settings per day/week.
- LCD display showing real-time, hour, minute, and ON/AUTO/OFF status.
- DIN rail mounting design.
3.2 مكونات

الصورة 1: أمام view of the Walfront LCD Digital Programmable Weekly Timer Switch. Shows the LCD display and control buttons.

الصورة 2: خلف view of the timer switch, illustrating the wiring terminals and basic electrical specifications printed on the unit.
4. الإعداد والتثبيت
This timer is designed for DIN rail mounting. Ensure the DIN rail is securely installed before attaching the timer.
4.1 مخطط الأسلاك

الصورة 3: Wiring diagrams showing direct connection (left) and connection with an AC contactor (right). The direct connection illustrates neutral and live wire inputs and load output. The AC contactor diagram shows 220V power input and output to the load device.
Direct Wiring: Connect the neutral and live wires to the designated input terminals (L and N). Connect the load to the output terminals (typically 3 and 4 for normally open, or 3 and 5 for normally closed, as indicated on the device). Refer to the diagram on the device for exact terminal numbering.
Wiring with AC Contactor: For higher loads, connect the timer to control an AC contactor. The timer's output will switch the coil of the contactor, which in turn controls the main power to the load. This setup is shown on the right side of Image 3.
4.2 Initial Power-Up and Battery Charging
Upon first use, connect the timer to power. The internal 1.2V/40mA rechargeable battery will begin charging. If the display is blank or shows incorrect time, allow it to charge for a few minutes. Press the "إعادة ضبط" button (often labeled with a small 'R' or 'C' and requires a pointed object) to clear all settings and start fresh.
5. تعليمات التشغيل
5.1 ضبط الوقت الحالي
- اضغط على "ساعة" button (often labeled with a clock icon) and hold it.
- بينما يحمل "ساعة"اضغط على "D+" زر لضبط اليوم الحالي من الأسبوع.
- بينما يحمل "ساعة"اضغط على "H+" زر لضبط الساعة الحالية.
- بينما يحمل "ساعة"اضغط على "M+" زر لضبط الدقيقة الحالية.
- أطلق سراح "ساعة" زر. تم ضبط الوقت الآن.
5.2 Setting 12/24 Hour Mode
By default, the timer operates in 24-hour mode. To switch between 12-hour (AM/PM) and 24-hour modes, press and hold the "ساعة" button for approximately 5 seconds. The display will show "AM" for 12-hour mode or switch back to 24-hour format.
5.3 برمجة جداول التشغيل/الإيقاف
The timer supports up to 16 ON and 16 OFF programs. Each program consists of an ON time and an OFF time.
- اضغط على "برنامج" اضغط على الزر مرة واحدة. ستظهر على الشاشة عبارة "1 تشغيل".
- يضعط "D+" to select the day(s) for this ON program (e.g., Mon-Fri, Sat-Sun, or specific days).
- يضعط "H+" لضبط ساعة التشغيل المطلوبة.
- يضعط "M+" لضبط دقيقة التشغيل المطلوبة.
- يضعط "برنامج" مرة أخرى. ستظهر على الشاشة عبارة "خصم 1".
- كرر الخطوات من 2 إلى 4 لضبط وقت الإيقاف للبرنامج الأول.
- تواصل الضغط "برنامج" to cycle through "2 ON", "2 OFF", up to "16 ON", "16 OFF", setting each as needed.
- بعد ضبط جميع البرامج المطلوبة، اضغط على "ساعة" button to exit programming mode and return to real-time display.
ملحوظة: If you need to cancel a program, press the "برنامج" button to select the program, then press the "يدوي" button until "----" appears on the display for that program's time slot.
5.4 التجاوز اليدوي (تشغيل/تلقائي/إيقاف)
اضغط على "يدوي" زر للتنقل بين أوضاع التشغيل:
- على: يتم تشغيل الإخراج باستمرار، متجاهلاً جميع البرامج.
- تلقاءي: The timer operates according to the programmed ON/OFF schedules.
- OFF: يتم إيقاف تشغيل الإخراج باستمرار، متجاهلاً جميع البرامج.
تأكد من أن المؤقت في وضع التشغيل "AUTO" وضع التشغيل المبرمج.
5.5 وظيفة قفل المفتاح
To prevent accidental changes to settings, the timer features a key lock function.

الصورة 4: The timer display showing the key lock symbol, indicating that the buttons are locked.
- To lock the keys: Press and hold the "C/R" (Cancel/Reset) button for approximately 4 seconds until a lock symbol appears on the LCD.
- To unlock the keys: Press and hold the "C/R" button again for approximately 4 seconds until the lock symbol disappears.
6. المواصفات
| المعلمة | قيمة |
|---|---|
| حجم الإدخالtage | AC/DC 24V (This model) |
| Contact Rated Voltage | AC 180V~264V (50/60Hz) |
| سعة التحميل | 16A 250VAC (Resistive Load) |
| تشغيل/إيقاف العمليات | 16 ON / 16 OFF (Manual/Auto) |
| عرض | شاشة الكريستال السائل |
| استهلاك الطاقة | 4.5VA (Max) |
| خطأ | ≤2 seconds/day (at 25℃) |
| طريقة التركيب | DIN Rail (sold separately) |
| مدى التوقيت | 1 دقيقة إلى 168 ساعات |
| الحد الأدنى للفاصل الزمني | 1 دقيقة |
| درجة حرارة التشغيل | -10 درجة مئوية إلى 55 درجة مئوية |
| رطوبة التشغيل | 35-85% رطوبة نسبية |
| الأبعاد (الطول × العرض × الارتفاع) | 86 × 36 × 65 مم |
| بطارية داخلية | 1.2V/40mA rechargeable, >15 days backup |
| عدد الدوائر | Changeover switch (SPDT) |
| عمر الخدمة | Mechanical: 107, Electrical: 105 |
| وزن | 125 جرام |
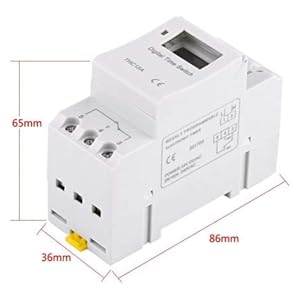
الصورة 5: Diagram illustrating the dimensions of the timer switch: 86mm length, 36mm width, and 65mm height.
7. الصيانة
- Keep the timer clean and free from dust. Use a dry, soft cloth for cleaning.
- لا تستخدم المنظفات أو المذيبات الكاشطة.
- قم بفحص توصيلات الأسلاك بشكل دوري للتأكد من أنها آمنة.
- The internal battery is designed for long life and typically does not require replacement. If the timer loses settings frequently after power outages, the battery may need servicing by a qualified technician.
8. استكشاف الأخطاء وإصلاحها
| مشكلة | السبب المحتمل | حل |
|---|---|---|
| العرض فارغ. | No power supply or internal battery discharged. | Check power connections. Allow the timer to charge for a few minutes after connecting to power. |
| لا يعمل المؤقت عند التشغيل/الإيقاف كما هو مبرمج. | Timer is not in "AUTO" mode, programs are incorrect, or key lock is active. | Press "MANUAL" until "AUTO" is displayed. Review and correct programs. Unlock keys if necessary. |
| الأزرار لا تستجيب. | وظيفة قفل المفتاح نشطة. | Press and hold "C/R" for 4 seconds to unlock the keys. |
| الوقت غير دقيق. | Minor drift (within specifications) or internal battery issue. | Reset and re-set the time. If inaccuracy persists or settings are lost frequently, contact support. |
9. الضمان والدعم
Walfront strives to provide high-quality products. If you encounter any issues with your product, please contact us for prompt assistance. We offer return and refund services for product defects.
For support, please refer to the contact information provided with your purchase or visit the Walfront store on Amazon: Walfront Amazon Store.