1. المقدمة
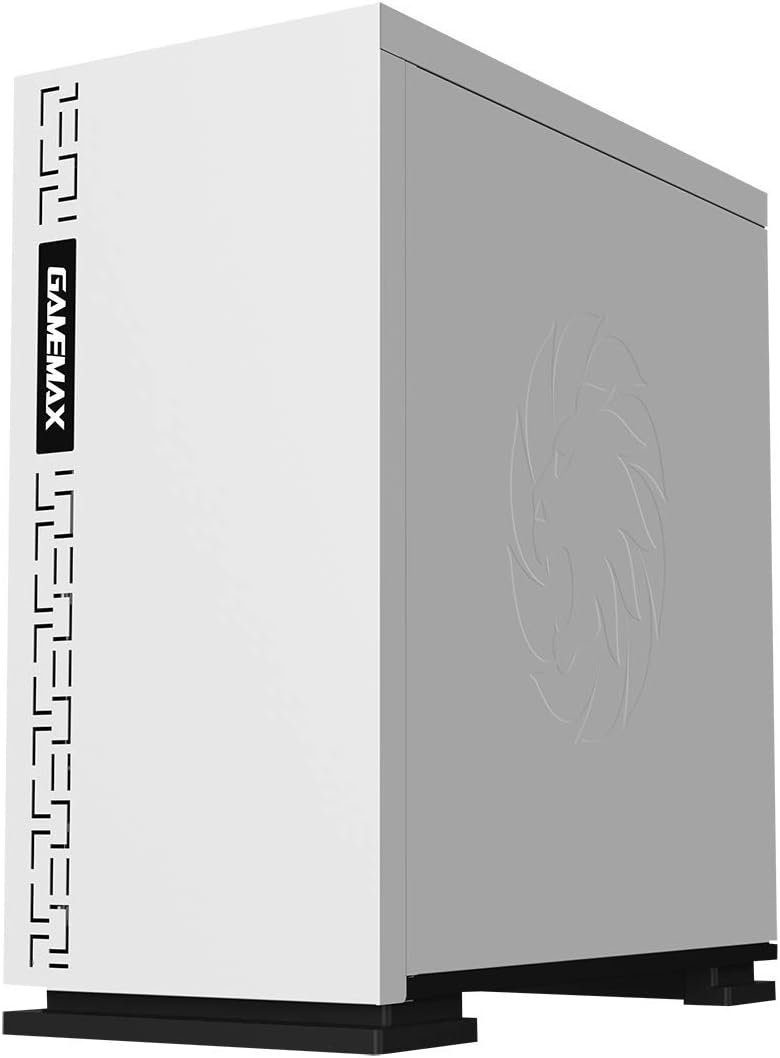
The GameMax Expedition is a compact Micro ATX PC gaming case designed for efficient cooling and component compatibility. This manual provides instructions for the proper installation, operation, and maintenance of your PC case.

Figure 1.1: GameMax Expedition MATX PC Gaming Case, White.
2. معلومات السلامة
- افصل دائمًا الطاقة عن جميع المكونات قبل التثبيت أو الصيانة.
- ارتدِ حزام معصم مضادًا للكهرباء الساكنة لمنع تلف المكونات بسبب التفريغ الكهروستاتيكي (ESD).
- Be cautious of sharp edges inside the chassis.
- احتفظ بالأجزاء الصغيرة والبراغي بعيدًا عن متناول الأطفال.
- Ensure proper ventilation around the case during operation.
3. محتويات العبوة
تأكد من وجود جميع العناصر في العبوة:
- GameMax Expedition MATX PC Gaming Case
- صندوق الملحقات (براغي، فواصل، أربطة كابلات)
- 1 x 120mm Blue LED Fan (pre-installed at rear)
- دليل المستخدم (هذا المستند)
4. مواصفات المنتج
- Micro Gaming Chassis: Compact design optimized for gaming components.
- منافذ الإدخال/الإخراج: 1 x USB 3.0, 2 x USB 2.0, and HD Audio ports located on the top panel.
- تبريد: Includes 1 x 120mm Blue LED fan. Supports additional fans for enhanced airflow.
- النافذة الجانبية: Full side window panel allows visibility of internal components.
- Magnetic Dust Filter: Removable dust filter on the top panel for easy cleaning and improved system longevity.
- GPU Bracket: Integrated bracket provides support for graphics cards, preventing sag and accommodating larger cards.
5. مكون أكثرview
5.1 خارجي Views

Figure 5.1: Front panel design with air intake and included 120mm fan illustration.

Figure 5.2: Top I/O panel featuring USB 3.0, USB 2.0, and audio ports.
الشكل 5.3: الجزء العلوي view showing the magnetic dust filter for fan ventilation.
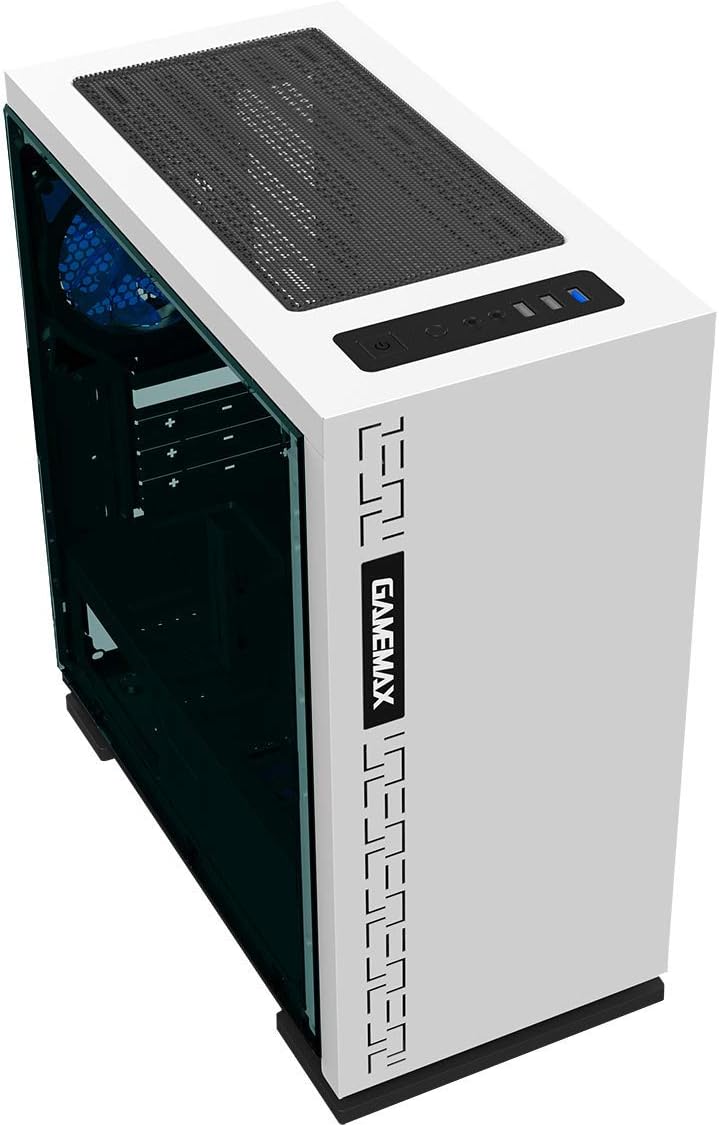
الشكل 5.4: خلفي view displaying expansion slots and the pre-installed 120mm fan.
5.2 التصميم الداخلي

الشكل 5.5: داخلي view with the side panel removed, showing the motherboard tray and cable routing options.

Figure 5.6: Illustration of fan and radiator mounting points within the chassis.

Figure 5.7: Drive bay locations supporting 2.5" and 3.5" storage devices.
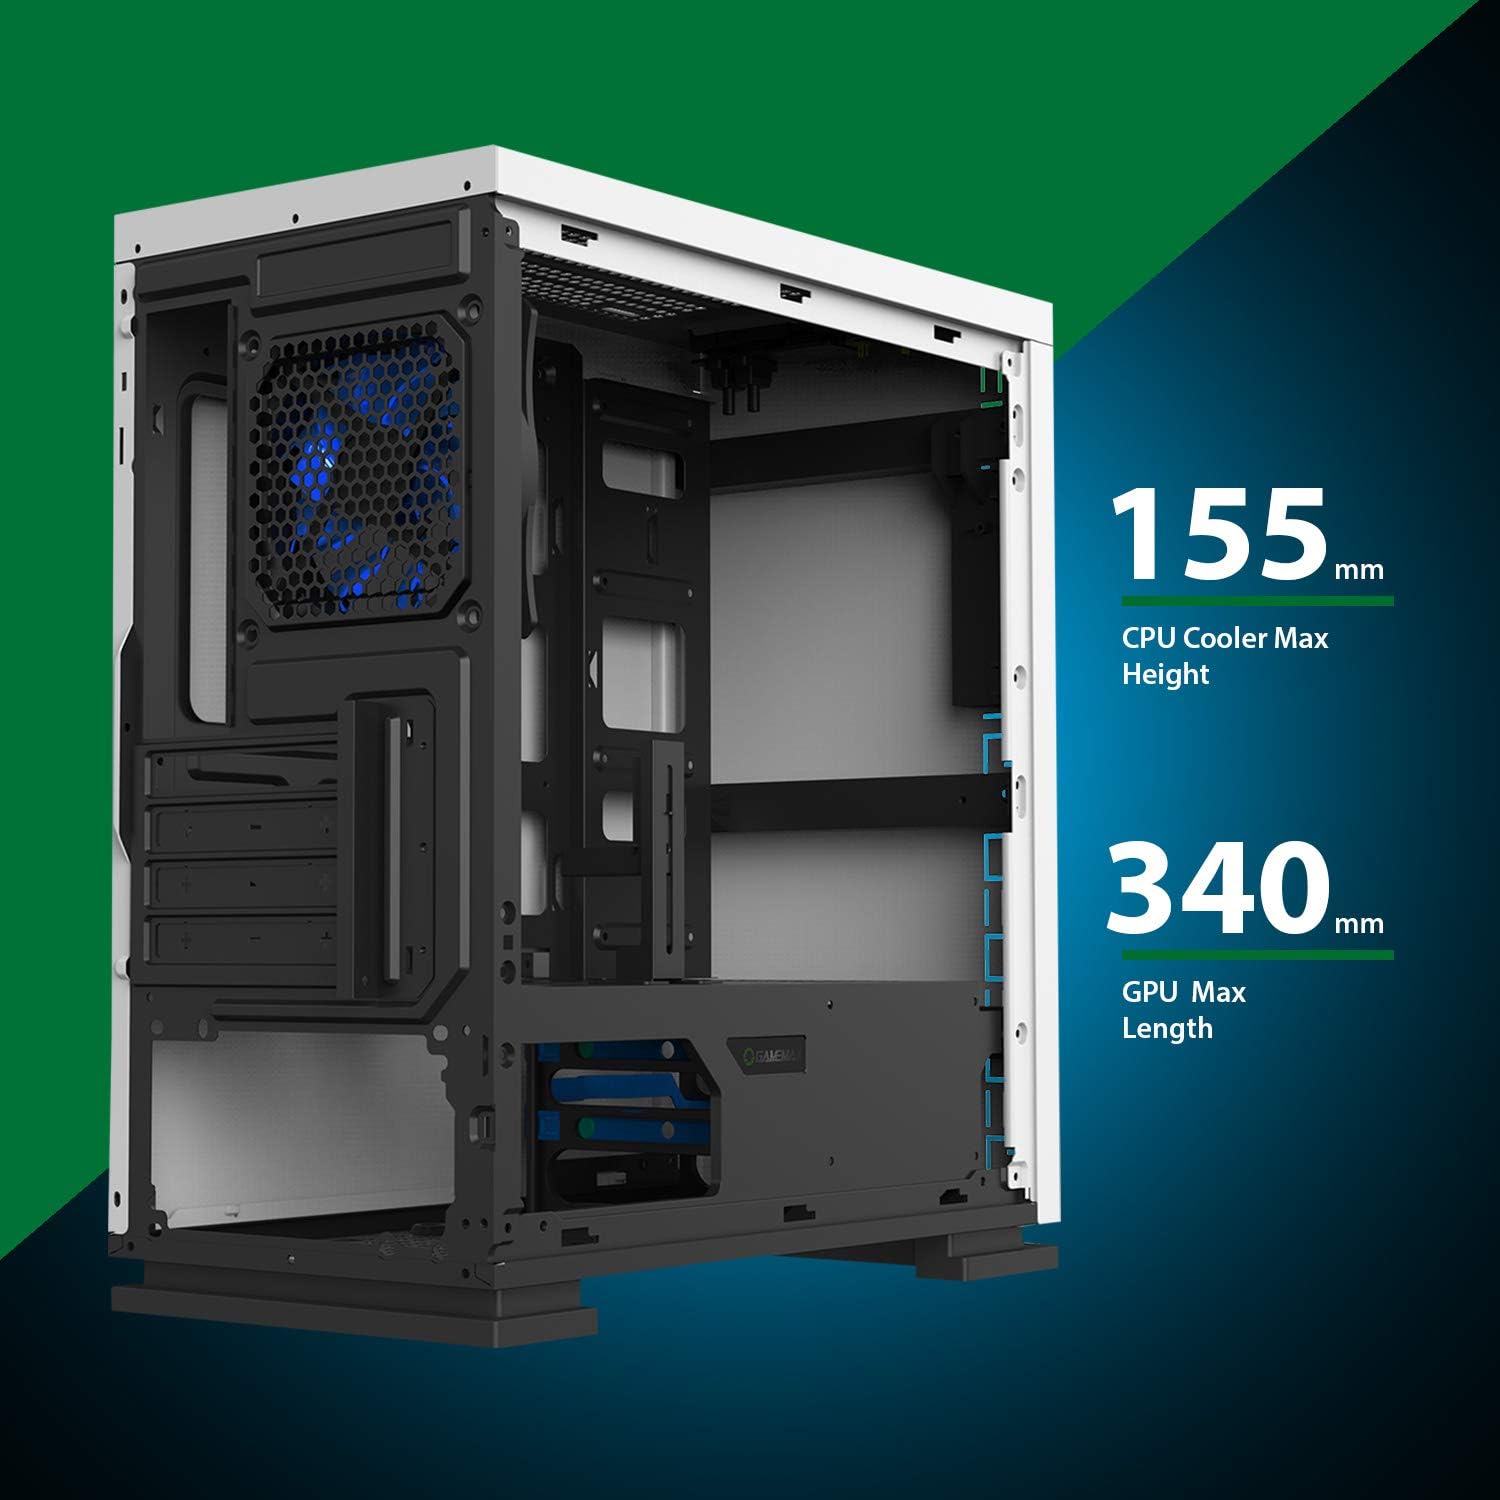
Figure 5.8: Maximum clearance for CPU coolers (155mm) and GPUs (340mm).
6. الإعداد والتثبيت
6.1 التحضير
- Unpack the chassis and remove all packaging materials.
- Remove the side panels by unscrewing the thumbscrews at the rear.
- Gather necessary tools: Phillips head screwdriver, cable ties.
6.2 تركيب اللوحة الأم
- Install the I/O shield into the rear opening of the chassis.
- Align the motherboard with the pre-installed standoffs. Ensure the standoffs match your Micro ATX motherboard's mounting holes.
- قم بتأمين اللوحة الأم باستخدام البراغي المتوفرة.
6.3 تركيب مصدر الطاقة
- Place the power supply unit (PSU) into the dedicated compartment at the bottom rear of the case.
- Align the PSU with the screw holes on the rear of the chassis.
- قم بتأمين وحدة إمداد الطاقة باستخدام البراغي المرفقة.
6.4 تركيب محرك التخزين
- محركات أقراص 2.5 بوصة: Mount 2.5" SSDs/HDDs to the dedicated mounting points on the motherboard tray or within the drive cage using the provided screws.
- محركات أقراص 3.5 بوصة: Install 3.5" HDDs into the drive cage located beneath the PSU shroud. Slide the drive into the tray and secure it.
6.5 Expansion Card (GPU) Installation
- قم بإزالة أغطية فتحات التوسعة اللازمة من الجزء الخلفي من الهيكل.
- أدخل بطاقة الرسومات أو بطاقة التوسعة الأخرى في فتحة PCIe المناسبة على اللوحة الأم.
- ثبّت البطاقة بمسمار.
- Utilize the adjustable GPU bracket to provide additional support for heavier graphics cards.
6.6 تركيب المروحة والتبريد
- The case comes with one 120mm Blue LED fan pre-installed at the rear.
- Additional 120mm fans can be installed at the top and front positions as needed.
- Ensure fans are oriented correctly for optimal airflow (intake or exhaust).
6.7 Front Panel Connector Installation
Connect the front panel cables (USB 3.0, USB 2.0, HD Audio, Power SW, Reset SW, Power LED, HDD LED) to their corresponding headers on your motherboard. Refer to your motherboard manual for exact pin layouts.
7. التشغيل
Once all components are installed and cables are connected, replace the side panels. Connect your monitor, keyboard, mouse, and power cable. Press the power button on the top panel to start your system. The pre-installed LED fan will illuminate upon power-on.
8. الصيانة
- تنظيف فلتر الغبار: Regularly remove and clean the magnetic dust filter located on the top panel to maintain optimal airflow and prevent dust buildup inside the case.
- النظافة العامة: استخدمي قطعة قماش ناعمةamp cloth to clean the exterior surfaces of the case. Avoid abrasive cleaners.
- إزالة الغبار الداخلي: Periodically use compressed air to clear dust from internal components and fans. Ensure the system is powered off and unplugged before performing internal cleaning.
9. استكشاف الأخطاء وإصلاحها
- النظام لا يعمل: Check all power connections, including the PSU to the wall outlet, PSU to motherboard, and front panel power switch cable to the motherboard.
- المراوح لا تدور: Verify fan cables are securely connected to the motherboard or fan controller.
- منافذ USB لا تعمل: Ensure the front panel USB cables are correctly connected to the motherboard's USB headers.
- لا يوجد إخراج للعرض: Confirm the graphics card is properly seated and connected to power, and the monitor cable is connected to the graphics card, not the motherboard's integrated graphics port (unless using integrated graphics).
10. المواصفات
| ميزة | مواصفة |
|---|---|
| اسم الموديل | GMX EXPEDITION |
| ماركة | جيم ماكس |
| نوع الحالة | Micro Tower (MATX) |
| التوافق مع اللوحة الأم | مايكرو ATX |
| لون | Expedition White |
| مادة | البولي كربونات (PC) |
| أبعاد المنتج (الطول × العرض × الارتفاع) | 14.96 × 7.4 × 13.78 بوصة (380 × 188 × 350 مم) |
| وزن العنصر | 8.58 رطل (3.9 كجم) |
| منافذ USB 3.0 | 1 |
| منافذ USB 2.0 | 2 |
| طريقة التبريد | الهواء، الماء |
| وشملت مروحة | 1 x 120mm Blue LED (Rear) |
| أقصى ارتفاع لمبرد وحدة المعالجة المركزية | 155 ملم |
| أقصى طول GPU | 340 ملم |
11. الضمان والدعم
For warranty information and technical support, please visit the official GameMax webالموقع أو اتصل بالبائع المحلي الخاص بك.
رسمي Webموقع: gamemaxpc.com