
1. المقدمة
This manual provides detailed instructions for the installation, operation, and maintenance of your GIGABYTE Z370XP SLI motherboard. Designed for 8th Generation Intel Core processors, this ATX motherboard offers robust performance and features for various computing needs. Please read this manual thoroughly before beginning installation.
2. الميزات الرئيسية
- Supports 8th Generation Intel Core Processors.
- Dual Channel DDR4 memory support with 4 DIMM slots.
- USB 3.1 Gen 2 with USB Type-C for high-speed connectivity.
- 2-Way Graphics Support (SLI/CrossFire) for enhanced visual performance.
- Intel Gigabit LAN for stable and fast network connections.
- GIGABYTE UEFI Dual BIOS for system protection and easy configuration.
- APP Center including Easy Tune and Cloud Station Utilities for system management.
- Realtek ALC1220 Codec for high-definition audio.
- ATX Form Factor (305mm x 225mm).
3. محتويات العبوة
Verify that all items are present in the package. If any item is missing or damaged, contact your retailer.
- GIGABYTE Z370XP SLI Motherboard
- (Additional accessories such as SATA cables, I/O shield, and manual may be included depending on the region and retailer.)
4. الإعداد والتثبيت
Before installing the motherboard, ensure your system components are compatible and that you have a static-free environment.
4.1 اللوحة الأمview

الصورة 1: من أعلى إلى أسفل view of the GIGABYTE Z370XP SLI Motherboard. This image displays the CPU socket, DIMM slots, PCIe slots, and various headers.

الصورة 2: بزاوية view of the GIGABYTE Z370XP SLI Motherboard, highlighting the heatsinks and overall layout.
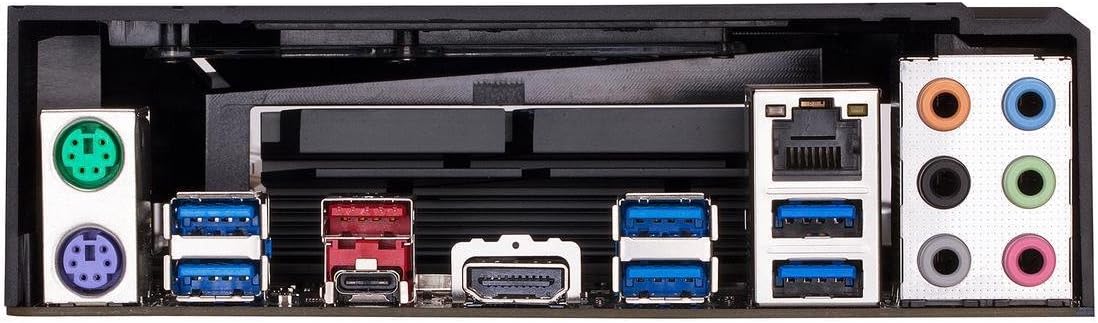
الصورة 3: Rear I/O panel of the GIGABYTE Z370XP SLI Motherboard, showing the various ports including USB, HDMI, Ethernet, and audio jacks.
4.2 تثبيت وحدة المعالجة المركزية
- حدد مكان مقبس وحدة المعالجة المركزية LGA 1151 على اللوحة الأم.
- افتح ذراع مقبس وحدة المعالجة المركزية وقم بإزالة الغطاء الواقي.
- قم بمحاذاة وحدة المعالجة المركزية مع المقبس بعناية، مع التأكد من أن المثلث الذهبي الموجود على وحدة المعالجة المركزية يتطابق مع المثلث الموجود على المقبس.
- قم بوضع وحدة المعالجة المركزية في المقبس برفق دون إجبارها.
- أغلق ذراع المقبس لتثبيت وحدة المعالجة المركزية.
- قم بتثبيت مبرد وحدة المعالجة المركزية وفقًا لإرشادات الشركة المصنعة.
4.3 تثبيت الذاكرة (RAM)
- افتح المشابك الموجودة على طرفي فتحات DIMM.
- قم بمحاذاة الشق الموجود على وحدة ذاكرة DDR4 مع الشق الموجود في فتحة DIMM.
- قم بإدخال وحدة الذاكرة بإحكام في الفتحة حتى تستقر المشابك في مكانها.
- For dual-channel operation, refer to the motherboard manual for recommended slot configurations.
4.4 تركيب جهاز التخزين
- محركات SATA: Connect SATA data cables from your storage devices (HDDs/SSDs) to the SATA 3 ports on the motherboard. Connect SATA power cables from your power supply to the drives.
- محركات M.2: Locate the M.2 slots. Insert the M.2 drive at an angle and secure it with the provided screw.
4.5 تركيب بطاقة الرسومات وبطاقة التوسعة
- Open the latch on the desired PCI Express x16 slot.
- Align your graphics card or expansion card with the slot and press down firmly until it is seated.
- قم بتثبيت البطاقة بمسمار في علبة جهاز الكمبيوتر الخاص بك.
- قم بتوصيل أي كابلات طاقة PCIe ضرورية من وحدة التزويد بالطاقة إلى بطاقة الرسومات.
4.6 توصيلات الطاقة
- Connect the 24-pin ATX main power connector from your power supply to the corresponding port on the motherboard.
- Connect the 8-pin (or 4+4-pin) ATX 12V CPU power connector to the motherboard.
4.7 توصيلات اللوحة الأمامية
Connect the front panel cables (power button, reset button, HDD LED, power LED, USB ports, audio jacks) to their respective headers on the motherboard. Refer to the motherboard's silkscreen labels for correct orientation.
5. تعليمات التشغيل
5.1 Initial System Boot
- After all components are installed and connected, close your PC case.
- قم بتوصيل الشاشة ولوحة المفاتيح والماوس.
- Connect the power cord to your power supply and turn on the power switch.
- اضغط على زر الطاقة الموجود على علبة الكمبيوتر الخاص بك.
- The system should power on and display the GIGABYTE splash screen.
5.2 إعداد BIOS/UEFI
للدخول إلى أداة إعداد BIOS/UEFI، اضغط على ديل key repeatedly during the initial boot process. The BIOS allows you to configure system settings such as boot order, CPU/memory frequencies, and peripheral settings. Save changes before exiting.
5.3 تثبيت برنامج التشغيل
After installing your operating system, install the necessary drivers for the motherboard chipset, LAN, audio, and other integrated components. These drivers are typically provided on a support DVD or can be downloaded from the GIGABYTE official webموقع.
6. الصيانة
- إزالة الغبار: نظّف الغبار بانتظام من داخل صندوق الكمبيوتر، وخاصة من المراوح والمشتتات الحرارية، لمنع ارتفاع درجة الحرارة. استخدم الهواء المضغوط للحصول على أفضل النتائج.
- تحديثات BIOS: Periodically check the GIGABYTE website for BIOS updates. BIOS updates can improve system stability, compatibility, and performance. Follow the instructions provided by GIGABYTE carefully when updating the BIOS.
- تحديثات برنامج التشغيل: حافظ على تحديث برامج تشغيل النظام لضمان الأداء الأمثل والتوافق مع البرامج والأجهزة الجديدة.
7. استكشاف الأخطاء وإصلاحها
إذا واجهت مشكلات، راجع خطوات استكشاف الأخطاء وإصلاحها الشائعة التالية:
- لا يوجد طاقة/لا يوجد تمهيد:
- Ensure all power cables (24-pin ATX, 8-pin CPU, GPU) are securely connected.
- Check if the power supply is switched on.
- تحقق من توصيل زر الطاقة في اللوحة الأمامية.
- لا يوجد عرض:
- Ensure the monitor is connected to the graphics card (or motherboard if using integrated graphics) and powered on.
- أعد تركيب بطاقة الرسومات ووحدات الذاكرة.
- قم بالاختبار باستخدام شريحة ذاكرة وصول عشوائي واحدة في فتحات مختلفة.
- عدم استقرار النظام/الأعطال:
- التحقق من درجات حرارة وحدة المعالجة المركزية ووحدة معالجة الرسومات.
- تأكد من تثبيت كافة برامج التشغيل بشكل صحيح وتحديثها.
- قم بتشغيل أدوات تشخيص الذاكرة للتحقق من وجود أخطاء في ذاكرة الوصول العشوائي (RAM).
- أعد ضبط إعدادات BIOS إلى الوضع الافتراضي.
- On-board Readout/Debug LED: The motherboard may feature an on-board debug LED or POST code display. Consult the full GIGABYTE manual for specific code meanings to diagnose boot issues.
8. المواصفات
| ميزة | التفاصيل |
|---|---|
| ماركة | جيجابايت |
| اسم الموديل | Z370XP SLI |
| مقبس وحدة المعالجة المركزية | إل جي إيه 1151 |
| المعالجات المتوافقة | الجيل العاشر من معالجات إنتل كور |
| نوع الشريحة | إنتل Z370 |
| تقنية ذاكرة الوصول العشوائي (RAM) | دي دي ار 4 |
| سرعة ساعة الذاكرة | 2666 MHz (Supports higher via OC) |
| فتحات الذاكرة المتاحة | 4 |
| Ram Memory Maximum Size | 64 جيجا بايت |
| واجهة بطاقة الرسوميات | بي سي اي اكسبريس |
| Total PCIe Ports | 4 |
| Total SATA Ports | 6 |
| فتحات M.2 | 2 |
| إجمالي منافذ USB | 8 (Rear I/O) + Internal Headers |
| USB 3.1 الجيل الثاني من النوع C | 1 (منافذ الإدخال/الإخراج الخلفية) |
| عدد منافذ إيثرنت | 1 (Intel Gigabit LAN) |
| Total Number of HDMI Ports | 1 |
| S/PDIF Connector Type | بصري |
| نوع موصل الطاقة الرئيسي | ATX ذو 24 سنًا |
| عامل الشكل | ATX (305mm X 225mm) |
| وزن العنصر | 16 أونصات |
| رمز المنتج الموحد | 889523011324 |
9. معلومات الضمان
The GIGABYTE Z370XP SLI motherboard typically comes with a ضمان محدود لمدة سنة واحدة. Warranty terms and conditions may vary by region and retailer. Please retain your proof of purchase for warranty claims. For detailed warranty information, visit the official GIGABYTE webموقع.
10. الدعم الفني
For further assistance, driver downloads, BIOS updates, or troubleshooting not covered in this manual, please visit the official GIGABYTE support webموقع: www.gigabyte.com/support. You may also contact GIGABYTE customer service directly.