1. المقدمة
The Neewer Wall Mounting Triangle Boom Arm is designed to provide a space-saving and versatile solution for mounting various photography and studio equipment. Its robust construction and adjustable features make it ideal for professional and home studio environments, allowing for flexible lighting and equipment positioning without occupying floor space.
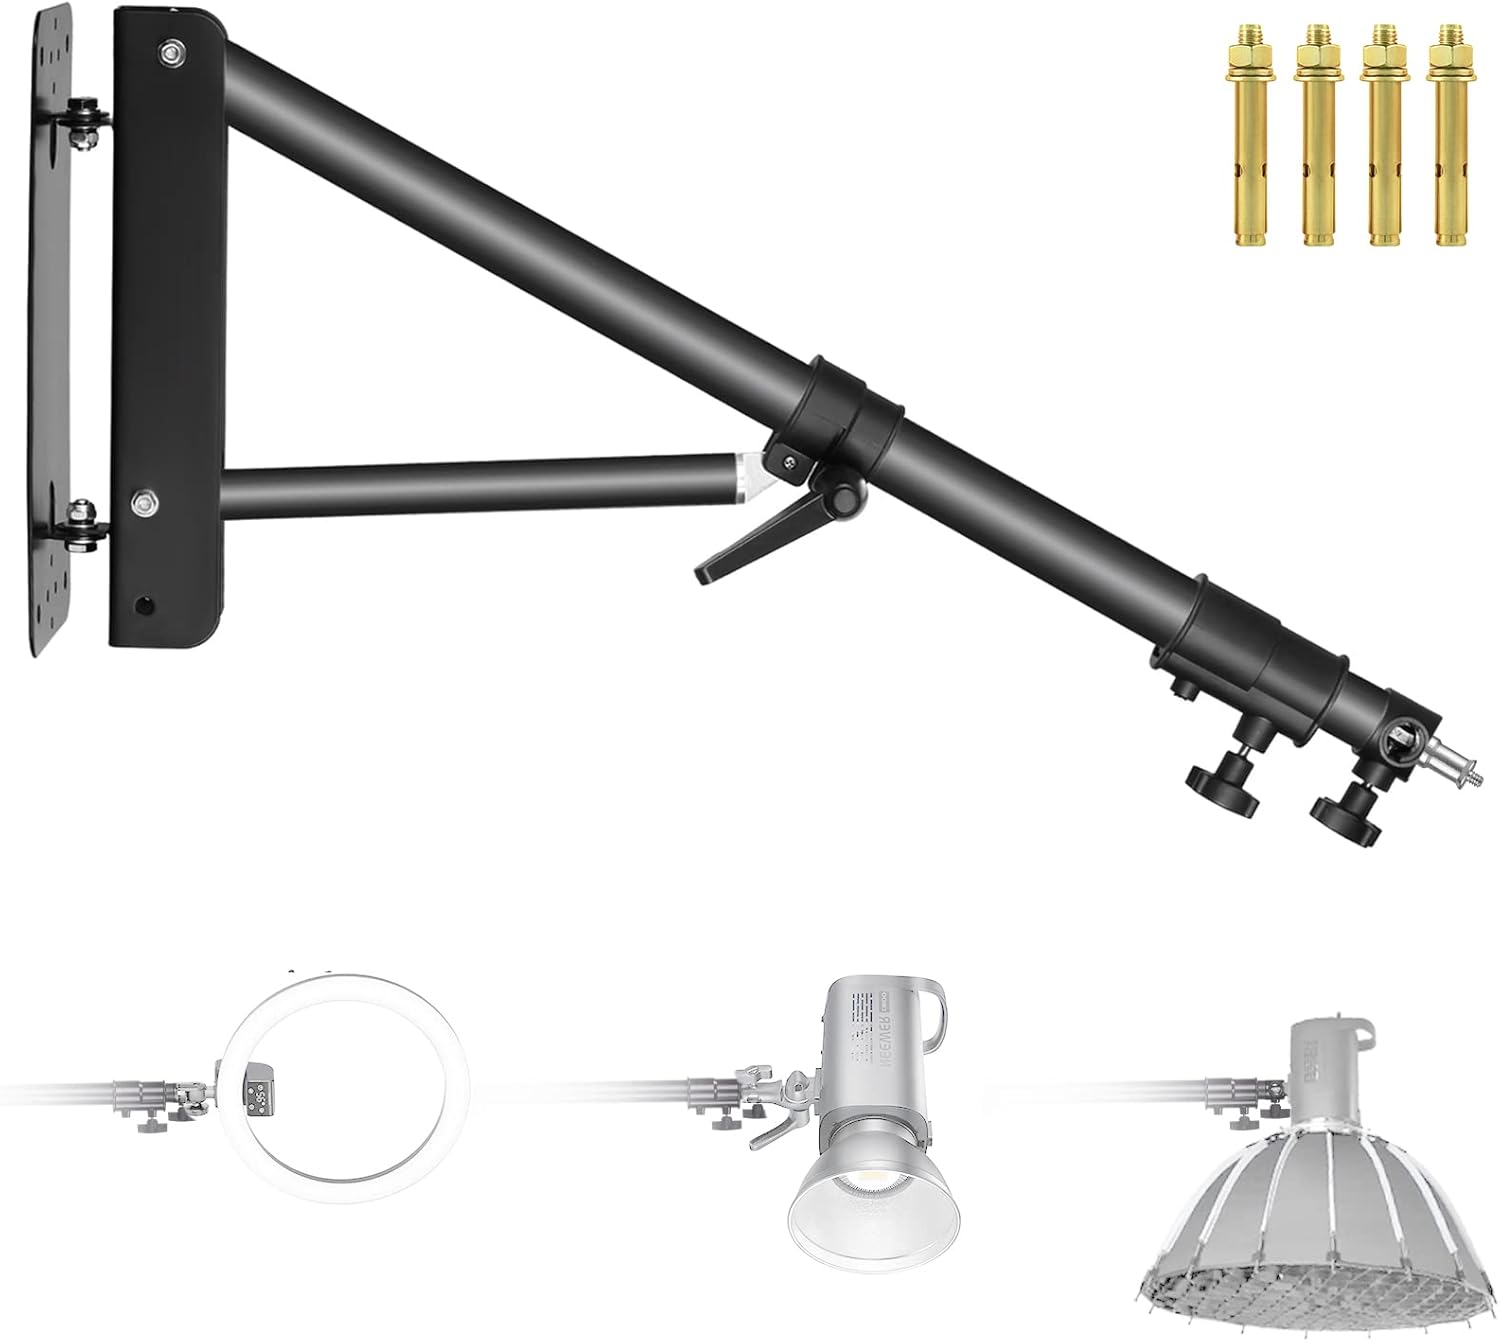
Figure 1: Neewer Wall Mounting Triangle Boom Arm with accessories.
2. محتويات العبوة
يرجى التأكد من أن جميع العناصر المدرجة أدناه متضمنة في الحزمة الخاصة بك:
- 1 x Neewer Wall-Mounted Boom Arm (Model: WB-1250-1)
- 4 × مسامير التوسع

Figure 2: Package contents and key dimensions.
3. مواصفات المنتج
- تطبيق واسع: Designed for photography strobe lights, monolights, ring lights, softboxes, umbrellas, reflectors, and microphones.
- طول قابل للتعديل: The boom arm can be extended up to 4.1 feet (125cm) to meet various setup requirements.
- Dual-Swivel Design: Allows for 0° to 180° rotation both up/down and side-to-side, offering extensive angle adjustments. It can also fold flat against the wall for space-saving storage.
- التثبيت الآمن: Includes 4 expansion screws for firm and secure installation on solid walls.
- Triangle Structure: Enhances the stability of the boom arm.

Figure 3: Key features of the boom arm.
4. الإعداد والتثبيت
Proper installation is crucial for the stability and safety of your equipment. This boom arm is designed for mounting on solid walls.
4.1 Mounting the Base Plate
- ثقوب الحفر: Identify the desired mounting location on a solid wall. Use a drill to create four holes that match the spacing of the base plate and the size of the provided expansion screws.
- أدخل مسامير التمدد: Remove the nuts and washers from the expansion screws. Insert the expansion bolts into the drilled holes.
- قم بتثبيت اللوحة الأساسية: Align the mounting arm wall bracket with the inserted expansion bolts. Replace the washers and nuts, then tighten them securely. The tightening process will cause the metal sleeve of the expansion bolt to expand, firmly securing the bracket to the wall.
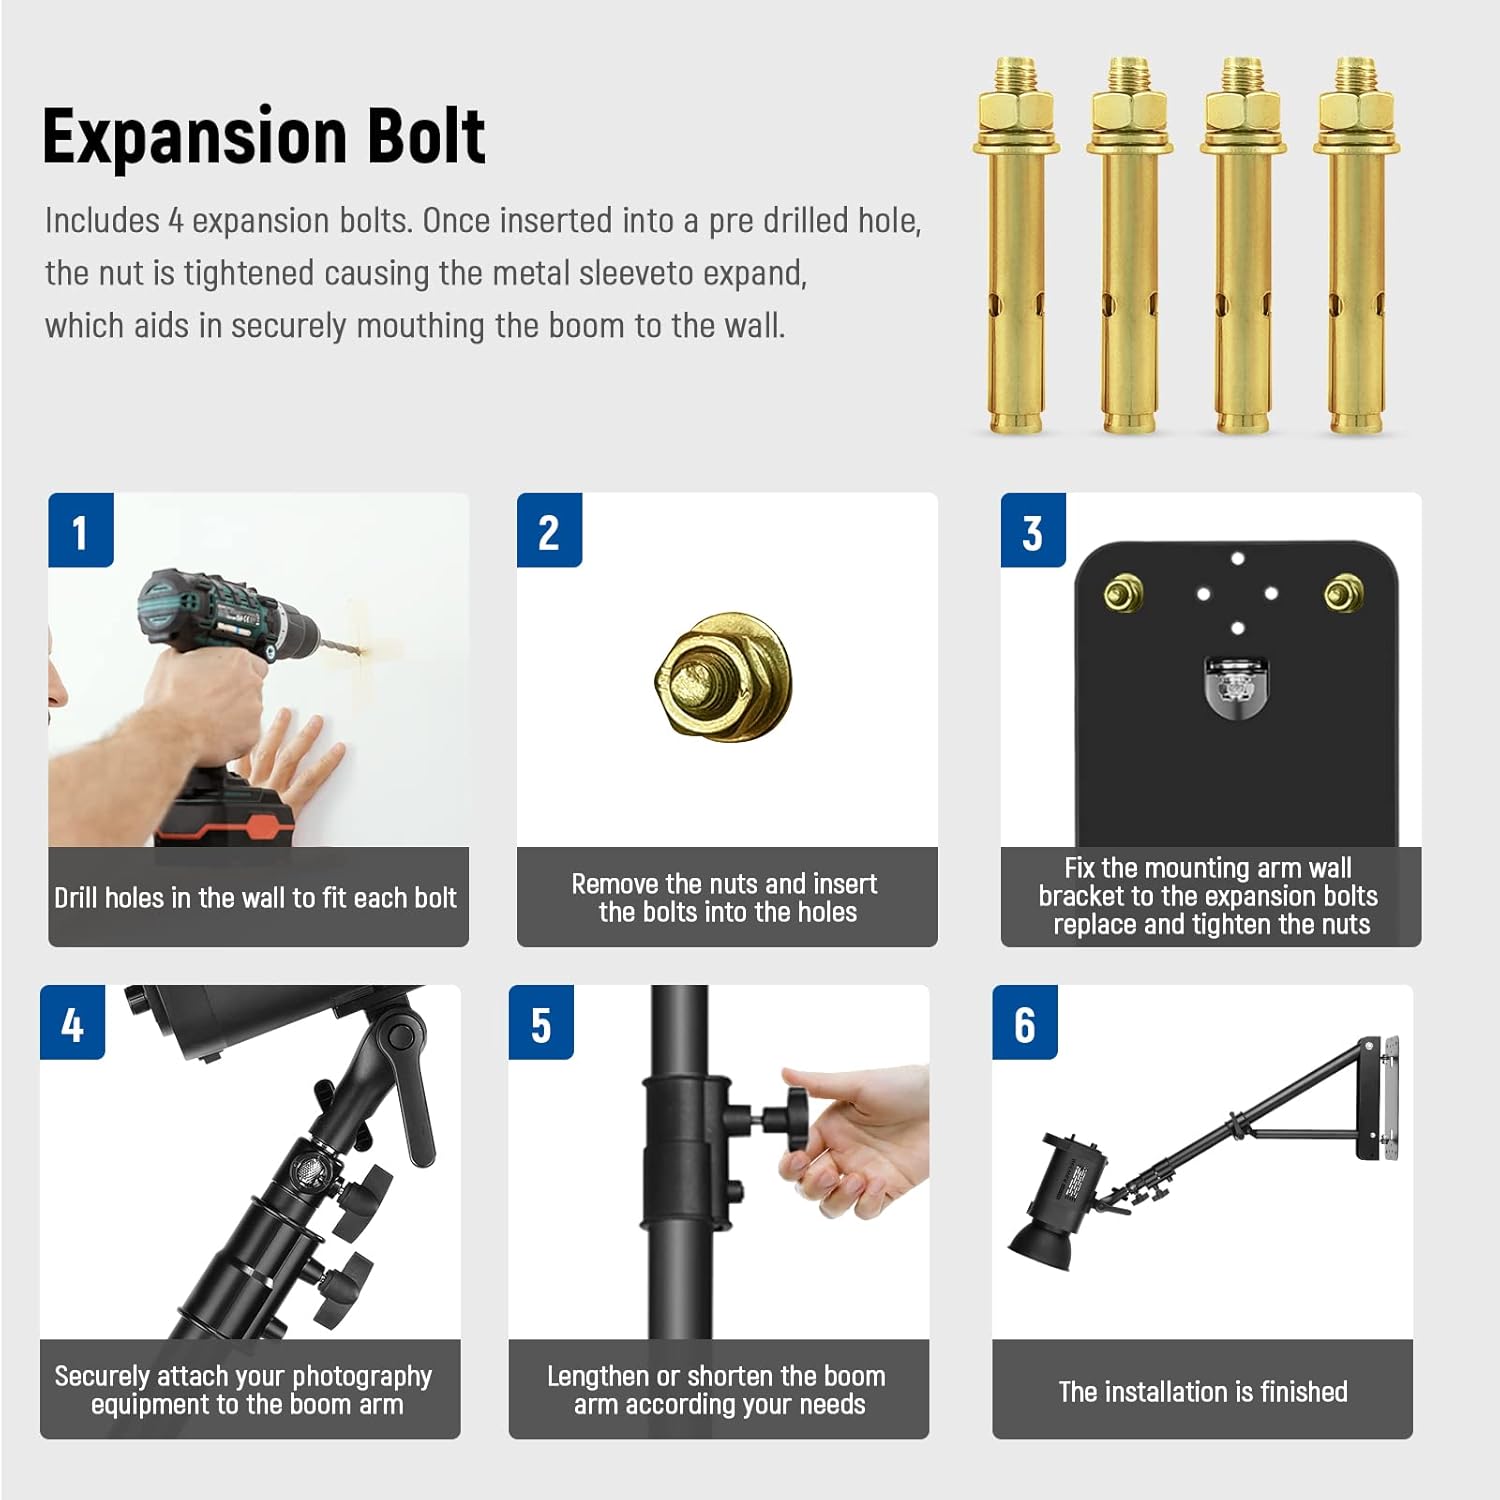
Figure 4: Installation steps for the boom arm.

Figure 5: Detail of an expansion bolt.
4.2 تركيب ذراع الرافعة
The boom arm is pre-assembled to the wall bracket. Ensure all pivot points are tightened before use.
4.3 Adjusting Length and Angle
The boom arm features adjustment knobs to control its length and angle. Loosen the knobs to adjust, then tighten firmly to secure the desired position.

Figure 6: Convenient angle adjustment.
5. Operation & Usage
5.1 Attaching Equipment
The boom arm is equipped with a universal adapter (1/4" and 3/8" screw threads) suitable for most photography equipment. Securely attach your strobe light, monolight, ring light, softbox, or reflector to the end of the boom arm.
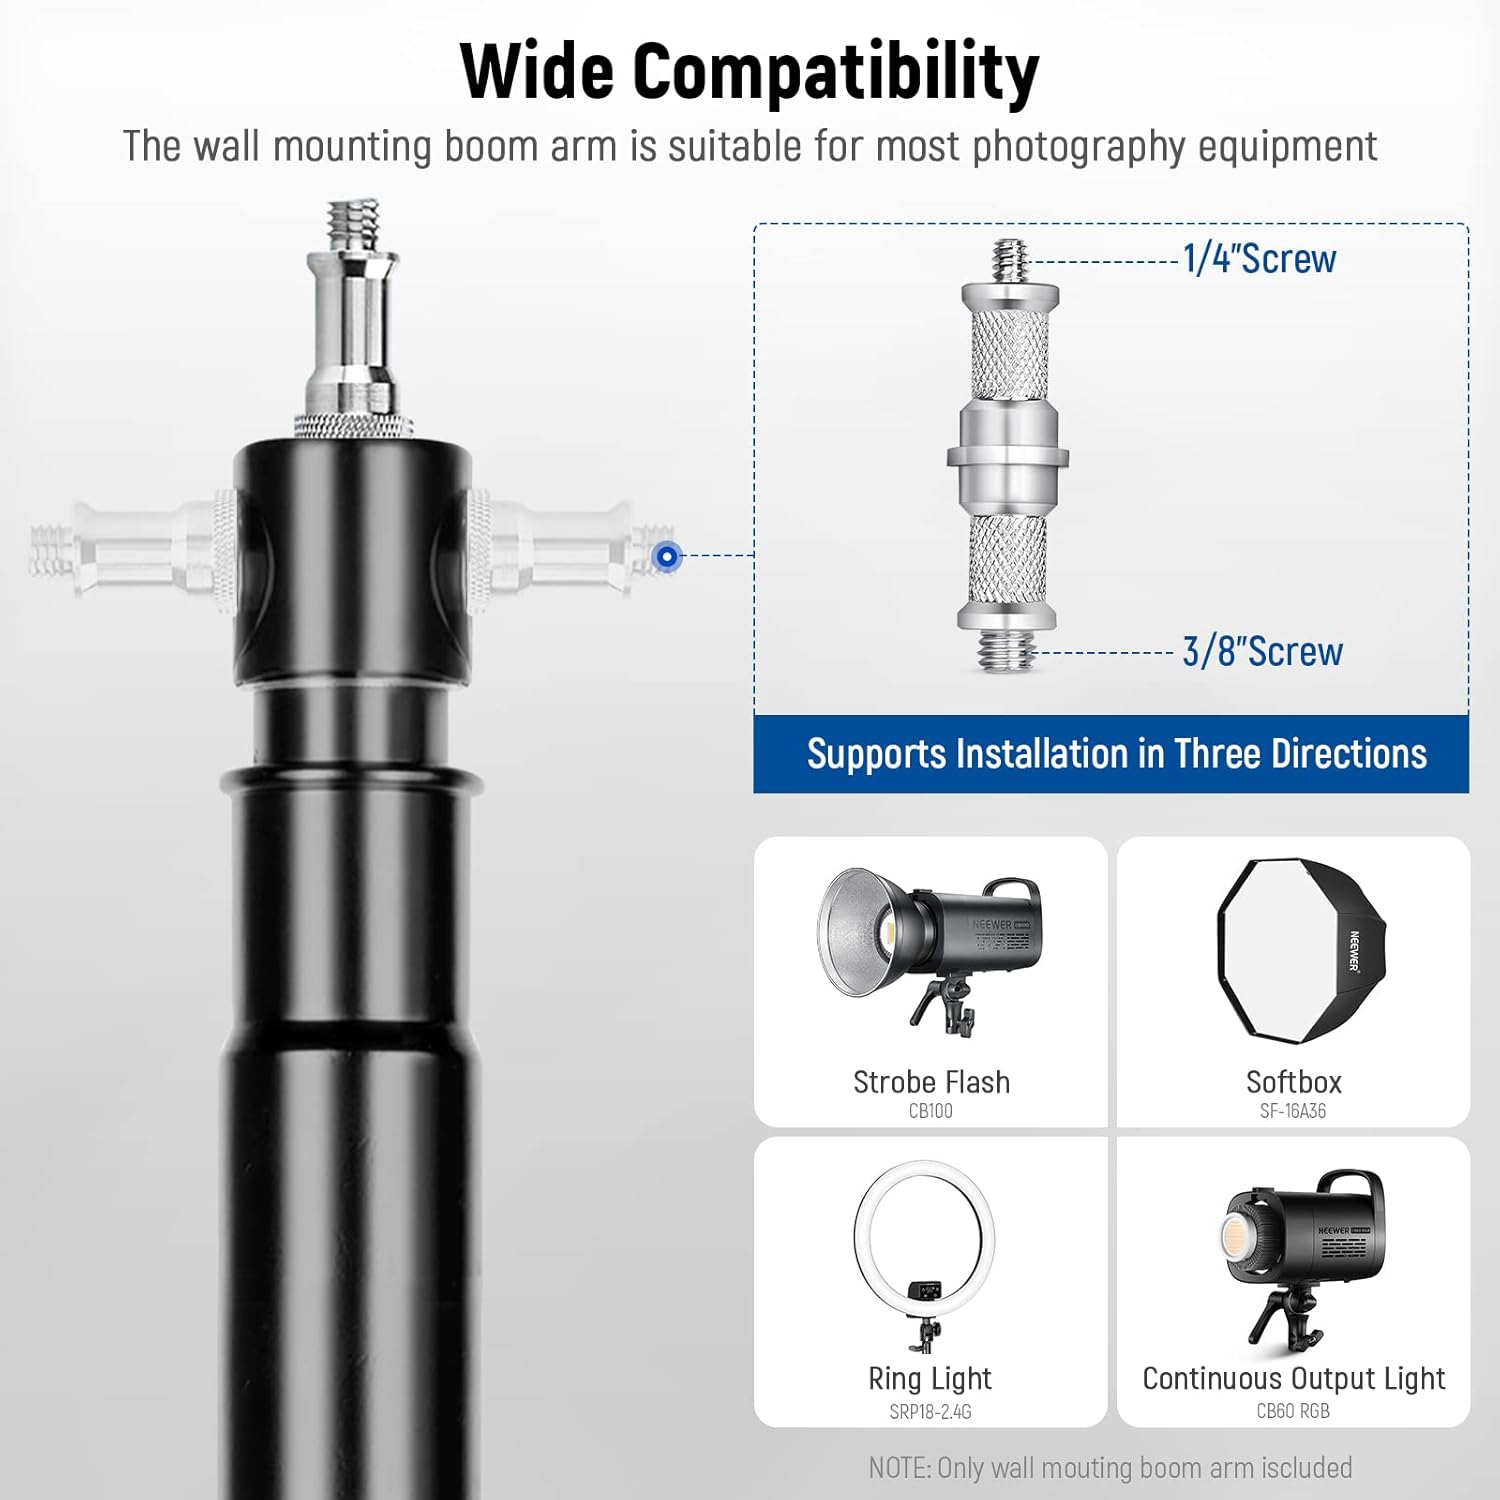
Figure 7: Wide compatibility with various equipment.
5.2 Adjusting Position
Once your equipment is attached, you can adjust the boom arm's position by loosening the relevant knobs, moving the arm to the desired angle or extension, and then tightening the knobs firmly. The dual-swivel design allows for precise positioning to achieve optimal lighting angles.
6. الصيانة
- Regularly inspect all screws and bolts to ensure they remain tight and secure.
- Keep the boom arm clean by wiping it with a soft, dry cloth. Avoid abrasive cleaners.
- Do not exceed the maximum load capacity of the boom arm (refer to specifications).
7. استكشاف الأخطاء وإصلاحها
| مشكلة | السبب المحتمل | حل |
|---|---|---|
| Boom arm feels unstable after installation. | Mounting screws are loose or not properly installed. Wall material is not solid. | Ensure all expansion screws are fully tightened. Verify the wall is solid and suitable for mounting. Consult a professional if unsure. |
| Difficulty adjusting arm length or angle. | Adjustment knobs are too tight or mechanism is stiff. | Loosen adjustment knobs sufficiently before attempting to move the arm. Apply a small amount of silicone lubricant if the mechanism is stiff. |
| Equipment slips from the boom arm. | Equipment not securely fastened to the adapter. | Ensure your equipment is properly screwed onto the 1/4" or 3/8" thread and tightened. |
8. المواصفات
- نموذج: WB-1250-1
- مادة: سبائك الألومنيوم
- الطول الأقصى: 49.2 بوصة (125 سم)
- Min Length: حوالي 29 بوصة (73 سم)
- زاوية الدوران: 180 degrees (up/down, left/right)
- نوع التركيب: Wall-mounted (requires solid wall)
- التوافق: 1/4" and 3/8" screw threads
- أبعاد المنتج: 29.5 × 8.3 × 3.9 بوصة
- وزن السلعة: 5.7 رطل
- الحمولة القصوى: 4kg (8.8 lbs) - Note: Some manuals may state 3kg (6.6 lbs) for ST-WM60 or 2kg (4.4 lbs) for ST-WM100. Refer to the specific model's documentation for precise load limits.
9. الضمان والدعم
For warranty information or technical support, please contact NEEWER customer service through their official website or the platform where the product was purchased. Keep your purchase receipt as proof of purchase.


