
1. المقدمة
The Surecom SW-102 is a compact and versatile digital VHF/UHF antenna power and SWR meter designed for radio enthusiasts and professionals. It provides direct digital readout of VSWR, forward power, and reflected power without the need for calibration. Its low insertion loss allows for permanent connection within your setup. The device also features a built-in frequency counter and displays comprehensive information including frequency, power, SWR, forward power (FW), reflected power (RW), and battery voltage.
2. معلومات السلامة
- لا تعرض الجهاز لدرجات حرارة شديدة أو رطوبة أو أشعة الشمس المباشرة.
- تجنب إسقاط الجهاز أو تعريضه لصدمات شديدة.
- لا تحاول تفكيك الجهاز أو تعديله. سيؤدي ذلك إلى إلغاء الضمان وقد يتسبب في تلفه.
- Use only the specified charger (5V micro USB) to prevent damage to the battery and device.
- Ensure proper connection of all cables and adapters before operation to prevent damage to the meter or connected equipment.
- This device is designed for analog radio systems only and is not compatible with DMR radios.
3. محتويات العبوة
عند فتح العبوة، يرجى التأكد من أن جميع العناصر المذكورة أدناه موجودة وفي حالة جيدة:
- 1x SURECOM SW-102 Meter
- 1x Charger Cable (Micro USB)
- 1x Users Manual
- SL16 to SMA-F Connector (included)
- SL16 to SMA-M Connector (included)
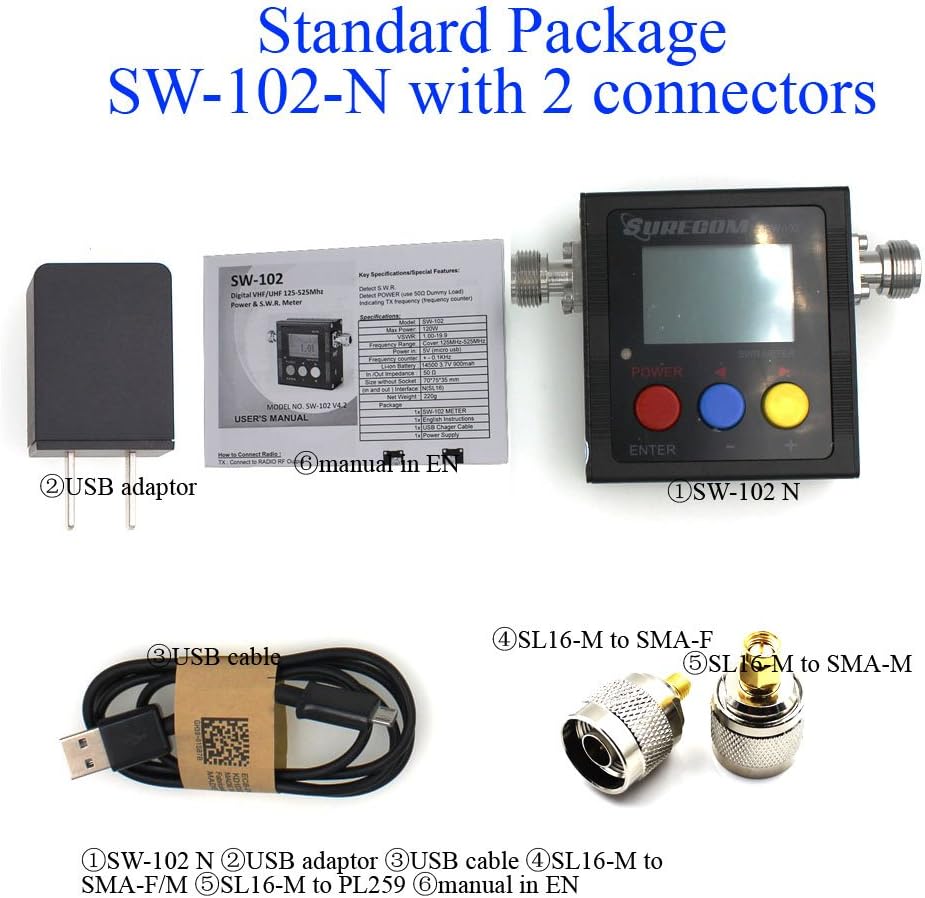
4. انتهى المنتجview
4.1. الميزات الرئيسية
- Direct digital readout of VSWR, Forward Power, and Reflected Power.
- لا حاجة للمعايرة.
- Maximum measurable power range up to 120W.
- Low insertion loss (<0.15dB VHF, <0.25dB UHF) allows permanent connection.
- Built-in Frequency Counter.
- All-function display: Frequency, Power, SWR, FW, RW, Battery voltage.
- Compact and handheld size with large LCD display.
4.2. المكونات والضوابط


The SW-102 features an N-J Interface for connections. Optional accessories such as SL16 to SMA and SL16 to BNC adapters are available to ensure compatibility with various radio and antenna connectors.

5. الإعداد
5.1. Connecting the Meter
To connect the Surecom SW-102, connect the output of your transceiver to the "TX" port on the meter. Then, connect your antenna or dummy load to the "ANT" port. Ensure proper adapters or cables are used if your device has different connector types. The device ships with SL16 to SMA-F and SL16 to SMA-M connectors for common applications.
Watch the video below for a visual guide on connecting the SW-102 to your radio and antenna:
Video 5.1: Demonstration of unboxing, physical overview, and connecting the Surecom SW-102 to a radio and antenna for SWR measurement.
5.2. تشغيل
To power on the SW-102, press and hold the الزر الأحمر for 2 seconds. To power off, press and hold the الزر الأحمر مرة أخرى لمدة 2 ثواني.
6. تعليمات التشغيل
6.1. أخذ القياسات
Once connected and powered on, the SW-102 will display real-time measurements. To measure SWR and power, ensure the meter is in a vertical position and avoid touching the antenna during measurement. Press the PTT (Push-To-Talk) button on your radio to transmit, and the meter will display the VSWR, transmit power, and other relevant data.
المجلدtage Standing Wave Ratio (VSWR) is an indication of the amount of mismatch between an antenna and the feed line connecting to it. The range of values for VSWR is from 1 to ∞. A VSWR value under 2 is considered suitable for most antenna applications. The antenna can be described as having a good match. So when someone says that the antenna is poorly matched, very often it means that the VSWR value exceeds 2 for a frequency of interest.
Video 6.1: Demonstration of taking SWR measurements with the Surecom SW-102, including proper positioning and interpreting the display.
6.2. عرض مقدمة
The LCD display provides comprehensive information at a glance. Key indicators include:
- حالة البطارية
- وقت العمل
- قوة الإرسال (واط)
- تردد الإرسال (ميجاهرتز)
- VSWR (المجلدtag(نسبة الموجة الدائمة)
- Forward Power (FW)
- Reflected Power (RW)
Video 6.2: Detailed introduction to the Surecom SW-102's display, explaining each parameter and its significance.
6.3. Function Memory Save
To save function memory settings:
- اضغط على MENU (Blue button).
- يضعط F1 (Red button) to select a function (1-6).
- اضبط القيم باستخدام Blue button (-) و Yellow button (+).
- اضغط على الزر الأحمر لمدة ثانيتين للتأكيد.
- اضغط على الزر الأزرق to SAVE and EXIT.
7. الصيانة
7.1. شحن البطارية
The SW-102 is equipped with a 3.7V Li-ion rechargeable battery (14500 type). To charge the device, connect the provided USB charger cable to the micro USB port on the side of the meter and plug the other end into a 5V (0.5-1A) USB power source.

Video 7.1: Instructions on how to charge the Surecom SW-102 using the provided USB cable.
7.2. ميزات توفير الطاقة
- يتميز الجهاز بـ إيقاف التشغيل التلقائي function, configurable from 1 to 9 minutes.
- ال الإضاءة الخلفية also has an AUTO OFF feature, configurable from 1 to 9 minutes, to conserve battery life.
8. استكشاف الأخطاء وإصلاحها
- If the device does not power on, ensure the battery is charged.
- If readings are inconsistent, check all cable connections for tightness and proper adapter usage.
- Ensure the SW-102 is used with analog radios only. إنها not compatible with DMR radios.
- For significant discrepancies in SWR readings, verify the antenna's condition and proper installation.
9. المواصفات
| ميزة | مواصفة |
|---|---|
| نطاق التردد | 100 - 520 ميجاهرتز |
| نطاق الطاقة القابل للقياس | 0 - 120 واط |
| الحد الأقصى لقوة الإدخال | 120 واط |
| دقة | +/- 5% |
| نطاق VSWR | 1.00 ~ 19.9 |
| مقاومة | 50 أوم |
| Insertion Loss (VHF) | <0.15 ديسيبل |
| Insertion Loss (UHF) | <0.25 ديسيبل |
| درجة حرارة التشغيل | 0 درجة مئوية ~ 60 درجة مئوية |
| Input Frequency Counter | نعم |
| حجم البطاريةtagالعرض الإلكتروني | نعم |
| نوع البطارية | 3.7V Li-ion Rechargeable Battery (14500) |
| إيقاف التشغيل التلقائي | 1-9 minutes (configurable) |
| مدخل الشاحن | 5 فولت (USB مصغر) |
| إيقاف تشغيل الإضاءة الخلفية تلقائيًا | 1-9 minutes (configurable) |
| Interface (In and Out) | N (SL16) |
| مقاس | 66*68*37 (مم) |
| وزن | 220 جرام |
| وزن العنصر | 13.4 أونصات |
| أبعاد الحزمة | 7.76 × 5.43 × 1.81 بوصة |
10. الضمان والدعم
Specific warranty information and detailed support contacts are not provided in this manual. Please refer to the product packaging or the manufacturer's official website for warranty details and customer support options.