
KitchenAid 5KMT223GOB
KitchenAid 5KMT223GOB 2-Slot Automatic Toaster
دليل المستخدم
الضمانات الهامة
عند استخدام الأجهزة الكهربائية، يجب دائمًا اتباع احتياطات السلامة الأساسية، بما في ذلك ما يلي:
- اقرأ كافة التعليمات قبل تشغيل محمصة الخبز.
- لا تلمس الأسطح الساخنة. استخدم المقابض أو الأزرار.
- للحماية من الصدمات الكهربائية، لا تغمر السلك أو المقابس أو محمصة الخبز في الماء أو أي سائل آخر.
- من الضروري المراقبة الدقيقة عند استخدام أي جهاز بواسطة الأطفال أو بالقرب منه.
- افصل الجهاز عن المقبس عند عدم استخدامه وقبل التنظيف. اتركه ليبرد قبل تركيب أو خلع الأجزاء.
- لا تقم بتشغيل أي جهاز به سلك أو قابس تالف ، أو بعد تعطل الجهاز أو تعرضه للتلف بأي شكل من الأشكال. أعد الجهاز إلى أقرب مركز خدمة معتمد لفحصه أو إصلاحه أو تعديله.
- قد يؤدي استخدام ملحقات غير موصى بها من قبل الشركة المصنعة للجهاز إلى حدوث إصابات.
- لا تستخدمه في الهواء الطلق.
- لا تترك السلك يتدلى على حافة الطاولة أو المنضدة، أو يلامس الأسطح الساخنة.
- لا تضعه على أو بالقرب من موقد غاز أو كهرباء ساخن، أو في فرن ساخن.
- احرص دائمًا على توصيل القابس بالجهاز أولًا، ثم وصل السلك بمقبس الحائط. لفصله، أطفئ أي جهاز تحكم، ثم افصل القابس من مقبس الحائط.
- لا تستخدم الجهاز لغير الغرض المخصص له.
- لا يجوز إدخال الأطعمة كبيرة الحجم، أو العبوات المعدنية، أو الأواني في محمصة الخبز لأنها قد تنطوي على خطر الحريق أو الصدمة الكهربائية.
- قد يحدث حريق إذا تم تغطية أجهزة تحميص الخبز أو ملامستها لمواد قابلة للاشتعال، بما في ذلك الستائر والجدران وما شابه ذلك، أثناء التشغيل.
- لا تحاول إخراج الطعام من داخل جهاز التحميص أثناء توصيله بالكهرباء.
- لا تعمل بدون مراقبة.
الأجزاء والميزات
Familiarize yourself with the components of your KitchenAid 2-Slot Automatic Toaster for optimal use.
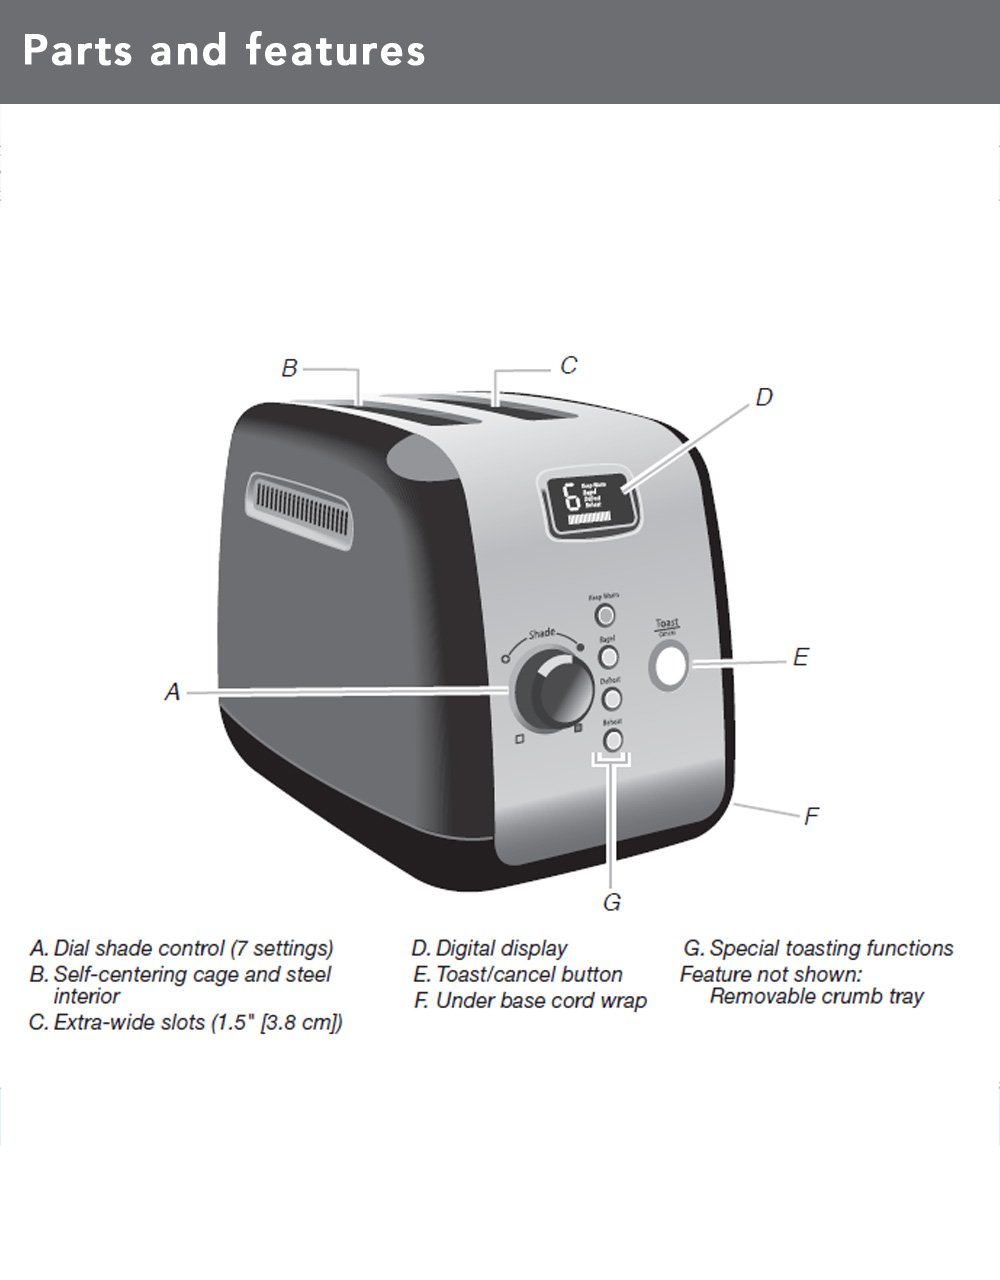
صورة: Labeled diagram of the KitchenAid 2-Slot Automatic Toaster, highlighting its various parts.
- A. Dial Shade Control (7 settings): Adjusts the browning level of your toast.
- B. Self-Centering Cage and Steel Interior: Ensures even toasting for various bread thicknesses.
- C. Extra-Wide Slots (1.5" / 3.8 cm): Accommodates thick crumpets, breads, or pastries.
- د. العرض الرقمي: Shows selected shade setting and a countdown timer for toasting progress.
- E. Toast/Cancel Button: Initiates or stops the toasting cycle at any point.
- F. Under Base Cord Wrap: Provides convenient cord storage.
- G. Special Toasting Functions: Includes Keep Warm, Bagel, Defrost, and Reheat buttons.
- Feature not shown: Removable Crumb Tray for easy cleaning.

صورة: انتهىview of the KitchenAid 2-Slot Automatic Toaster, detailing its key features such as extra-wide slots, shade control dial, Keep Warm feature, and Toast/Cancel button.
يثبت
التفريغ والتنسيب
- قم بإزالة المحمصة وجميع مواد التغليف بعناية.
- Place the toaster on a dry, flat, stable surface, away from the edge of the counter.
- Ensure there is adequate clearance around the toaster for proper ventilation, especially from flammable materials like curtains.
- Unwind the power cord and plug it into a grounded 240-volt electrical outlet.
الاستخدام الأول
Before toasting food for the first time, operate the toaster without bread for one cycle at the highest shade setting. This will burn off any manufacturing residues and eliminate any odors. A slight odor or smoke is normal during this initial use.
تعليمات التشغيل
تحميص الخبز

صورة: The KitchenAid 2-Slot Automatic Toaster actively toasting two slices of bread, demonstrating its function.
- Insert up to two slices of bread or other items into the toasting slots. The self-centering racks will automatically adjust to hold the bread.
- حدد مستوى التحمير المطلوب باستخدام قرص التحكم في الظل. Settings range from 1 (lightest) to 7 (darkest). The digital display will show the selected shade.
- اضغط على Toast/Cancel button. The motorized lift will automatically lower the bread into the toasting slots, and the toasting cycle will begin. The digital display will show a countdown timer.
- Once the toasting cycle is complete, the bread will automatically be raised.
- لإيقاف دورة التحميص في أي وقت، اضغط على Toast/Cancel button again. The bread will automatically raise.
وظائف خاصة
Your toaster includes several specialized functions for different toasting needs:
- ابقى دافئا: Press this button after a toasting cycle to keep toasted foods warm for up to one minute without additional browning. The motorized lift will lower the toast and keep it warm.
- باجل: This function toasts the cut-side of a bagel while gently warming the outer surfaces. Insert bagels with the cut side facing inwards. Select your shade and press the Bagel button, then the Toast/Cancel button.
- تذويب: Defrosts and toasts frozen food. Insert frozen bread, select your shade, and press the Defrost button, then the Toast/Cancel button. The toaster will automatically adjust the toasting time.
- إعادة التسخين: Quickly reheats previously toasted food without further browning. Insert the toasted item, and press the Reheat button, then the Toast/Cancel button.
العناية والتنظيف
Regular cleaning ensures the longevity and optimal performance of your toaster.
تنظيف صينية الفتات
- تأكد من فصل محمصة الخبز عن الكهرباء وأنها باردة تماماً.
- حدد مكان صينية الفتات القابلة للإزالة في أسفل المحمصة.
- اسحب صينية الفتات لإزالة الفتات المتراكم.
- Empty the crumbs into a waste bin. The crumb tray can be washed in the top rack of a dishwasher or by hand with warm, soapy water. Rinse thoroughly and dry completely before reinserting.
- أعد وضع صينية الفتات في مكانها حتى تسمع صوت طقطقة عند تثبيتها بإحكام.
تنظيف الجزء الخارجي
- افصل محمصة الخبز عن الكهرباء واتركها حتى تبرد تمامًا.
- امسح الجزء الخارجي من محمصة الخبز بالإعلانamp لا تستخدم المنظفات الكاشطة أو الإسفنجات الكاشطة، لأنها قد تخدش السطح.
- Ensure no moisture enters the toasting slots or electrical components.
- جفف جيدًا باستخدام قطعة قماش ناعمة.
استكشاف الأخطاء وإصلاحها
If you experience issues with your toaster, refer to the following common problems and solutions:
| مشكلة | السبب المحتمل | حل |
|---|---|---|
| لا يتم تشغيل محمصة الخبز. | غير متصل بالكهرباء؛ الطاقة غير متوفرةtagهـ؛ قاطع الدائرة الكهربائية انقطع. | تأكد من توصيل المحمصة بشكل صحيح بمأخذ كهربائي يعمل. تحقق من قاطع الدائرة الكهربائية في منزلك. |
| Bread does not lower or raise. | Motorized lift malfunction; Toast/Cancel button not pressed. | Ensure the toaster is plugged in and the Toast/Cancel button is pressed firmly. If the issue persists, contact customer service. |
| تحميص غير متساوي. | Bread not centered; crumb tray full; internal element issue. | The self-centering racks should position bread correctly. Empty and clean the crumb tray. If unevenness persists, contact customer service. |
| رائحة دخان أو حريق. | Crumbs in toaster; food stuck; first use residue. | Immediately press the Cancel button and unplug the toaster. Allow to cool. Clean the crumb tray. Remove any stuck food carefully (only when unplugged and cool). Initial use may produce some smoke/odor. |
If the problem persists after attempting these solutions, please contact KitchenAid Customer Service.
تحديد
- ماركة: كيتشن إيد
- نموذج: 5KMT223GOB
- قوة: 1100 واط
- المجلدtage: 240 فولت
- عدد الشرائح: 2
- Slot Count: 2
- عرض الفتحة: 3.8 cm (Extra-wide)
- إعدادات الظل: 7
- المميزات الخاصة: Cancel Function, Touchscreen (Digital Display), Motorized Lift, Keep Warm, Bagel, Defrost, Reheat functions.
- وزن السلعة: 5.64 رطل
- بناء: All metal (stainless steel housing and steel interior)
الضمان والخدمة
معلومات الضمان
This KitchenAid 5KMT223GOB 2-Slot Automatic Toaster comes with a ضمان لمدة سنة من تاريخ الشراء. يُرجى الاحتفاظ بإيصال الشراء للمطالبة بالضمان.
The warranty covers defects in materials and workmanship under normal household use. It does not cover damage resulting from misuse, abuse, accidents, alterations, or commercial use.
خدمة العملاء
For technical assistance, service, or warranty claims, please contact KitchenAid Customer Service. Refer to the contact information provided in your product packaging or visit the official KitchenAid webموقع لمنطقتك.
When contacting customer service, please have your product model number (5KMT223GOB) and serial number (if applicable) ready.
Ask a question about this manual
Ask about setup, troubleshooting, compatibility, parts, safety, or missing instructions. Manuals+ will review the question and use this page’s manual context to help answer it.