
1. تعليمات السلامة الهامة
عند استخدام الأجهزة الكهربائية، يجب اتباع احتياطات السلامة الأساسية، بما في ذلك ما يلي:
- اقرأ كافة التعليمات قبل استخدام الجهاز.
- لا تحاول تشغيل هذا الفرن مع ترك الباب مفتوحًا لأن هذا قد يؤدي إلى التعرض الضار لطاقة الميكروويف.
- لا تضع أي شيء بين الواجهة الأمامية للفرن والباب ولا تسمح للأتربة أو بقايا المنظف بالتراكم على الأسطح المغلقة.
- لا تقم بتشغيل الفرن في حالة تلفه. من المهم بشكل خاص أن يغلق باب الفرن بشكل صحيح ولا يوجد أي تلف في: (1) الباب (مثني) ، (2) المفصلات والمزالج (مكسورة أو مفكوكة) ، (3) أختام الباب وأسطح منع التسرب.
- لا يجوز تعديل الفرن أو إصلاحه من قبل أي شخص باستثناء أفراد الخدمة المؤهلين بشكل صحيح.
- تأكد من أن الجهاز مؤرض بشكل صحيح.
- لا تغمر السلك أو القابس في الماء.
- من الضروري المراقبة الدقيقة عند استخدام الجهاز بواسطة الأطفال أو بالقرب منه.
- لا تستخدم الفرن لأغراض أخرى غير تسخين الطعام.
2. انتهى المنتجview
2.1. Microwave Oven Components

الشكل 1: الجبهة view of the Sharp R-369T Microwave Oven, showcasing its 33L capacity, 6 microwave power levels, and various cooking functions.
The Sharp R-369T is a 33-liter solo microwave oven designed for efficient food preparation. It features a sleek silver finish and a black glass door. Key components include the oven cavity, glass turntable, control panel, and door with a push-open mechanism.

الشكل 2: الداخلية view of the microwave oven, showing the spacious 33L cavity and the removable glass turntable for even cooking.
The interior includes a 272mm glass turntable that rotates during operation to ensure food is heated evenly. The oven door opens with a simple push mechanism.
2.2. لوحة التحكم
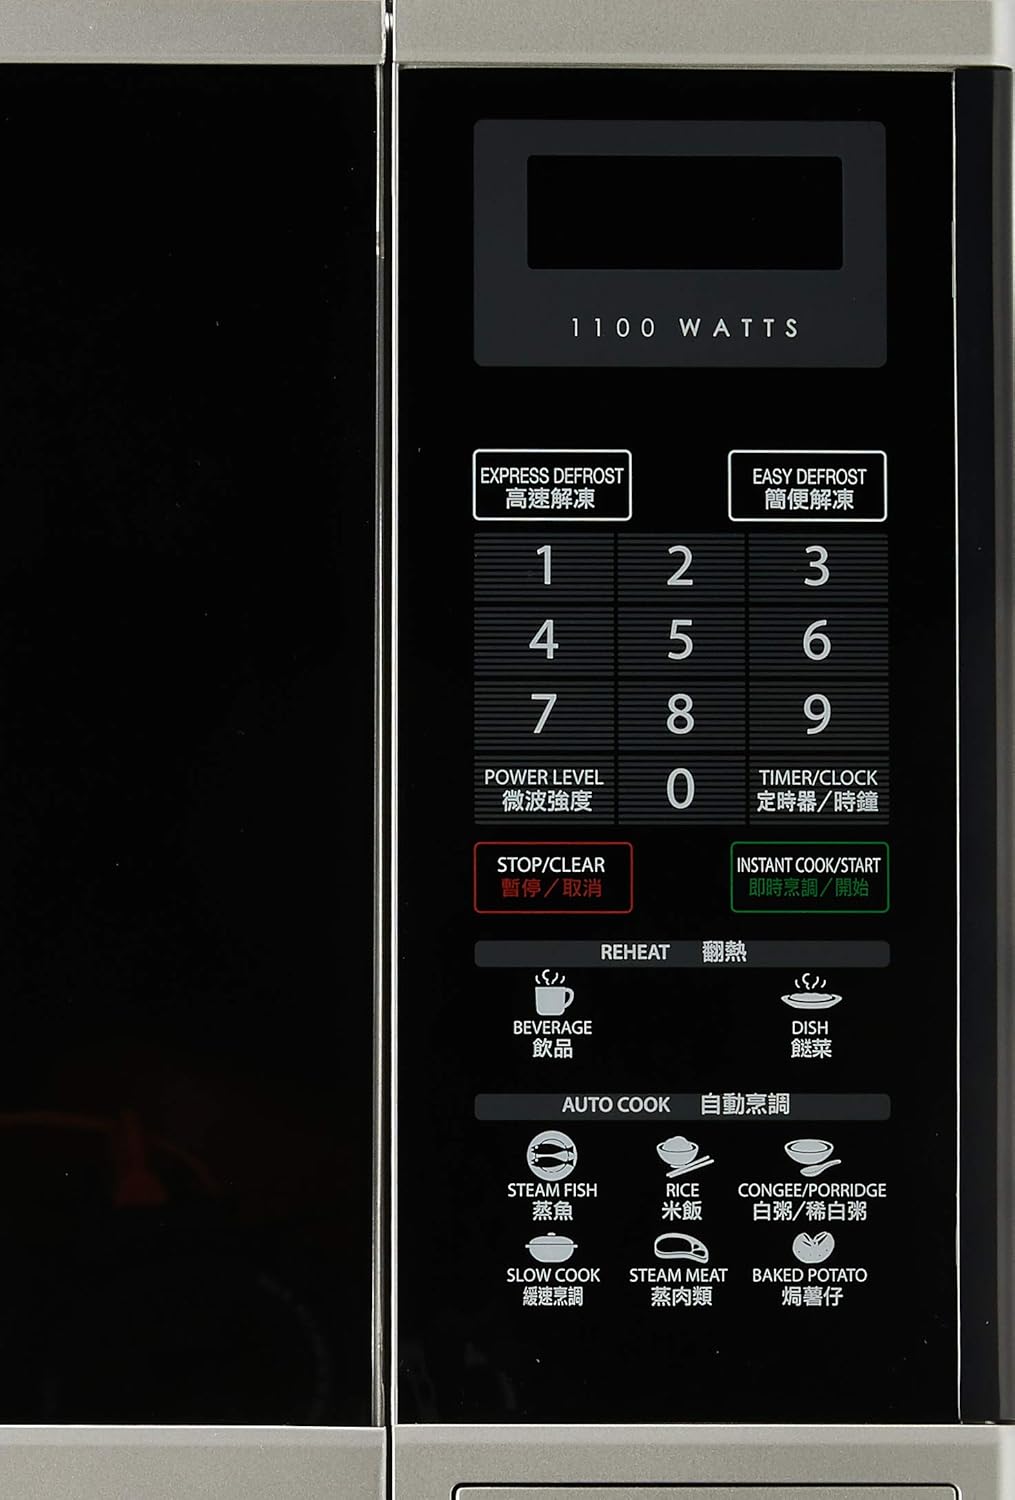
الشكل 3: مفصل view of the control panel, featuring numerical keys, function buttons, and the digital display.
The control panel is located on the right side of the oven and features a digital display, numerical keypad (0-9), and various function buttons:
- EXPRESS DEFROST / EASY DEFROST: For quick and convenient defrosting.
- مستوى الطاقة: ضبط خرج طاقة الميكروويف.
- الموقت/الساعة: Sets the cooking timer or the current time.
- إيقاف/مسح: يوقف العملية الحالية أو يمسح الإعدادات.
- INSTANT COOK/START: Starts cooking immediately or confirms settings.
- إعادة التسخين: Dedicated buttons for reheating beverages and dishes.
- AUTO COOK: Pre-programmed settings for various food types like Steam Fish, Rice, Congee/Porridge, Slow Cook, Steam Meat, and Baked Potato.
3. الإعداد والتثبيت
3.1. فك التعبئة
Carefully remove the microwave oven and all packing materials from the carton. Check the oven for any damage, such as dents or a misaligned door. Do not operate the oven if it is damaged. Contact your dealer or authorized service center.
3.2. تحديد مستوى
- Place the oven on a flat, stable surface strong enough to hold its weight (approximately 17kg).
- Ensure adequate ventilation. Leave a minimum of 10 cm (4 inches) clearance at the rear, 20 cm (8 inches) at the top, and 5 cm (2 inches) on each side for proper airflow.
- لا تسد فتحات الهواء.
- أبقِ الفرن بعيداً عن مصادر الحرارة أو البخار أو السوائل المتناثرة.
- لا تضع الفرن بالقرب من جهاز راديو أو تلفزيون، فقد يتسبب ذلك في حدوث تداخل.
3.3 الربط الكهربائي

الشكل 4: خلفي view of the microwave oven, illustrating the power cord connection and important safety warnings regarding microwave energy.
- Plug the oven into a properly grounded 220V, 50Hz AC outlet with a dedicated circuit.
- لا تستخدم أسلاك تمديد أو محولات.
- تأكد من أن سلك الطاقة غير تالف أو مضغوط.
4. تعليمات التشغيل
4.1. ضبط الساعة
- اضغط على مؤقت / ساعة الزر مرة واحدة.
- Use the numerical keypad to enter the current time (e.g., 12:30 for 12:30 PM).
- اضغط على مؤقت / ساعة اضغط على الزر مرة أخرى للتأكيد.
4.2. أساسيات الطبخ في الميكروويف
- ضع الطعام في وعاء آمن للاستخدام في الميكروويف على القرص الزجاجي الدوار.
- أغلق باب الفرن جيدًا.
- اضغط على مستوى الطاقة button repeatedly to select the desired power level (e.g., P100 for 100% power, P80 for 80% power). The oven offers 6 microwave power levels.
- Use the numerical keypad to enter the cooking time.
- يضعط INSTANT COOK/START لبدء الطبخ.
4.3. تذويب
The oven offers two defrost functions:
- EXPRESS DEFROST: For quick defrosting of smaller items. Follow on-screen prompts or manual for specific weight settings.
- EASY DEFROST: For more controlled defrosting. Refer to the manual for weight and food type guidelines.
- ضع الطعام المجمد على القرص الدوار.
- اضغط على أي منهما تذويب سريع or EASY DEFROST.
- Enter the weight of the food using the numerical keypad.
- يضعط INSTANT COOK/START.
4.4. Reheat Functions
The oven includes 2 Reheat Menu keys for common items:
- المشروبات: For reheating drinks.
- DISH: For reheating prepared meals.
- Place the item to be reheated on the turntable.
- اضغط على الزر المناسب تهيئ button (BEVERAGE or DISH).
- The oven will automatically set the time. Press INSTANT COOK/START للبدء.
4.5. Auto Cook Functions
ال كوك السيارات menu provides pre-programmed settings for various foods:
- السمك بالبخار
- أرز
- CONGEE/PORRIDGE
- طبخ بطيء
- لحم مطهو على البخار
- بطاطس مخبوزة
- Place the food in a suitable container on the turntable.
- اضغط على المطلوب كوك السيارات زر.
- Select the quantity or weight if prompted (refer to the full manual for specific auto cook settings).
- يضعط INSTANT COOK/START.
5. الصيانة والتنظيف
إن التنظيف المنتظم لفرن الميكروويف الخاص بك سيضمن له طول عمره وكفاءة تشغيله.
5.1. التنظيف الخارجي
- امسحي الأسطح الخارجية بقطعة ناعمة ، دamp قطعة قماش.
- لا تستخدم المنظفات الكاشطة أو المواد الكيميائية القاسية.
5.2. التنظيف الداخلي
- Clean the oven cavity after each use with a mild detergent and a soft cloth.
- لإزالة بقع الطعام العنيدة، ضع وعاءً من الماء مع شرائح الليمون بداخله، ثم سخّنه في الميكروويف على درجة حرارة عالية لمدة دقيقتين إلى ثلاث دقائق. سيساعد البخار على تليين البقايا، مما يسهل تنظيفها.
- تأكد من نظافة أختام الأبواب وأسطح منع التسرب للحفاظ على التشغيل السليم.
5.3. القرص الدوار الزجاجي
- يمكن إزالة القرص الزجاجي الدوار وحلقة الأسطوانة للتنظيف.
- اغسلهم بالماء الدافئ والصابون أو في غسالة الأطباق.
- تأكدي من أنها جافة تمامًا قبل وضعها مرة أخرى في الفرن.
6. استكشاف الأخطاء وإصلاحها
قبل الاتصال بالخدمة، تحقق من المشكلات الشائعة التالية:
| مشكلة | السبب المحتمل | حل |
|---|---|---|
| الفرن لا يبدأ | سلك الطاقة غير موصول؛ الباب غير مغلق بشكل صحيح؛ المصهر محترق أو قاطع الدائرة معطل. | Plug in power cord; Close door securely; Check fuse or reset circuit breaker. |
| الطعام لا يسخن | وقت طهي غير صحيح أو مستوى طاقة غير مضبوط؛ الباب غير مغلق بشكل صحيح. | Adjust time/power; Ensure door is latched. |
| القرص الدوار لا يدور | القرص الدوار غير مثبت بشكل صحيح؛ يوجد عائق أسفل القرص الدوار. | أعد وضع القرص الدوار وحلقة البكرات؛ أزل أي عوائق. |
| شرارات داخل الفرن | Metal or foil in oven; Food splatters. | أزل الأجسام المعدنية؛ ونظف الجزء الداخلي للفرن جيداً. |
If the problem persists after checking these points, please contact an authorized service technician.
7. المواصفات
| ماركة | حاد |
| نموذج | آر-369 تي |
| سعة | 33 لتر |
| طاقة الإخراج | 800 واط (ميكروويف) |
| واتtage | 1100 watts (Input) |
| قطر القرص الدوار | 272 ملم |
| الأبعاد الخارجية (العرض × الارتفاع × العمق) | 520 × 310 × 448 ملم |
| وزن | 16.96 كجم |
| المجلدtage | 220 فولت |
| تكرار | 50 هرتز |
| مادة | فُولاَذ |
| المميزات الخاصة | Programmable, 6 Microwave Power Levels, 2 Reheat Menu Keys, Easy Defrost, Slow Cook Key, Black Glass Door |

Figure 5: Dimensional drawing of the Sharp R-369T Microwave Oven, illustrating its width (520 mm / 52 cm), height (310 mm / 31 cm), and depth (448 mm / 44.8 cm).
8. الضمان والدعم
للحصول على معلومات الضمان ودعم العملاء، يرجى الرجوع إلى بطاقة الضمان المرفقة مع المنتج أو زيارة موقع شارب الرسمي. webالموقع الإلكتروني الخاص بمنطقتك. احتفظ بإيصال الشراء كإثبات للشراء لأي مطالبات تتعلق بالضمان.
For technical assistance or service inquiries, please contact Sharp customer service.