
1. المقدمة
This manual provides essential instructions for the installation, operation, and maintenance of your HP Compaq 6005 Pro Socket AM3 System Motherboard (P/N 531966-001). This motherboard is designed for use in personal computers and supports AMD Socket AM3 processors. Please read this manual thoroughly before proceeding with installation or operation.
2. معلومات السلامة
يرجى مراعاة احتياطات السلامة التالية لمنع تلف اللوحة الأم أو الإصابة الشخصية:
- افصل دائمًا مصدر الطاقة من مأخذ الحائط قبل تثبيت أو إزالة أي مكونات.
- Wear an anti-static wrist strap and work on an anti-static mat to prevent electrostatic discharge (ESD) damage to sensitive components.
- أمسك اللوحة الأم من حوافها، وتجنب ملامستها للمكونات والموصلات.
- تأكد من وجود تهوية مناسبة داخل علبة الكمبيوتر لمنع ارتفاع درجة الحرارة.
- إذا كنت غير متأكد من أي خطوة من خطوات التثبيت، فاستشر فنيًا مؤهلًا.
3. Motherboard Components Overview
Familiarize yourself with the key components and connectors on your HP Compaq 6005 Pro motherboard.

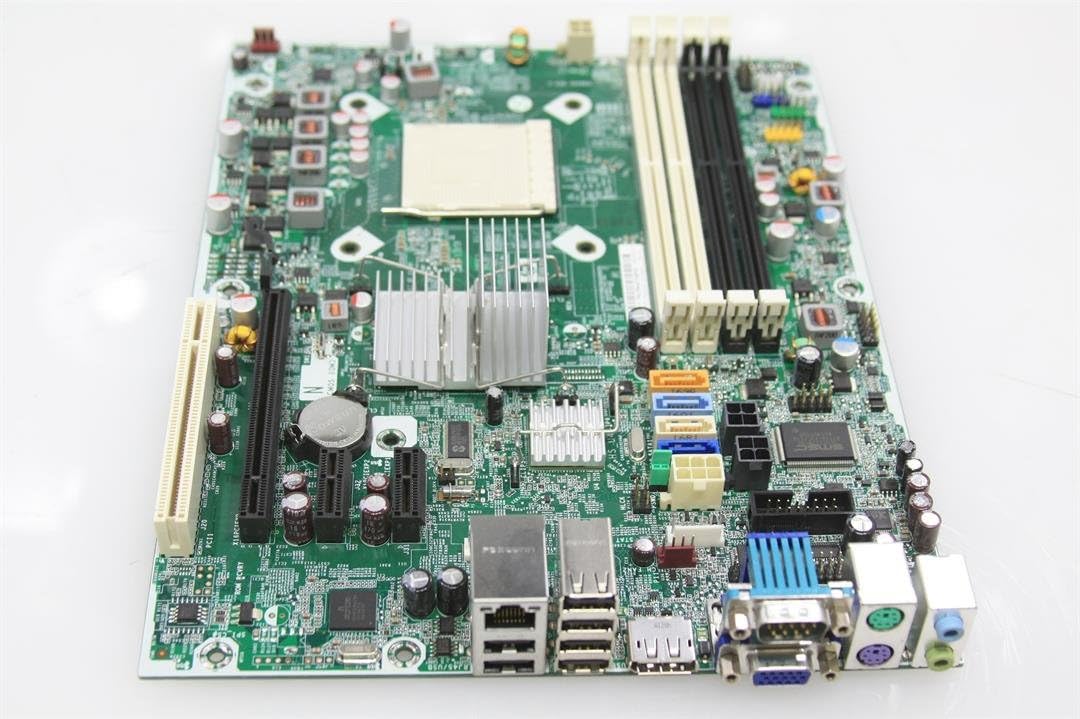
الشكل 3.1: من أعلى إلى أسفل view of the HP Compaq 6005 Pro motherboard, showing the CPU socket, RAM slots, and various chipsets.
The motherboard features an AMD Socket AM3 for compatible processors, four DDR3 DIMM slots for memory, and various expansion slots for additional cards. The rear I/O panel provides connectivity for peripherals.
الشكل 3.2: Rear I/O panel of the HP Compaq 6005 Pro motherboard, featuring VGA, DisplayPort, DVI, USB ports, Ethernet, and audio jacks.
Key areas include:
- مقبس وحدة المعالجة المركزية (AM3): For installing the central processing unit.
- فتحات DIMM: For installing DDR3 memory modules.
- فتحات PCIe: لبطاقات الرسومات وبطاقات التوسعة الأخرى.
- منافذ SATA: For connecting storage devices like hard drives and SSDs.
- موصلات الطاقة: Main 24-pin ATX and 4-pin CPU power connectors.
- موصلات اللوحة الأمامية: For case buttons, LEDs, and front USB/audio ports.

الشكل 3.3: Another perspective of the HP Compaq 6005 Pro motherboard, highlighting expansion slots and internal connectors.
4. الإعداد والتثبيت
اتبع الخطوات التالية لتثبيت اللوحة الأم ومكوناتها بشكل صحيح.
4.1. قائمة التحقق قبل التثبيت
- Computer case with appropriate standoffs.
- Compatible AMD Socket AM3 processor.
- DDR3 memory modules.
- CPU cooler with thermal paste.
- وحدة إمداد الطاقة (PSU).
- Screwdriver and anti-static wrist strap.
4.2. تركيب اللوحة الأم
- Install the I/O shield into the computer case's rear opening.
- قم بوضع اللوحة الأم داخل العلبة بعناية، مع محاذاة فتحات البراغي مع الحوامل.
- قم بتثبيت اللوحة الأم بالمسامير، مع التأكد من تثبيتها بإحكام ولكن دون إحكام ربطها بشكل مفرط.
4.3. تثبيت وحدة المعالجة المركزية
- ارفع ذراع مقبس وحدة المعالجة المركزية.
- قم بمحاذاة العلامة المثلثة الموجودة على وحدة المعالجة المركزية مع العلامة المقابلة لها على المقبس.
- قم بوضع وحدة المعالجة المركزية في المقبس برفق دون إجبارها.
- Lower the socket lever to secure the CPU.
- Apply a thin, even layer of thermal paste to the CPU's surface.
- Install the CPU cooler according to its manufacturer's instructions, ensuring good contact with the CPU.
4.4. تثبيت الذاكرة (RAM)
- افتح المشابك الموجودة في كلا طرفي فتحة DIMM.
- قم بمحاذاة الشق الموجود على وحدة الذاكرة DDR3 مع المفتاح الموجود في فتحة DIMM.
- اضغط بقوة على كلا طرفي وحدة الذاكرة حتى تستقر المشابك في مكانها.
4.5. توصيلات الطاقة
- Connect the 24-pin ATX power cable from the PSU to the main power connector on the motherboard.
- Connect the 4-pin CPU power cable from the PSU to the CPU power connector near the CPU socket.
4.6. Storage Devices and Expansion Cards
- Connect SATA data cables from your storage devices (HDD/SSD) to the SATA ports on the motherboard.
- Install any necessary expansion cards (e.g., graphics card) into the appropriate PCIe slots and secure them with screws.
4.7. توصيلات اللوحة الأمامية والأجهزة الطرفية
- Connect the front panel cables (power button, reset button, HDD LED, power LED, front USB, front audio) to their respective headers on the motherboard. Refer to your case manual for specific pin assignments.
- Connect external peripherals such as keyboard, mouse, monitor, and network cable to the rear I/O ports.
5. تعليمات التشغيل
5.1. التمهيد الأول
- After all components are installed and connected, connect the power cord to the PSU and turn on the power switch.
- اضغط على زر الطاقة الموجود على علبة الكمبيوتر لديك.
- يجب أن يتم تشغيل النظام، ويجب أن ترى شاشة عرض على شاشتك.
5.2. إعداد BIOS/UEFI
للوصول إلى أداة إعداد BIOS/UEFI، اضغط على المفتاح المخصص (عادةً ف10 or ف12 for HP systems) repeatedly during the initial boot sequence. In the BIOS/UEFI, you can configure system settings, boot order, and monitor hardware status.
5.3. تثبيت نظام التشغيل
Once the system is booting correctly, you can proceed with installing your preferred operating system (e.g., Windows 10) from a bootable USB drive or DVD.
6. الصيانة
6.1. التنظيف
Regularly clean dust from the motherboard, CPU cooler, and case fans using compressed air. Ensure the system is powered off and unplugged before cleaning. Avoid using liquid cleaners directly on components.
6.2. تحديثات BIOS
تحقق بشكل دوري من دعم HP الرسمي website for BIOS/firmware updates. BIOS updates can improve system stability, compatibility, and performance. Follow HP's instructions carefully when performing a BIOS update to avoid system damage.
7. استكشاف الأخطاء وإصلاحها
إذا واجهت مشكلات، راجع خطوات استكشاف الأخطاء وإصلاحها الشائعة التالية:
- لا يوجد طاقة: Ensure all power cables (24-pin ATX, 4-pin CPU) are securely connected. Check the PSU switch and wall outlet.
- لا يوجد عرض: Verify the monitor is connected to the correct video output (VGA, DVI, or DisplayPort) and is powered on. Reseat the graphics card (if applicable) and RAM modules.
- يصدر النظام أصوات تنبيه: Listen for beep codes during startup. These codes often indicate specific hardware issues (e.g., memory failure, graphics card issue). Consult the HP support website for a list of beep codes for your model.
- عدم استقرار النظام/الأعطال: Check for overheating (monitor temperatures in BIOS). Ensure all drivers are up to date. Test memory modules individually.
- لم يتم اكتشاف المكون: Reseat the component (e.g., hard drive, expansion card). Check cable connections. Verify BIOS settings.
8. المواصفات
Detailed technical specifications for the HP Compaq 6005 Pro Motherboard (P/N 531966-001).
| ميزة | مواصفة |
|---|---|
| ماركة | HP |
| اسم الموديل | HP Compaq 6005 Pro |
| رقم الموديل | 531966-001 |
| مقبس وحدة المعالجة المركزية | مقبس AMD AM3 |
| المعالجات المتوافقة | AMD Phenom II, Athlon II, AMD FX |
| نوع الشريحة | AMD 760MP |
| تقنية ذاكرة الوصول العشوائي (RAM) | دي دي ار 3 |
| فتحات الذاكرة المتاحة | 4 فتحة DIMM |
| الحد الأقصى لحجم ذاكرة الوصول العشوائي (RAM) | 16 جيجا بايت |
| سرعة ساعة الذاكرة | Up to 2133 MHz (depending on CPU/RAM) |
| واجهة بطاقة الرسوميات | بي سي اي اكسبريس x16 |
| فتحات التوسعة | 1x PCIe x16, 2x PCIe x1, 1x PCI |
| Total SATA Ports | 4 × ساتا 2.0 |
| نوع موصل الطاقة الرئيسي | ATX ذو 24 سنًا |
| منافذ الإدخال والإخراج الخلفية | 6x USB 2.0, 1x VGA, 1x DVI-D, 1x DisplayPort, 1x RJ-45 Ethernet, Audio In/Out/Mic, 2x PS/2 |
| الأجهزة المتوافقة | كمبيوتر شخصي |
| منصة | ويندوز 10 (والإصدارات المتوافقة السابقة) |
| عامل الشكل | مايكرو-ATX |
9. معلومات الضمان
For specific warranty terms and conditions related to your HP Compaq 6005 Pro Motherboard, please refer to the original purchase documentation or contact HP customer support directly. Warranty coverage may vary based on region and point of purchase.
10. الدعم
For additional assistance, driver downloads, updated documentation, or to contact technical support, please visit the official HP support webموقع:
When contacting support, please have your motherboard model number (531966-001) and any relevant system information ready.