
1. المقدمة
شكرا لك على الشراءasing the Mastech MS8230B Digital Multimeter. This device is a compact, battery-operated, handheld digital multimeter designed for measuring DC and AC voltage, DC current, resistance, diode, and transistor (hFE) tests. It features a large LCD display for easy reading and is built to international safety standards.
Please read this instruction manual thoroughly before using the multimeter to ensure safe and proper operation. Keep this manual for future reference.
2. معلومات السلامة
This multimeter is designed according to IEC 1010-1 international safety standards for electronic measuring instruments. It complies with CAT III 600V and CAT II 1000V overvoltage categories. Always adhere to the following safety precautions:
- Never exceed the maximum input limits for any function.
- Do not use the meter if the case is damaged or open.
- تأكد من أن أسلاك الاختبار في حالة جيدة، وخالية من أي تلف في العزل.
- قم دائمًا بفصل التيار الكهربائي عن الدائرة وتفريغ جميع الأحمال العاليةtage capacitors before measuring resistance, diodes, or hFE.
- توخي الحذر الشديد عند العمل مع المجلدtages أعلى من 60 فولت تيار مستمر أو 30 فولت تيار متردد RMS، لأن هذه تشكل خطر الصدمة الكهربائية.
- قم بإزالة أسلاك الاختبار من الدائرة قبل تغيير الوظائف أو النطاقات.
- استبدل البطارية فور ظهور مؤشر انخفاض مستوى البطارية لضمان دقة القراءات.
- لا تقم بتشغيل العداد في بيئات تحتوي على غازات أو أبخرة أو غبار قابل للاشتعال.
3. محتويات العبوة
تأكد من وجود جميع العناصر المدرجة أدناه وأنها غير تالفة:
- Mastech MS8230B Digital Multimeter
- أسلاك اختبار (زوج واحد)
- بطارية 9 فولت (مثبتة مسبقًا أو مرفقة بشكل منفصل)
- دليل المستخدم
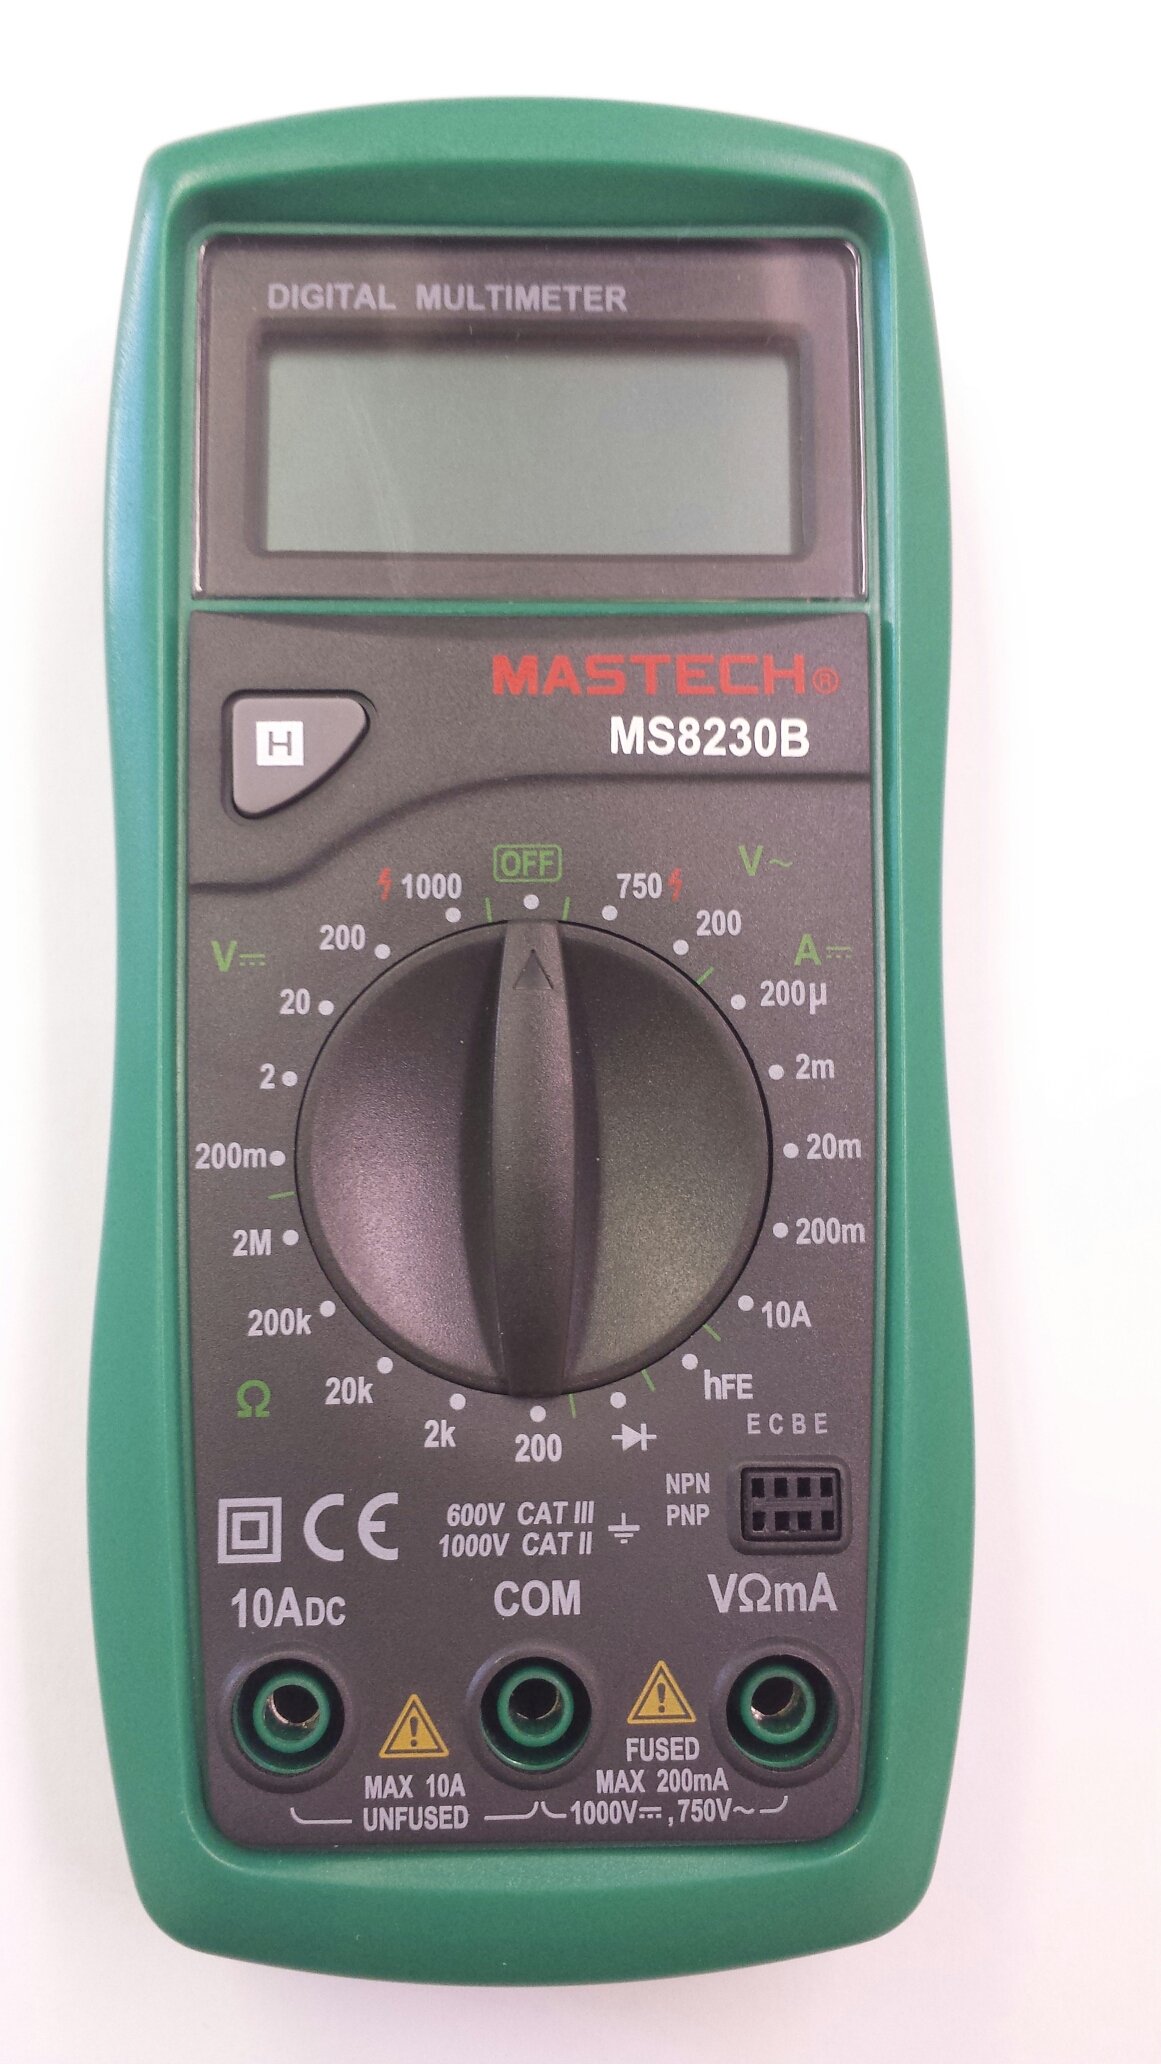
Image 1: Contents of the Mastech MS8230B package, including the multimeter, test leads, batteries, and user manual.
4. الإعداد
4.1 تركيب البطارية
The MS8230B multimeter requires one 9V battery for operation. If the battery is not pre-installed or needs replacement:
- تأكد من إيقاف تشغيل جهاز القياس المتعدد وفصل جميع أسلاك الاختبار.
- حدد موقع غطاء حجرة البطارية على الجزء الخلفي من الوحدة.
- Loosen the screw(s) on the battery cover and remove the cover.
- Connect the 9V battery to the battery connector, observing correct polarity.
- ضع البطارية في الحجرة وأعد الغطاء، وثبته بالبرغي (البراغي).
4.2 توصيل أسلاك الاختبار
Always connect the test leads correctly for the desired measurement:
- Insert the red test lead into the "VΩmA" jack for voltagهـ، المقاومة، وقياسات التيار المنخفض.
- Insert the red test lead into the "10ADC" jack for high DC current measurements (up to 10A).
- Always insert the black test lead into the "COM" (common) jack.
5. تعليمات التشغيل
Before taking any measurement, ensure the test leads are correctly connected and the function switch is set to the appropriate range.
5.1 العاصمة المجلدtagالقياس الإلكتروني (DCV)
- Connect the red test lead to the "VΩmA" jack and the black test lead to the "COM" jack.
- Set the rotary switch to the desired DCV range (e.g., 200mV, 2V, 20V, 200V, 1000V). If the voltagإذا كانت قيمة e غير معروفة، فابدأ بأعلى نطاق وقم بتقليله حسب الضرورة.
- قم بتوصيل أسلاك الاختبار عبر المكون أو الدائرة المراد قياسها.
- اقرأ المجلدtage value on the LCD display. Observe the polarity indication.
5.2 أس فولtagالقياس الإلكتروني (ACV)
- Connect the red test lead to the "VΩmA" jack and the black test lead to the "COM" jack.
- Set the rotary switch to the desired ACV range (e.g., 200V, 750V). Start with the highest range if the voltagالبريد غير معروف.
- قم بتوصيل أسلاك الاختبار عبر المكون أو الدائرة المراد قياسها.
- اقرأ المجلدtagقيمة e على شاشة LCD.
5.3 DC Current Measurement (DCA)
حذر: Never attempt to measure current on a circuit with voltage present by connecting the meter in parallel. Always connect the meter in series with the load.
- Determine the expected current. For currents up to 200mA, connect the red lead to "VΩmA". For currents up to 10A, connect the red lead to "10ADC". The black lead always goes to "COM".
- Set the rotary switch to the appropriate DCA range (e.g., 200µA, 2mA, 20mA, 200mA, 10A).
- Turn off the power to the circuit. Open the circuit where the current is to be measured.
- قم بتوصيل المقياس المتعدد على التوالي مع الدائرة.
- قم بتوصيل الطاقة بالدائرة واقرأ قيمة التيار على شاشة LCD.
5.4 قياس المقاومة
حذر: Ensure the circuit under test is completely de-energized and all capacitors are discharged before measuring resistance.
- Connect the red test lead to the "VΩmA" jack and the black test lead to the "COM" jack.
- Set the rotary switch to the desired Resistance (Ω) range (e.g., 200Ω, 2kΩ, 20kΩ, 200kΩ, 2MΩ).
- قم بتوصيل أسلاك الاختبار عبر المكون المراد قياسه.
- اقرأ قيمة المقاومة على شاشة LCD.
5.5 اختبار الصمام الثنائي
حذر: Ensure the circuit under test is completely de-energized and all capacitors are discharged before performing a diode test.
- Connect the red test lead to the "VΩmA" jack and the black test lead to the "COM" jack.
- Set the rotary switch to the Diode symbol (→|).
- قم بتوصيل سلك الاختبار الأحمر بالأنود وسلك الاختبار الأسود بالكاثود للدايود. ستعرض الشاشة جهد التيار الأماميtage drop (typically 0.5V to 0.8V for silicon diodes).
- Reverse the test leads. The display should show "OL" (Open Loop) for a good diode. A reading in both directions or "0" indicates a shorted diode.
5.6 اختبار hFE للترانزستور
حذر: Ensure the transistor is not connected to a live circuit.
- Set the rotary switch to the "hFE" position.
- حدد ما إذا كان الترانزستور من نوع NPN أو PNP.
- Insert the transistor's emitter, base, and collector leads into the corresponding holes in the hFE socket on the multimeter.
- Read the hFE (DC current gain) value on the LCD display.
5.7 وظيفة الاحتفاظ بالبيانات
Press the "H" button to hold the current reading on the display. Press it again to release the hold function and resume live readings.
6. الصيانة
6.1 التنظيف
امسح الحالة بالإعلانamp استخدم قطعة قماش ومنظفًا معتدلًا. لا تستخدم مواد كاشطة أو مذيبات. حافظ على الرافعات خالية من الغبار والشوائب.
6.2 استبدال البطارية
When the battery symbol appears on the LCD, the 9V battery needs to be replaced. Refer to section 4.1 for battery installation instructions.
6.3 استبدال الصمامات
The multimeter is protected by a fuse. If the current measurement function stops working, the fuse may need replacement. This should only be performed by qualified personnel. The fuse specifications are typically printed near the fuse holder or in the specifications section.
7. استكشاف الأخطاء وإصلاحها
If the multimeter does not function correctly, check the following:
- لا يوجد عرض أو عرض خافت: افحص البطارية. استبدلها إذا لزم الأمر.
- قراءات خاطئة: Ensure the test leads are properly connected, the function switch is on the correct range, and the battery is not low.
- تم عرض "OL" (الحمل الزائد): The measured value exceeds the selected range. Switch to a higher range.
- لا يعمل قياس التيار: التحقق من الصمامات.
إذا استمرت المشاكل، فاتصل بدعم العملاء.
8. المواصفات
The Mastech MS8230B Digital Multimeter offers the following technical specifications:

Image 2: Detailed specifications for the Mastech MS8230B Multimeter, including display, range, and accuracy.
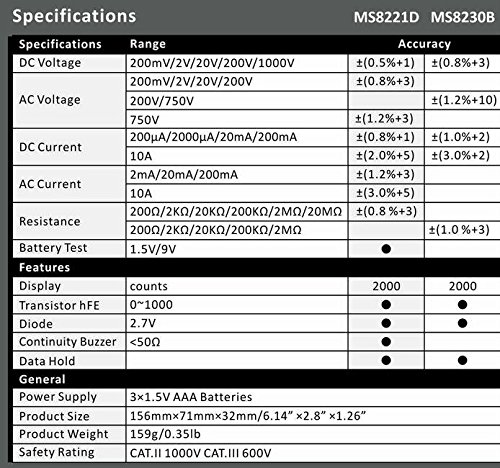
Image 3: Comparison table of specifications for Mastech MS8230B and MS8221D multimeters.
| مواصفة | قيمة |
|---|---|
| عرض | 1999 counts, 15mm digit height |
| المجلد العاصمةtagه (DCV) | 200mV, 2V, 20V, 200V, 1000V (Accuracy: 0.5% to 0.8%) |
| المجلد ACtag(أكف) | 200V, 750V (Accuracy: 1.2%) |
| تيار مستمر (DCA) | 200µA, 2mA, 20mA, 200mA, 10A (Accuracy: 1.0% to 2.0%) |
| المقاومة (Ω) | 200Ω, 2kΩ, 20kΩ, 200kΩ, 2MΩ (Accuracy: 0.8% to 1.0%) |
| اختبار الصمام الثنائي | إلى الأمام المجلدtagه قطرة |
| اختبار الترانزستور hFE | 1 إلى 1000 |
| الاحتفاظ بالبيانات | نعم |
| مؤشر انخفاض مستوى البطارية | نعم |
| حماية من التحميل الزائد | نعم |
| مصدر الطاقة | 1 × بطارية 9 فولت |
| الأبعاد (الطول × العرض × الارتفاع) | 15.2 × 7.6 × 2.5 سم (تقريبًا 6 × 3 × 1 بوصة) |
| وزن | تقريبا. 158.76 جرام (5.6 أونصة) |
| تصنيف السلامة | IEC 1010-1 CAT III 600V, CAT II 1000V |
| درجة حرارة التشغيل | 0 درجة مئوية إلى 40 درجة مئوية (32 درجة فهرنهايت إلى 104 درجة فهرنهايت) |
| درجة حرارة التخزين | -10 درجة مئوية إلى 50 درجة مئوية (14 درجة فهرنهايت إلى 122 درجة فهرنهايت) |
9. الضمان والدعم
Mastech products are designed for reliability and performance. For specific warranty details, please refer to the warranty card included with your product or contact your local Mastech distributor.
For technical support or service inquiries, please contact Mastech customer service through their official webالموقع أو معلومات الاتصال المقدمة مع وثائق الشراء الخاصة بك.