1. المقدمة
This manual provides detailed instructions for the installation, operation, and maintenance of your SpeaKa Professional DL-1117 In-Wall/Ceiling Speaker. Please read this manual thoroughly before installation and use to ensure proper function and safety. Keep this manual for future reference.
2. انتهى المنتجview
The SpeaKa Professional DL-1117 is a high-quality in-wall/ceiling speaker designed for various audio applications in both residential and industrial environments. Its robust metallic construction ensures durability and reliable performance.

الشكل 2.1: أمام view of the SpeaKa Professional DL-1117 In-Wall/Ceiling Speaker. This image shows the speaker's front grille and mounting frame.
المميزات الرئيسية:
- Ideal for wall and ceiling mounting.
- Suitable for industrial and residential spaces.
- Solid metallic construction for enhanced durability.
3. المواصفات
| مواصفة | قيمة |
|---|---|
| ماركة | SpeaKa Professional |
| اسم الموديل | دي ال-1117 |
| رقم موديل العنصر | إس بي-1207908 |
| نوع السماعة | In-Wall/Ceiling Speaker |
| حجم السماعة | 8 Inches (77mm INWALL SPEAKER as per label) |
| مقاومة | 8 أوم |
| القدرة (الاسمية) | 15 واط |
| الحد الأقصى لقوة خرج مكبر الصوت | 25 واط |
| استجابة التردد | 90Hz - 17,000Hz (as per label) |
| نوع التركيب | تركيب على السقف (مناسب أيضًا للتركيب على الحائط) |
| أبعاد المنتج (الطول × العرض × الارتفاع) | 11 × 11 × 7 سم |
| وزن العنصر | 520 جرام |
| لون | أسود |
| عدد الوحدات | 1 وحدة |
| الاستخدامات الموصى بها | For computer (audio output), general audio systems |
| الأجهزة المتوافقة | Desktop computer, Laptop (via amplifier/receiver) |

الشكل 3.1: Dimensional drawing of the SpeaKa Professional DL-1117 speaker. This diagram illustrates the speaker's diameter (Ø100mm), depth (49mm), and cutout dimensions (Ø74mm, Ø81mm).
الشكل 3.2: خلف view of the SpeaKa Professional DL-1117 speaker, showing the product label with model number DL-1117BK8, frequency response, power rating, and impedance.
4. تعليمات السلامة
يرجى مراعاة احتياطات السلامة التالية لمنع الإصابة أو إتلاف المنتج:
- السلامة الكهربائية: Ensure all power to the audio system is disconnected before making any connections or performing installation. Incorrect wiring can cause damage to the speaker or ampمكبر.
- تثبيت: Installation should be performed by a qualified professional if you are unsure about electrical wiring or structural integrity. Ensure the mounting surface (wall or ceiling) can safely support the weight of the speaker.
- بيئة: Do not expose the speaker to excessive moisture, extreme temperatures, or direct sunlight.
- تنظيف: استخدم قطعة قماش ناعمة وجافة للتنظيف. لا تستخدم المنظفات السائلة أو البخاخات.
- التفكيك: لا تحاول تفكيك السماعة أو تعديلها. سيؤدي ذلك إلى إلغاء الضمان وقد يتسبب في تلفها أو إصابتك.
5. الإعداد والتثبيت
Follow these steps for proper installation of your in-wall/ceiling speaker:
5.1 الأدوات المطلوبة
- حفر
- Hole saw (matching cutout diameter, approx. Ø74-81mm)
- مفك البراغي
- تقشير الأسلاك
- Speaker wire (appropriate gauge for your amplifier and cable length)
5.2 موقع التركيب
Choose a suitable location in your wall or ceiling. Ensure there are no electrical wires, plumbing, or structural elements behind the chosen area. Use a stud finder if necessary.
5.3 قطع الافتتاح
- Carefully mark the desired cutout diameter on the wall or ceiling. Refer to the dimensions in Figure 3.1.
- Using a hole saw, carefully cut the opening.
5.4 الأسلاك
- قم بتوصيل سلك السماعات من جهازك amplifier/receiver to the cutout opening.
- Strip approximately 1/2 inch (12mm) of insulation from the ends of the speaker wire.
- Connect the speaker wires to the terminals on the back of the DL-1117 speaker. Ensure correct polarity (+ to + and - to -) from the amplifier to the speaker. The terminals are typically screw-type or spring-loaded.
5.5 Installing the Speaker
- Carefully insert the speaker into the cutout opening.
- Secure the speaker using the integrated mounting clips or screws, if applicable. For this model, the design suggests it is inserted and then secured from the front.

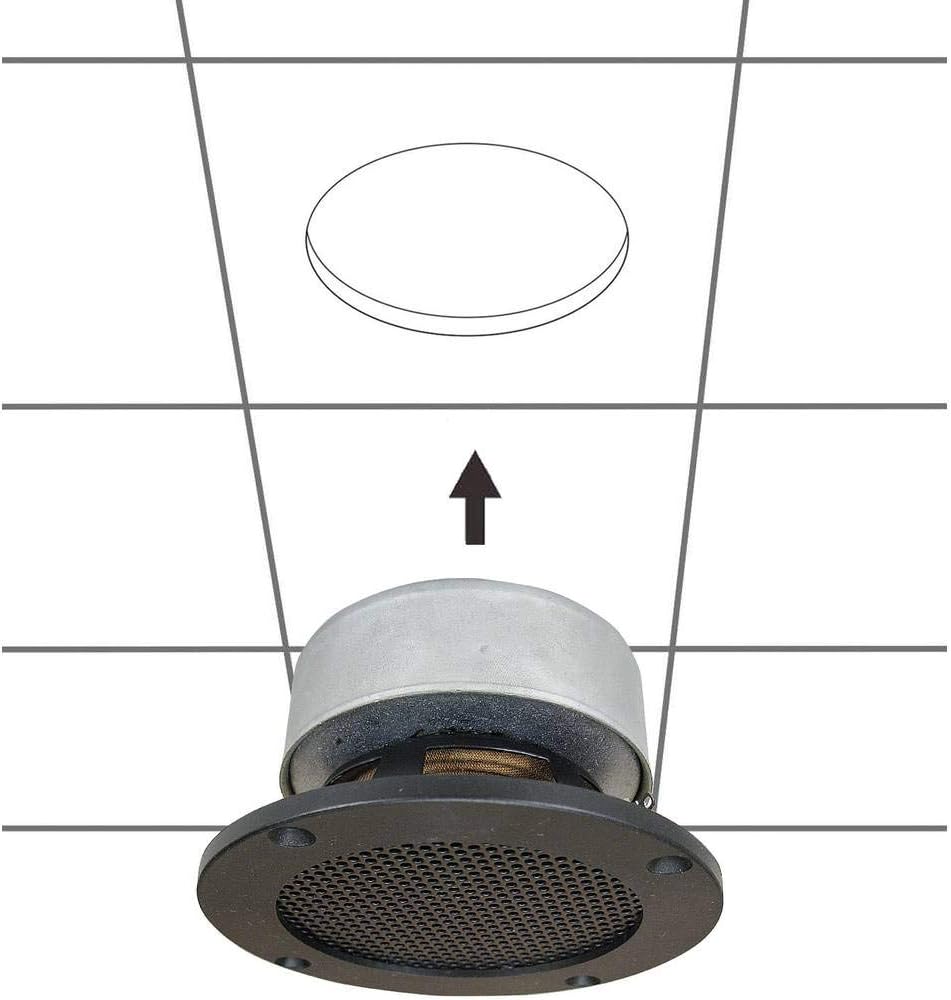
الشكل 5.1: Diagram illustrating the installation process of the SpeaKa Professional DL-1117 speaker into a ceiling opening. The speaker is inserted from below into the pre-cut hole.
6. تعليمات التشغيل
Once the speaker is correctly installed and wired to your ampمكبر الصوت أو جهاز الاستقبال:
- تأكد من أن جميع التوصيلات آمنة.
- قم بتشغيل جهازك ampمكبر / مستقبل.
- Start playing audio through your connected source.
- اضبط مستوى الصوت في ملف amplifier/receiver to a comfortable listening level. Avoid excessively high volumes that could distort the sound or damage the speaker.
7. الصيانة
The SpeaKa Professional DL-1117 speaker requires minimal maintenance:
- تنظيف: Periodically wipe the speaker grille and frame with a soft, dry cloth to remove dust. Do not use abrasive cleaners or solvents.
- تقتيش: Occasionally check the speaker for any visible damage or loose connections.
8. استكشاف الأخطاء وإصلاحها
إذا واجهت مشكلات مع مكبر الصوت الخاص بك، فراجع المشكلات والحلول الشائعة التالية:
| مشكلة | السبب المحتمل | حل |
|---|---|---|
| لا يوجد صوت من السماعة | الأسلاك المفكوكة أو غير الصحيحة Amplifier/receiver off or muted Source device not playing audio | تأكد من صحة جميع توصيلات أسلاك السماعات من حيث القطبية والربط المحكم. يضمن amplifier/receiver is on and not muted, and volume is up. Verify audio is playing from the source device. |
| صوت مشوه | حجم مرتفع للغاية مصدر صوت ذو جودة رديئة سلك مكبر الصوت تالف | خفّض مستوى الصوت على جهازك ampمكبر / مستقبل. جرب مصدر صوت مختلف لاستبعاد مشاكل المصدر. Inspect speaker wires for fraying or damage and replace if necessary. |
| صوت متقطع | اتصالات فضفاضة معيب ampقناة مكبر | تحقق من جميع توصيلات أسلاك مكبر الصوت وقم بتأمينها. Test the speaker with a different amplifier channel or a known working ampمكبر. |
If the problem persists after trying these solutions, please contact SpeaKa Professional customer support.
9. الضمان والدعم
For warranty information and customer support, please refer to the documentation provided with your purchase or visit the official SpeaKa Professional webالموقع. احتفظ بإثبات الشراء الخاص بك لتقديم مطالبات الضمان.
الشركة المصنعة: SpeaKa Professional
ASIN: B00CS2V1AQ