مقدمة
شكرا لك على الشراءasing the GPX Weatherx WR282B Weather and Alert Radio. This portable radio is designed to provide you with AM/FM radio reception and access to all 7 NOAA weatherband channels, ensuring you stay informed during various conditions. It offers flexible power options, operating on either AC power or D-size batteries, making it suitable for both indoor and outdoor use.
Please read this manual thoroughly before operating the device to ensure proper use and to maximize its performance and longevity.
معلومات هامة حول السلامة
- اقرأ التعليمات: يجب قراءة جميع تعليمات السلامة والتشغيل قبل تشغيل المنتج.
- الاحتفاظ بالتعليمات: ينبغي الاحتفاظ بتعليمات السلامة والتشغيل للرجوع إليها في المستقبل.
- إنتبه للتحذيرات: ينبغي الالتزام بجميع التحذيرات الموجودة على المنتج وفي تعليمات التشغيل.
- اتبع التعليمات: ينبغي اتباع كافة تعليمات التشغيل والاستخدام.
- الماء والرطوبة: Do not use this product near water (e.g., near a bathtub, washbowl, kitchen sink, laundry tub, in a wet basement, or near a swimming pool).
- تنظيف: نظف فقط بقطعة قماش جافة.
- تهوية: لا تسد أي فتحات تهوية. ثبّت المنتج وفقًا لتعليمات الشركة المصنعة.
- حرارة: لا تقم بالتثبيت بالقرب من أي مصادر للحرارة مثل المشعات أو فتحات التدفئة أو المواقد أو أي أجهزة أخرى (بما في ذلك ampالمُضخِّمات) التي تنتج الحرارة.
- حماية سلك الطاقة: احمِ سلك الطاقة من أن يدوس عليه أحد أو يضغط عليه، وخاصةً عند المقابس ومنافذ التوصيل الكهربائية ونقطة خروجها من الجهاز.
- البرق: افصل هذا الجهاز أثناء العواصف الرعدية أو عند عدم استخدامه لفترات طويلة من الزمن.
- الخدمة: أحل جميع أعمال الصيانة إلى موظفي الصيانة المؤهلين. يلزم إجراء الصيانة عند تعرض الجهاز للتلف بأي شكل من الأشكال، مثل تلف سلك مصدر الطاقة أو القابس، أو انسكاب السوائل أو سقوط الأشياء داخل الجهاز، أو تعرض الجهاز للمطر أو الرطوبة، أو عدم تشغيله بشكل طبيعي، أو سقوطه.
سمات
- موالف راديو AM/FM
- Weatherband - All 7 NOAA Channels
- Swivel Telescopic Antenna
- التحكم في مستوى الصوت
- Audio Line Input (Auxiliary Input)
- مقبض حمل متكامل
- Dual Power Options: AC/DC Adapter or 3 x 'D' Batteries
محتويات الحزمة
- GPX Weatherx WR282B Weather and Alert Radio
- محول الطاقة التيار المتردد/المستمر
- دليل المستخدم (هذا المستند)
الضوابط والمؤشرات
Familiarize yourself with the various controls and indicators on your WR282B radio.
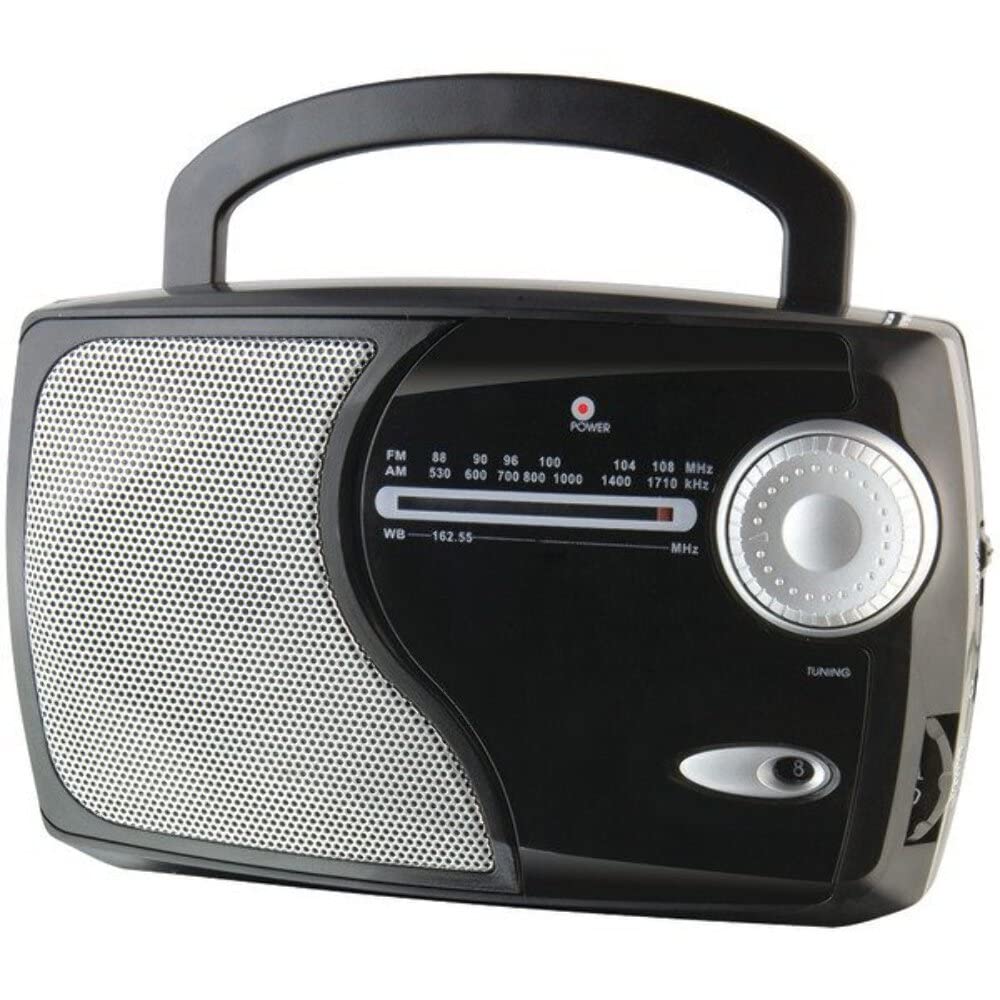
الصورة: الجبهة view of the GPX Weatherx WR282B radio, showing the speaker, tuning dial, and control knobs.
- مقبض الطاقة/الصوت: Turns the radio on/off and adjusts the audio output level.
- مفتاح اختيار النطاق: Selects between AM, FM, and Weatherband (WB) modes.
- موجة الضبط: Adjusts the frequency to tune into desired radio stations or weather channels.
- مؤشر الضبط: Illuminates when a strong signal is received.
- طلب التردد: يعرض تردد الراديو الحالي.
- هوائي تلسكوبي: Extendable antenna for improved FM and Weatherband reception.
- مدخل إضافي (AUX IN): مقبس مقاس 3.5 ملم لتوصيل أجهزة الصوت الخارجية.
- مدخلات الطاقة AC: Jack for connecting the included AC/DC power adapter.
- حجرة البطارية: Located on the back, holds 3 'D' size batteries.
- مقبض الحمل: لسهولة الحمل.
يثبت
تشغيل الراديو
The WR282B radio can be powered using either the included AC/DC power adapter or three 'D' size batteries.
1. AC Power Operation
- Ensure the radio is turned off by rotating the Power/Volume knob counter-clockwise until it clicks.
- Insert the small plug of the AC/DC power adapter into the AC Power Input jack on the radio.
- Plug the other end of the AC/DC power adapter into a standard wall outlet (AC 120V~60Hz).
- أصبح الراديو الآن جاهزًا للاستخدام مع التيار المتردد.
ملحوظة: When the AC adapter is connected, battery power is automatically disconnected.
2. Battery Power Operation
- تأكد من إيقاف تشغيل الراديو.
- حدد موقع حجرة البطارية في الجزء الخلفي من الراديو.
- افتح غطاء حجرة البطارية.
- Insert three (3) 'D' size batteries (not included) into the compartment, observing the correct polarity (+/-) as indicated inside the compartment.
- أغلق غطاء حجرة البطارية جيدًا.
- The radio is now ready for use with battery power.
مهم: Remove batteries if the radio will not be used for an extended period to prevent leakage and damage.
تعليمات التشغيل
1. Turning On and Adjusting Volume
- تدوير مقبض الطاقة/الحجم clockwise to turn on the radio. Continue rotating to increase the volume to a comfortable listening level.
- لإيقاف تشغيل الراديو ، قم بتدوير مقبض الطاقة/الحجم counter-clockwise until it clicks.
2. Selecting a Radio Band (AM/FM/Weatherband)
- استخدم مفتاح اختيار النطاق to choose your desired listening mode:
- صباحا: ل Ampمحطات راديو تعديل السعة.
- وزير الخارجية: لمحطات الراديو ذات التضمين الترددي.
- البنك الدولي: For NOAA Weatherband channels.
3. Tuning to a Station or Channel
- تمديد هوائي تلسكوبي fully for optimal FM and Weatherband reception. For AM reception, the radio has a built-in antenna, and adjusting the radio's position may improve reception.
- تدوير موجة الضبط to scan through frequencies on the طلب التردد.
- When a strong signal is received, the مؤشر الموالفة سوف يضيء الضوء.
- For Weatherband (WB) mode, tune to one of the 7 NOAA weather channels (162.400 MHz to 162.550 MHz).
4. Using the Auxiliary Input (AUX IN)
- Connect a 3.5mm audio cable (not included) from your external audio device (e.g., MP3 player, smartphone) to the مدخل مساعد (AUX IN) jack on the radio.
- Ensure the radio is turned on and the volume is adjusted.
- The audio from your external device will now play through the radio's speaker. Control playback and track selection from your external device.
صيانة
- تنظيف: امسح الجزء الخارجي من الراديو بقطعة قماش ناعمة وجافة. لا تستخدم المنظفات الكاشطة أو الشمع أو المذيبات.
- استبدال البطارية: Replace all three 'D' batteries when the radio's performance diminishes or if the unit will not be used for an extended period. Always replace with new batteries of the same type.
- تخزين: When storing the radio for a long time, remove the batteries to prevent leakage. Store in a cool, dry place away from direct sunlight and extreme temperatures.
- رعاية الهوائي: تعامل مع الهوائي التلسكوبي برفق لتجنب ثنيه أو كسره.
استكشاف الأخطاء وإصلاحها
| مشكلة | السبب المحتمل | حل |
|---|---|---|
| لا يوجد طاقة |
|
|
| استقبال الراديو ضعيف |
|
|
| لا يوجد صوت من مدخل AUX IN |
|
|
تحديد
- نموذج: دبليو ار 282 بي
- نطاقات الراديو: AM, FM, Weatherband (7 NOAA channels)
- مصدر الطاقة: AC 120V~60Hz (via included adapter) or 3 x 'D' Batteries (not included)
- الاتصال: 3.5mm المدخلات الإضافية
- الهوائي: Telescopic (FM/WB), Built-in Ferrite Bar (AM)
- أبعاد المنتج: 8.86" L x 2.76" W x 5.51" H (approximately)
- وزن السلعة: 1.06 رطل (بدون بطاريات)
الضمان والدعم
For detailed warranty information and customer support, please refer to the warranty card included with your product or visit the official GPX webالموقع. احتفظ بإيصال الشراء الخاص بك كإثبات للشراء في حالة وجود أي مطالبات بالضمان.
If you experience issues not covered in the troubleshooting section, please contact GPX customer service for assistance.