
1. المقدمة
This manual provides detailed instructions for the installation, operation, and maintenance of your Foxconn TSAA725 ATX Tower Case. Please read this manual thoroughly before beginning installation to ensure proper setup and safe use of the product. Keep this manual for future reference.
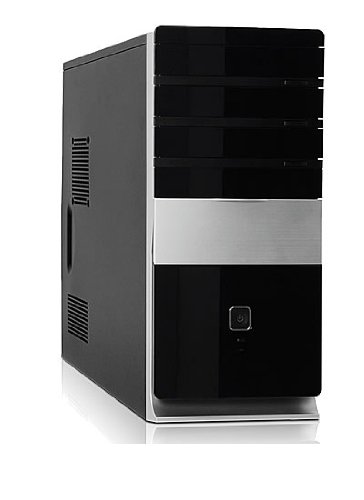
الصورة: الجبهة view of the Foxconn TSAA725 ATX Tower Case, showcasing its design and front panel ports.
2. معلومات السلامة
اتبع احتياطات السلامة التالية لمنع تلف المنتج أو إصابتك:
- Always disconnect the power supply from the wall outlet before opening the computer case or performing any installation/maintenance.
- Handle internal components with care to avoid electrostatic discharge (ESD) damage. Use an anti-static wrist strap if available.
- تأكد من وجود تهوية مناسبة حول الجهاز لمنع ارتفاع درجة الحرارة.
- لا تعرض الغلاف للرطوبة أو درجات الحرارة القصوى.
- احتفظ بالأجزاء الصغيرة بعيدًا عن متناول الأطفال.
3. محتويات العبوة
تأكد من وجود جميع العناصر في العبوة:
- Foxconn TSAA725 ATX Tower Case
- مزود طاقة بقدرة 350 واط (مثبت مسبقًا)
- مجموعة ملحقات (براغي، فواصل، روابط كابلات)
- هذا دليل التعليمات
4. الميزات الرئيسية
The Foxconn TSAA725 ATX Tower Case offers the following features:
- مادة: 0.5mm SGCC Alloy Steel construction for durability.
- دعم اللوحة الأم: Compatible with ATX and Micro ATX motherboards.
- حملة الخلجان:
- 3x 5.25" External Bays
- 2x 3.5" External Bays
- 4x 3.5" Internal Bays
- نظام التبريد:
- 1x 80/92/120mm rear fan support (fan not included)
- Optional 1x 80/92/120mm front fan support (fan not included)
- 80mm Air Duct for CPU cooling.
- لوحة الإدخال/الإخراج الأمامية:
- 2 منافذ USB 2.0
- منفذ سماعة رأس واحد
- منفذ ميكروفون واحد
- مزود الطاقة: Integrated 350W Power Supply.
5. الإعداد وتثبيت المكونات
Follow these steps to install your computer components into the Foxconn TSAA725 case:
- إعداد القضية:
Place the case on a flat, stable surface. Remove the side panel(s) by unscrewing the thumbscrews at the rear of the case and sliding the panel backward.
- تثبيت اللوحة الأم:
Install the necessary standoffs onto the motherboard tray according to your motherboard's form factor (ATX or Micro ATX). Carefully place the motherboard onto the standoffs, aligning the screw holes. Secure the motherboard with screws provided in the accessory kit.
- Install Drives (HDD/SSD):
For 3.5" internal drives, slide the drive into an available 3.5" internal bay and secure it with screws from the side. For 5.25" external drives (e.g., optical drives), remove the front panel bay cover, slide the drive in from the front, and secure it with screws.
- تثبيت بطاقات التوسعة:
Remove the appropriate expansion slot covers at the rear of the case. Insert your graphics card or other expansion cards into the PCIe/PCI slots on the motherboard and secure them with screws.
- توصيل الكابلات:
Connect the power supply cables to the motherboard (24-pin ATX, 4/8-pin CPU), graphics card (if applicable), and drives (SATA power). Connect the front panel cables (USB, audio, power switch, reset switch, LED indicators) to the corresponding headers on the motherboard. Refer to your motherboard manual for header locations.
- إدارة الكابلات:
Route cables neatly to improve airflow and aesthetics. Use cable ties from the accessory kit if needed.
- إغلاق القضية:
Once all components are installed and cables are connected, reattach the side panel(s) and secure them with the thumbscrews.
6. تعليمات التشغيل
After successful assembly, connect your peripherals (monitor, keyboard, mouse) and power cable to the case. Press the power button on the front panel to start your computer.
منافذ الإدخال/الإخراج في اللوحة الأمامية:
- منافذ USB 2.0: For connecting USB devices such as keyboards, mice, and external storage.
- مقبس سماعة الرأس: لتوصيل سماعات الرأس أو مكبرات الصوت.
- مقبس ميكروفون: لتوصيل الميكروفون.
- زر الطاقة: لتشغيل الكمبيوتر أو إيقاف تشغيله.
- زر إعادة الضبط: To restart the computer.
7. الصيانة
Regular maintenance helps ensure optimal performance and longevity of your computer case:
- تنظيف الغبار: Periodically clean dust from inside the case, especially from fans and heatsinks, using compressed air. Ensure the computer is powered off and unplugged before cleaning.
- التنظيف الخارجي: امسح الجزء الخارجي من العلبة بقطعة قماش ناعمة و...amp القماش. تجنب استخدام المنظفات أو المذيبات الكاشطة.
- إدارة الكابلات: قم بإجراء فحص دوري لمسار الكابلات للتأكد من عدم وجود كابلات تعيق تدفق الهواء أو تشغيل المروحة.
8. استكشاف الأخطاء وإصلاحها
إذا واجهت أي مشكلات، راجع الحلول الشائعة التالية:
- لا يعمل الكمبيوتر:
- Ensure the power cable is securely connected to both the case's power supply and the wall outlet.
- Check if the power supply switch (if present) is in the 'ON' position.
- تأكد من أن كابل زر الطاقة في اللوحة الأمامية موصول بشكل صحيح باللوحة الأم.
- لا يوجد عرض على الشاشة:
- Ensure the monitor is powered on and connected to the correct video output on your graphics card or motherboard.
- أعد تركيب بطاقة الرسومات ووحدات ذاكرة الوصول العشوائي (RAM).
- منافذ USB لا تعمل:
- Verify that the front panel USB cables are correctly connected to the motherboard's USB headers.
- حاول توصيل الجهاز بمنفذ USB مختلف.
9. المواصفات
| ميزة | التفاصيل |
|---|---|
| ماركة | فوكسكون |
| نموذج | TSAA725-ISO450 |
| مادة | 0.5mm SGCC Alloy Steel |
| التوافق مع اللوحة الأم | ATX، مايكرو ATX |
| فتحات محركات الأقراص (الخارجية) | 3 × 5.25 بوصة، 2 × 3.5 بوصة |
| فتحات محركات الأقراص (الداخلية) | 4 × 3.5 بوصة |
| دعم نظام التبريد | 1x 80/92/120mm rear fan, 1x 80/92/120mm front fan (optional), 80mm Air Duct |
| منافذ الإدخال / الإخراج الأمامية | منفذان USB 2.0، سماعة رأس واحدة، ميكروفون واحد |
| مزود الطاقة | 350W (Integrated) |
| أبعاد المنتج (الطول × العرض × الارتفاع) | 50.17 × 24.13 × 54.61 سم |
| وزن العنصر | 6.96 كجم |
10. الضمان والدعم
For warranty information and technical support, please refer to the official Foxconn webالموقع أو تواصل مع التاجر المحلي. احتفظ بإيصال الشراء للمطالبة بالضمان.
الموارد المتاحة على الإنترنت: For additional support and updated drivers, visit the official Foxconn support page.
ملاحظة: قد تختلف شروط الضمان باختلاف المنطقة.