
1. انتهى المنتجview
The Claber Rainjet 91217 is an adjustable in-line dripper designed for precise and efficient watering of plants. This device allows users to regulate the water flow from 0 to 6 liters per hour, adapting to the specific needs of different plants and soil types. It is ideal for use in drip irrigation systems, particularly in greenhouses, hanging baskets, and planters, ensuring calibrated watering.

Image 1.1: The Claber Rainjet 91217 adjustable in-line dripper. This image shows the main component of the dripper, featuring its black body and orange adjustment mechanism.
2. معلومات السلامة
- Always ensure water supply is turned off before installing or performing maintenance on the drippers.
- Do not use the drippers with water temperatures exceeding 40°C (104°F).
- احتفظ بالمكونات الصغيرة بعيدًا عن متناول الأطفال لمنع مخاطر الاختناق.
- تأكد من إحكام جميع التوصيلات لمنع التسربات وهدر المياهtage.
- Avoid using harsh chemicals or abrasive materials for cleaning, as this may damage the plastic components.
3. محتويات العبوة
Each package of Claber Rainjet 91217 drippers typically contains:
- Adjustable In-Line Drippers (quantity may vary by pack, commonly 10 units)

Image 3.1: Packaging of Claber Rainjet 91217 drippers. This image displays a blister pack containing multiple drippers, indicating they are sold in sets.
4. الإعداد والتثبيت
The Claber Rainjet 91217 drippers are designed for easy integration into a 1/4" (4-6mm) drip irrigation line. Follow these steps for proper installation:
- Prepare the Tubing: Cut your 1/4" (4-6mm) irrigation tubing at the desired location where you want to install the dripper. Ensure the cut is clean and straight.
- Insert the Dripper (Step 1): Take one end of the cut tubing and firmly push it onto the inlet barb of the dripper (the side with the orange adjustment mechanism). Ensure it is fully seated to prevent leaks.
- Insert the Dripper (Step 2): Take the other end of the cut tubing and firmly push it onto the outlet barb of the dripper (the side opposite the orange mechanism). Again, ensure a tight fit.
- Multiple Drippers: For longer lines or multiple plants, you can install several drippers in series along the same 1/4" tubing. Space them according to your plant layout and watering needs.
- التنسيب الآمن: Position the dripper near the base of the plant or in the desired watering zone. You may use support stakes (not included) to hold the tubing and dripper in place if necessary.
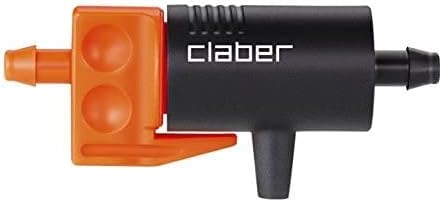
Image 4.1: First step of installation. This diagram illustrates pushing the 1/4" tubing onto one side of the dripper.

Image 4.2: Second step of installation. This diagram shows the dripper fully integrated into the 1/4" tubing line.

Image 4.3: Multiple drippers in an irrigation line. This illustration demonstrates how several drippers can be connected sequentially along a single tubing run, with water dripping from each.
5. تعليمات التشغيل
The Claber Rainjet 91217 dripper features an adjustable flow rate to customize watering for individual plants. The flow can be adjusted from 0 to 6 liters per hour.
- تشغيل إمدادات المياه: Once all drippers are installed, slowly turn on the main water supply to your irrigation system.
- ضبط معدل التدفق: Locate the orange adjustment mechanism on the dripper. Gently rotate this part to increase or decrease the water flow.
- Rotate clockwise to decrease flow or shut off.
- Rotate counter-clockwise to increase flow.
- Monitor and Fine-Tune: After initial adjustment, monitor your plants and soil moisture levels over a few days. Re-adjust the drippers as needed to ensure optimal watering, especially considering plant growth, weather conditions, and soil type.
Note: The optimal operating pressure for these drippers is typically around 1 BAR (14.5 PSI) to achieve the specified flow rates.
6. الصيانة
Regular maintenance ensures the longevity and efficient operation of your Claber Rainjet 91217 drippers.
- التحقق من الانسدادات: Periodically inspect drippers for any blockages caused by sediment, mineral deposits (calcium), or debris. If a dripper is not emitting water or has reduced flow, it may be clogged.
- تنظيف: To clean a clogged dripper, turn off the water supply. Gently remove the dripper from the tubing. You can try flushing it with clean water or carefully disassembling the adjustable orange part to clear any obstructions. Reassemble carefully.
- فحص الأنابيب: Check the 1/4" tubing for kinks, damage, or leaks. Repair or replace damaged sections as needed.
- فصل الشتاء: In regions with freezing temperatures, it is recommended to drain your irrigation system and remove drippers to prevent damage from freezing water. Store them in a dry, protected area.
7. استكشاف الأخطاء وإصلاحها
| مشكلة | السبب المحتمل | حل |
|---|---|---|
| No water or very low flow from dripper. |
|
|
| تسرب المياه من التوصيلات. |
|
|
| Inconsistent flow rate between drippers. |
|
|
8. المواصفات
| نموذج | 91217 |
| ماركة | كلابر |
| مادة | بلاستيك |
| لون | Black (with orange adjustment) |
| توافق الأنابيب | 1/4" (4-6 mm) |
| معدل تدفق قابل للتعديل | 0 to 6 Liters per Hour |
| أبعاد العنصر (الطول × العرض × الارتفاع) | Approximately 3.94 x 3.94 x 3.94 inches (individual dripper dimensions may vary slightly) |
| وزن العنصر | 0.08 Kilograms (for a pack, individual dripper is lighter) |
9. الضمان والدعم
For specific warranty information and customer support, please refer to the documentation included with your purchase or visit the official Claber webالموقع. احتفظ بإثبات الشراء الخاص بك لتقديم مطالبات الضمان.
الشركة المصنعة: كلابر