
1. المقدمة
This manual provides comprehensive instructions for the safe and efficient use of your Logisys PS480D 480W ATX Power Supply. Please read this manual thoroughly before installation and operation to ensure proper functionality and to prevent damage to the unit or other components.

Figure 1: Logisys PS480D 480W ATX Power Supply, front view with cables bundled.
2. معلومات السلامة
تحذير: Power supplies contain high voltagالمكونات الإلكترونية. لا تفتح وحدة التغذية الكهربائية.asinز. لا توجد أجزاء قابلة للصيانة من قبل المستخدم بالداخل.
- تأكد من فصل مصدر الطاقة عن مأخذ التيار المتردد قبل التركيب أو الصيانة.
- Always ground yourself to prevent electrostatic discharge (ESD) when handling internal computer components.
- لا تقم بتشغيل مصدر الطاقة في بيئة رطبة أو جافةamp شروط.
- تأكد من التهوية المناسبة حول مصدر الطاقة لمنع ارتفاع درجة الحرارة.
- Use only the provided power cables and connectors.
3. مواصفات المنتج
The Logisys PS480D is a 480W ATX power supply designed for personal computers. Key features include:
- كفاءة عالية
- Low Noise & Ripple
- أكثر من المجلدtagالحماية
- حماية من الدوائر القصيرة
- Built-in EMI Filter
- Insulation Resistance 100MΩ min.
- Complies with FCC part 15J class B 115VAC operation and CISPR 22 230 VAC operation.
- Meets UL 1950, CSA 22.2 LEVEL 3 Requirement.
- 100% Burn-in test / Vibration test / Hi-pot test / Leakage current test.
- MTBF above 100,000 hours at 25 °C.

Figure 2: Rear panel of the power supply with fan, AC inlet, and power switch.
4. الإعداد والتثبيت
Follow these steps to install the Logisys PS480D power supply into your computer system.
- تحضير: Ensure your computer is completely powered off and unplugged from the wall outlet. Open your computer case according to its manufacturer's instructions.
- قم بإزالة مصدر الطاقة القديم (إن وجد): Disconnect all cables from the old power supply to the motherboard, drives, and other components. Unscrew and remove the old power supply from the case.
- Install New Power Supply: Carefully place the Logisys PS480D into the power supply bay of your computer case. Secure it with screws.
- قم بتوصيل مصدر الطاقة الرئيسي: Connect the 20+4 pin ATX mainboard connector to your motherboard. If your motherboard uses a 20-pin connector, detach the 4-pin section. If it uses a 24-pin connector, connect both sections.
- قم بتوصيل طاقة المعالج: Connect the 4-pin +12V power connector to the corresponding port on your motherboard.
- Connect Peripheral Power:
- Use the 4-pin standard drive connectors for HDDs and CD/DVD-ROM drives.
- Use the 4-pin 3.5" FDD or ZIP connectors for floppy disk drives or similar devices.
- Use the Serial ATA (SATA) connectors for SATA hard drives and SSDs.
- إدارة الكابلات: قم بترتيب الكابلات بشكل أنيق لضمان تدفق الهواء بشكل صحيح داخل العلبة.
- إغلاق القضية: بمجرد تأمين كافة التوصيلات، أغلق علبة الكمبيوتر.
- توصيل طاقة التيار المتردد: Plug the AC power cord into the power supply's AC inlet and then into a wall outlet.
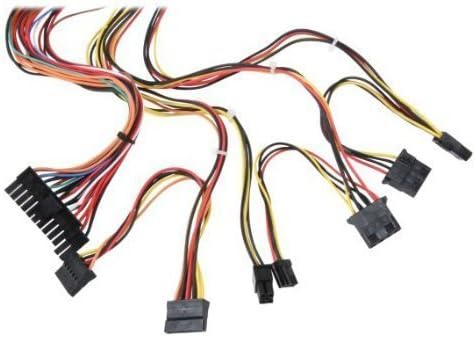
الشكل 3: انتهىview of power supply connectors.

Figure 4: Power supply dimensions and included AC power cord.
5. تعليمات التشغيل
After successful installation, you can power on your computer.
- Ensure the power switch on the rear of the power supply (Figure 2) is in the "ON" (I) position.
- اضغط على زر الطاقة الموجود على علبة الكمبيوتر لديك.
- The power supply will provide stable power to your system components.
- To power off, shut down your operating system normally. For complete power disconnection, switch the power supply to the "OFF" (O) position and unplug the AC cord.
6. الصيانة
تساعد الصيانة المنتظمة على ضمان طول عمر وأداء مصدر الطاقة الخاص بك على النحو الأمثل.
- تنظيف: Periodically clean dust from the power supply's fan and vents using compressed air. Ensure the power supply is unplugged before cleaning.
- تدفق الهواء: تأكد من أن هيكل الكمبيوتر يحتوي على تدفق هواء كافٍ وأن مروحة مصدر الطاقة غير مسدودة.
- سلامة الكابل: Periodically check all power cables for secure connections and signs of wear or damage.
7. استكشاف الأخطاء وإصلاحها
إذا واجهت مشكلات مع مصدر الطاقة لديك، فراجع خطوات استكشاف الأخطاء وإصلاحها الشائعة التالية:
- لا يوجد طاقة:
- تأكد من توصيل سلك الطاقة المترددة بإحكام بكل من مصدر الطاقة ومقبس الحائط.
- Ensure the power switch on the rear of the power supply is in the "ON" (I) position.
- تأكد من أن منفذ الحائط يعمل عن طريق توصيل جهاز آخر.
- Check all internal power connections (20/24-pin ATX, 4-pin +12V, peripheral connectors) are firmly seated.
- عدم استقرار النظام/الإغلاق العشوائي:
- This could indicate an overloaded or failing power supply. Ensure your system's power requirements do not exceed the PS480D's 480W capacity.
- تأكد من وجود تهوية مناسبة وأن مروحة مزود الطاقة تدور. قد يؤدي ارتفاع درجة الحرارة إلى عدم استقرار النظام.
- ضوضاء غير عادية:
- A loud fan noise might indicate dust buildup or a failing fan bearing. Clean the fan as described in the Maintenance section.
If problems persist after attempting these steps, contact Logisys customer support or a qualified technician.
8. المواصفات
| ميزة | مواصفة |
|---|---|
| ماركة | لوجيسيز |
| رقم الموديل | PS480D |
| انتاج واتtage | 480 واط |
| عامل الشكل | ايه تي اكس |
| الأبعاد (الطول × العرض × الارتفاع) | 6 بوصة طول × 5.5 بوصة عرض × 3.25 بوصة ارتفاع (15.24 × 13.97 × 8.25 سم) |
| وزن العنصر | 2.06 رطل (0.93 كجم) |
| موصل اللوحة الرئيسية | 1x 20+4 Pin ATX |
| موصل طاقة وحدة المعالجة المركزية | 1x 4 Pin +12V |
| Standard Drive Connectors | 4x 4 Pin (Molex) |
| FDD/ZIP Connectors | 1x 4 Pin 3.5" |
| موصلات ATA التسلسلية | 1 منافذ ساتا |
| طريقة التبريد | هواء |
| الحماية | أكثر من المجلدtagالحماية الإلكترونية، حماية ماس كهربائى |
| الشهادات | FCC part 15J class B, CISPR 22, UL 1950, CSA 22.2 LEVEL 3 |
9. الضمان والدعم
For warranty information, technical support, or service inquiries, please refer to the official Logisys webالموقع أو تواصل مع قسم خدمة العملاء. احتفظ بإيصال الشراء كإثبات للشراء.