
1. المقدمة
Thank you for choosing the Stanton RM-50 DJ Mixer. This professional 19-inch rackmount mixer is designed for reliable performance and versatile audio control in various DJ and live sound environments. This manual provides essential information for proper installation, operation, and maintenance to ensure optimal performance and longevity of your device. Please read this manual thoroughly before operating the unit.
2. انتهى المنتجview
2.1 الميزات الرئيسية
- 9 line, 4 phono, 4 mic inputs for extensive connectivity.
- 3-band master EQ with complete kill (+9/-60 dB) for precise sound shaping.
- Dedicated Booth output for monitoring.
- Fader start capability for seamless track transitions.
- Fully assignable crossfader (A, B, bypass) for flexible mixing.
- Balanced XLR master output for professional audio connections.
2.2 تخطيط اللوحة الأمامية
The Stanton RM-50 features an intuitive front panel designed for ease of use during live performances. Familiarize yourself with the controls shown below.
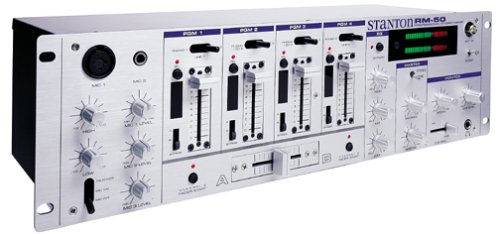
الشكل 1: اللوحة الأمامية view of the Stanton RM-50 DJ Mixer.
Detailed Description of Front Panel Controls:
- Microphone Section (Left Side): Features inputs for MIC 1 (XLR) and MIC 2 (1/4" jack). Each microphone input has dedicated HIGH, MID, and LOW EQ controls, along with individual LEVEL knobs. A MIC ON/OFF switch is also present.
- Program (PGM) Channels 1-4: Each of the four program channels includes a LINE/PHONO input selector switch, GAIN control, 3-band EQ (HIGH, MID, LOW), and a channel fader. A CUE button allows for pre-listening through headphones.
- كروس فايدر: Located at the bottom center, this fader allows for smooth transitions between channels assigned to A and B. An assign switch for each channel determines if it's routed to A, B, or bypass.
- Master Section (Right Side): Includes controls for MASTER LEVEL, BOOTH LEVEL, and HEADPHONE LEVEL. The 3-band master EQ (HIGH, MID, LOW) with kill switches is also located here. LED VU meters provide visual feedback of the master output level.
- مقبس سماعة الرأس: A 1/4" stereo jack for connecting headphones for monitoring.
3. الإعداد
3.1 تركيب الرف
The Stanton RM-50 is designed for standard 19-inch rack mounting. Secure the mixer using appropriate rack screws (not included) into a stable equipment rack. Ensure adequate ventilation around the unit to prevent overheating.
3.2 اتصالات الصوت
- مصادر الإدخال: Connect your turntables to the PHONO inputs and CD players, media players, or other line-level devices to the LINE inputs on the rear panel. Ensure the corresponding LINE/PHONO switch on the front panel is set correctly for each channel.
- الميكروفونات: Connect dynamic microphones to the MIC 1 (XLR) or MIC 2 (1/4" jack) inputs on the front panel.
- إخراج ماجستير: Connect the balanced XLR MASTER OUT to your main ampمكبر صوت أو مكبرات صوت تعمل بالطاقة.
- مخرجات الجناح: Connect the BOOTH OUT to your monitor speakers or a separate amplifier for booth monitoring.
- سماعات الرأس: Plug your headphones into the 1/4" HEADPHONE jack on the front panel.
3.3 توصيل الطاقة
Connect the provided power cord to the AC input on the rear of the mixer and then to a suitable power outlet. Ensure all connections are secure before powering on the unit.
4. تعليمات التشغيل
4.1 تشغيل/إيقاف التشغيل
Always ensure all volume controls (Master, Booth, Channel Faders) are set to their minimum position before powering on or off the mixer to prevent sudden loud noises or potential damage to speakers.
- لتشغيل: Press the POWER switch located on the rear panel.
- لإيقاف التشغيل: اضغط على مفتاح الطاقة مرة أخرى.
4.2 الخلط الأساسي
- اختيار الإدخال: For each channel, select LINE or PHONO using the switch above the GAIN knob, corresponding to your connected source.
- ضبط المكسب: Adjust the GAIN knob for each active channel until the signal level is strong but not clipping (indicated by the channel's peak LED).
- تلاشي القناة: Slowly raise the channel fader for the desired audio source.
- إخراج ماجستير: Adjust the MASTER LEVEL knob to control the overall output volume to your main sound system.
- مخرجات الجناح: Adjust the BOOTH LEVEL knob for your monitor speakers.
- مراقبة سماعة الرأس: Press the CUE button on any channel to pre-listen to its audio through your headphones. Adjust the HEADPHONE LEVEL knob for comfortable listening.
4.3 معادلة (EQ)
- معادل القناة: Use the HIGH, MID, and LOW knobs on each channel to adjust the tonal characteristics of individual audio sources.
- معادل الصوت الرئيسي: The 3-band master EQ allows for overall tonal adjustment of the mixed output. The kill switches provide a complete cut (-60 dB) for dramatic effects.
4.4 Crossfader Operation
The crossfader allows for smooth transitions between channels assigned to either side A or B. Use the assign switches above each channel fader to route the channel to A, B, or bypass the crossfader entirely.
- Move the crossfader to the left to hear channels assigned to A.
- Move the crossfader to the right to hear channels assigned to B.
- Center position blends both A and B channels.
4.5 استخدام الميكروفون
Connect your microphone, then press the MIC ON/OFF switch to activate the microphone channel. Adjust the MIC LEVEL knob and the HIGH, MID, LOW EQ controls for the desired sound. Be mindful of feedback when using microphones.
5. الصيانة
Proper maintenance ensures the longevity and optimal performance of your Stanton RM-50 DJ Mixer.
- تنظيف: Regularly wipe the exterior of the mixer with a soft, dry, lint-free cloth. Avoid using abrasive cleaners, solvents, or waxes. Do not spray liquids directly onto the unit.
- تهوية: Ensure that the ventilation openings are not blocked. Dust accumulation can lead to overheating.
- تخزين: When not in use for extended periods, store the mixer in a cool, dry place, protected from dust and extreme temperatures.
- العناية بالخفاف: Keep faders and knobs free from dust and debris. Specialized fader lubricants can be used if faders become stiff or noisy, but consult a professional if unsure.
6. استكشاف الأخطاء وإصلاحها
If you encounter issues with your RM-50 mixer, refer to the following common problems and solutions before contacting support.
| مشكلة | السبب المحتمل | حل |
|---|---|---|
| لا يوجد مخرج صوت |
|
|
| صوت مشوه |
|
|
| ملاحظات الميكروفون |
|
|
7. المواصفات
Below are the technical specifications for the Stanton RM-50 DJ Mixer:
- ماركة: ستانتون
- رقم الموديل: 50 رينغيت ماليزي
- أبعاد المنتج: 48.26 x 13.49 x 21.01 cm (19 x 5.3 x 8.3 inches)
- وزن السلعة: 3.39 كجم (7.47 رطل)
- عدد القنوات: 4
- مصدر الطاقة: كهرباء سلكية
- نوع موصل الإخراج: XLR (Balanced Master Output)
- المدخلات: 9 Line, 4 Phono, 4 Mic
- EQ: 3-band master EQ with kill (+9/-60 dB)
- كروس فايدر: Fully assignable (A, B, bypass)
- مخرجات إضافية: إخراج كشك
8. الضمان والدعم
For detailed warranty information, please refer to the warranty card included with your product or visit the official Stanton website. For technical support or service inquiries, please contact Stanton customer service through their official channels. Keep your purchase receipt as proof of purchase for warranty claims.
يمكنك العثور على مزيد من المعلومات وموارد الدعم على Stanton Store on Amazon.